
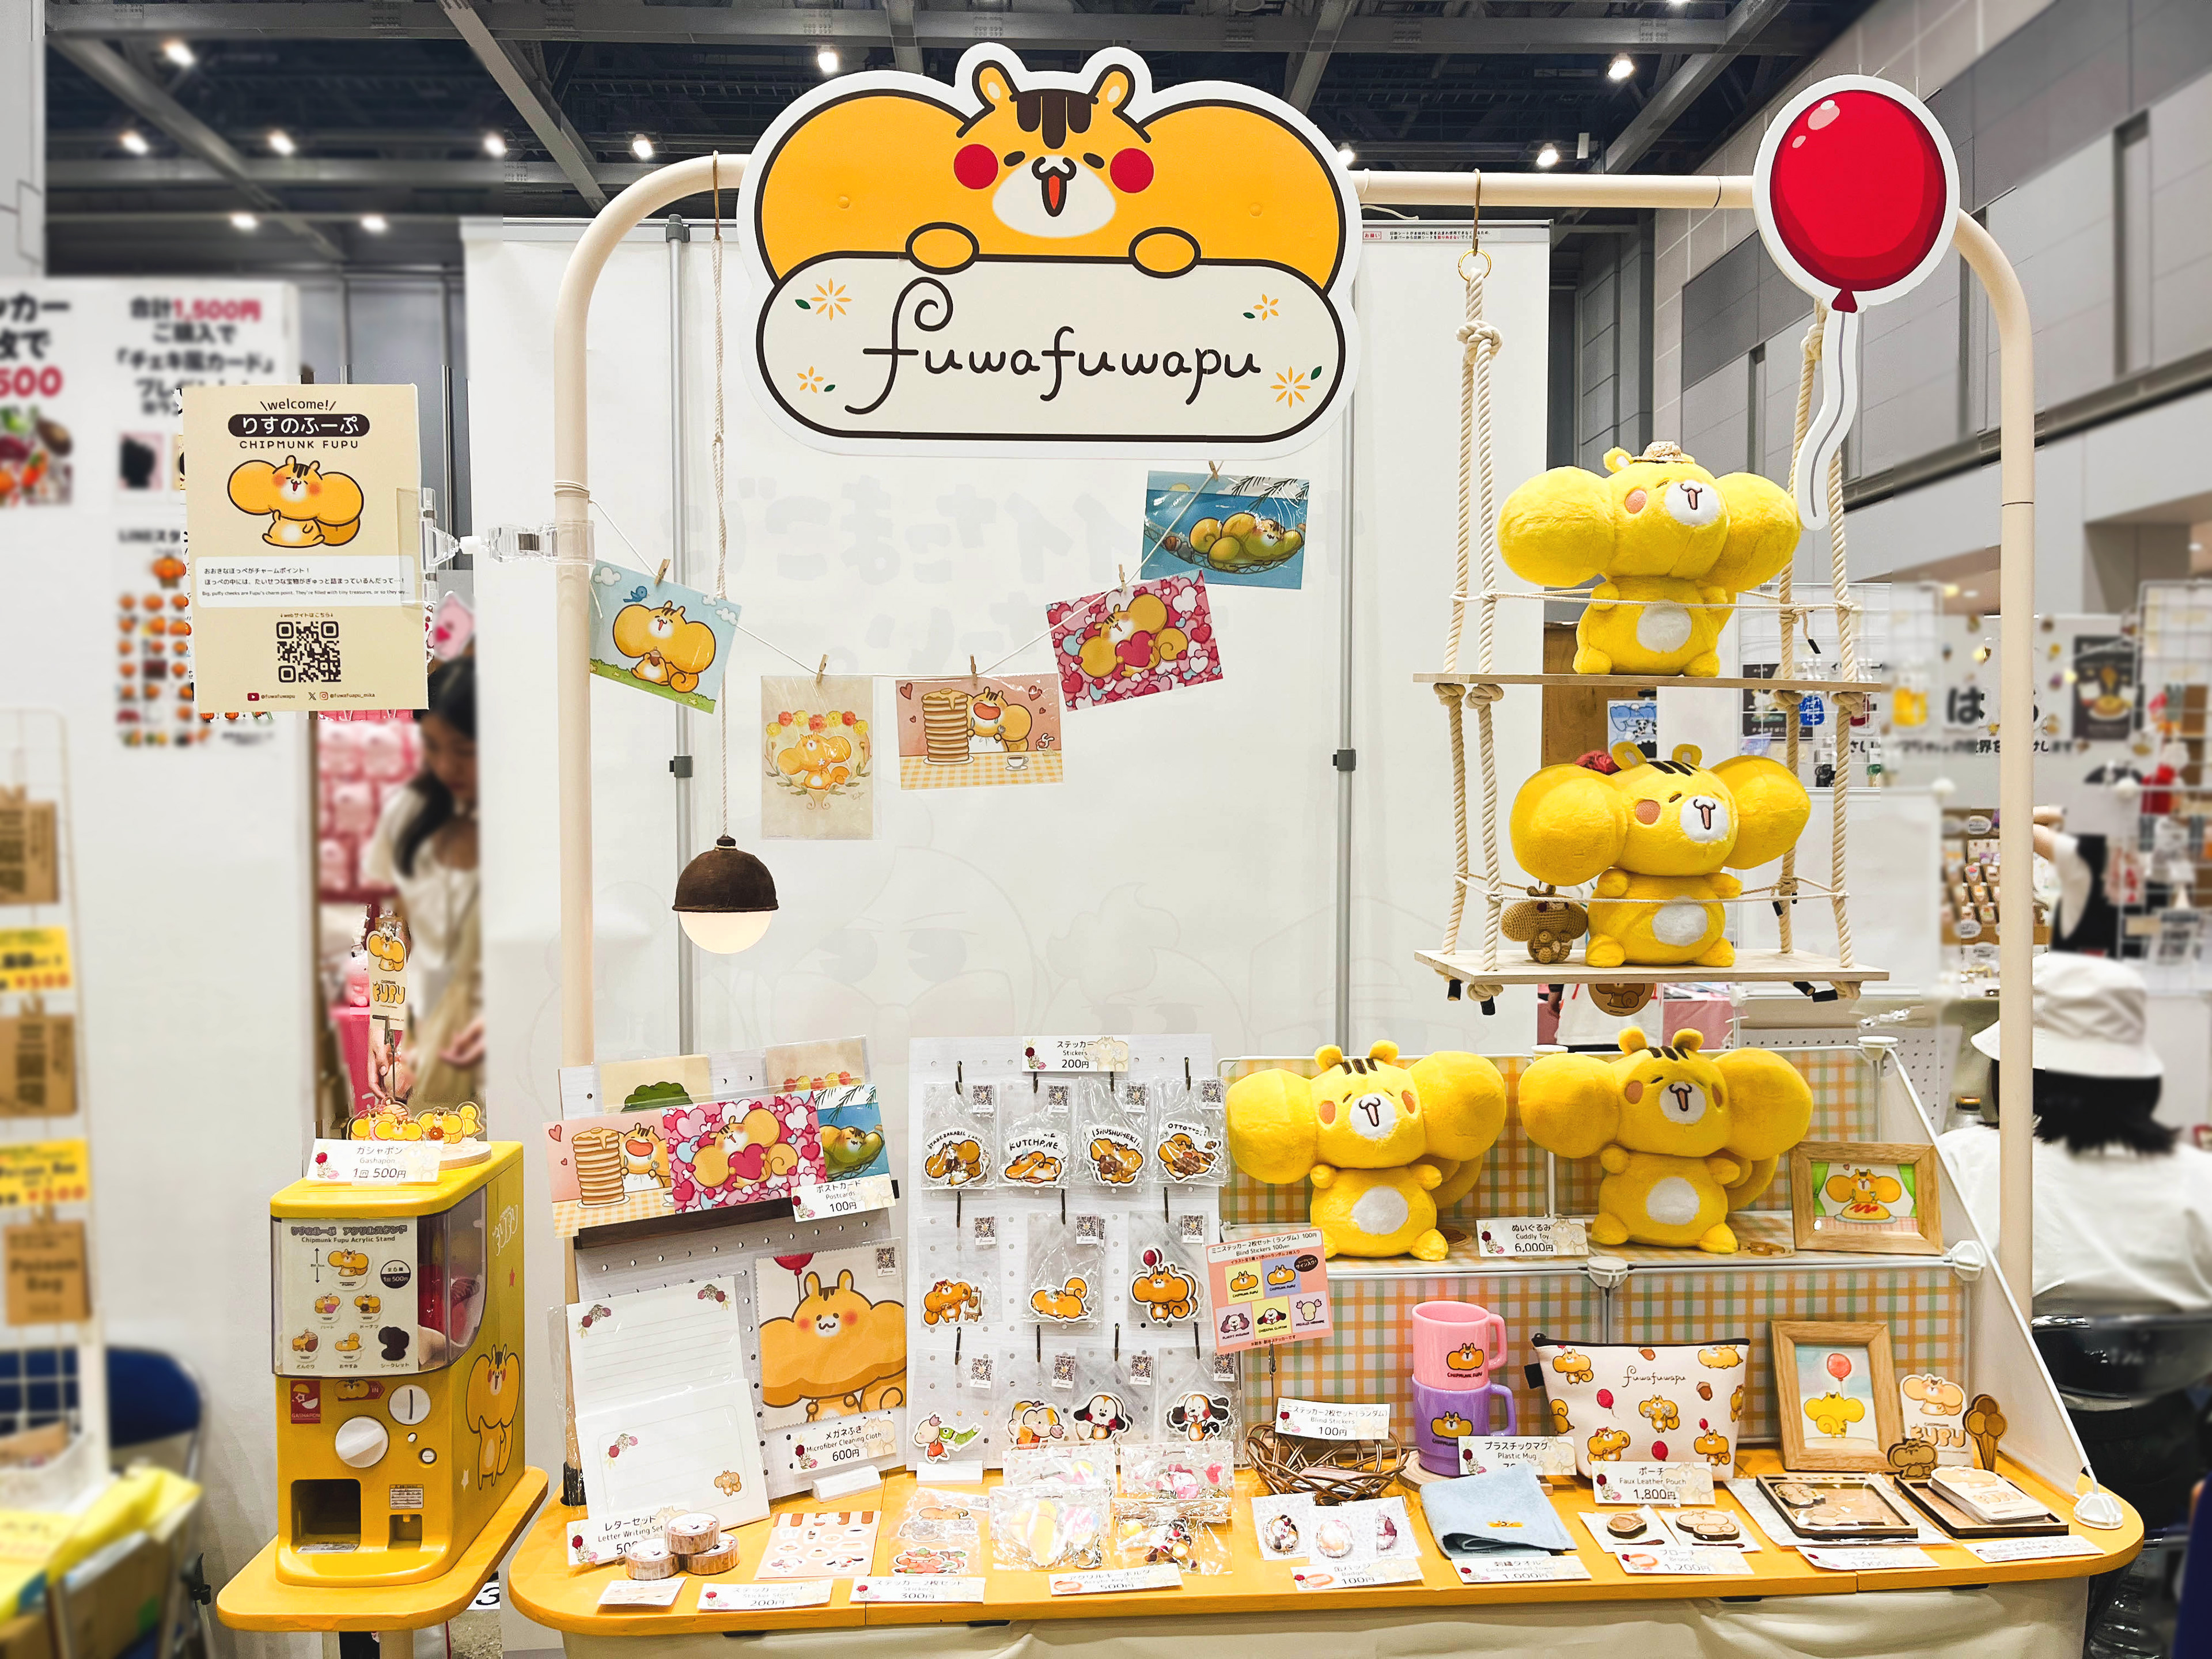
Booth – Day 2
Built My Booth from Scratch!
If you enjoyed Part 1, get ready—Part 2 is all about the booth! Let’s take a closer look!
Even so, I was so grateful that so many people stopped by my booth.
Even so, I was so grateful that so many people stopped by my booth.
Since I wasn’t able to exhibit last time due to the lottery, I wanted to make the most of this opportunity—so I gave my booth a major makeover to catch as many eyes as possible!
I had shared a few glimpses of my DIY process on social media, but the full reveal was saved for the event day—so it definitely made a strong impression!It made me so happy to see both longtime followers and first-time visitors taking a close look at every detail and saying, “Wow!”
This time, I’d love to share more about how I planned and designed my booth!
If you're thinking about joining Design Festa but still feeling unsure, or if you're struggling with your booth layout—
I hope this can be a little help or inspiration for you!
I hope this can be a little help or inspiration for you!
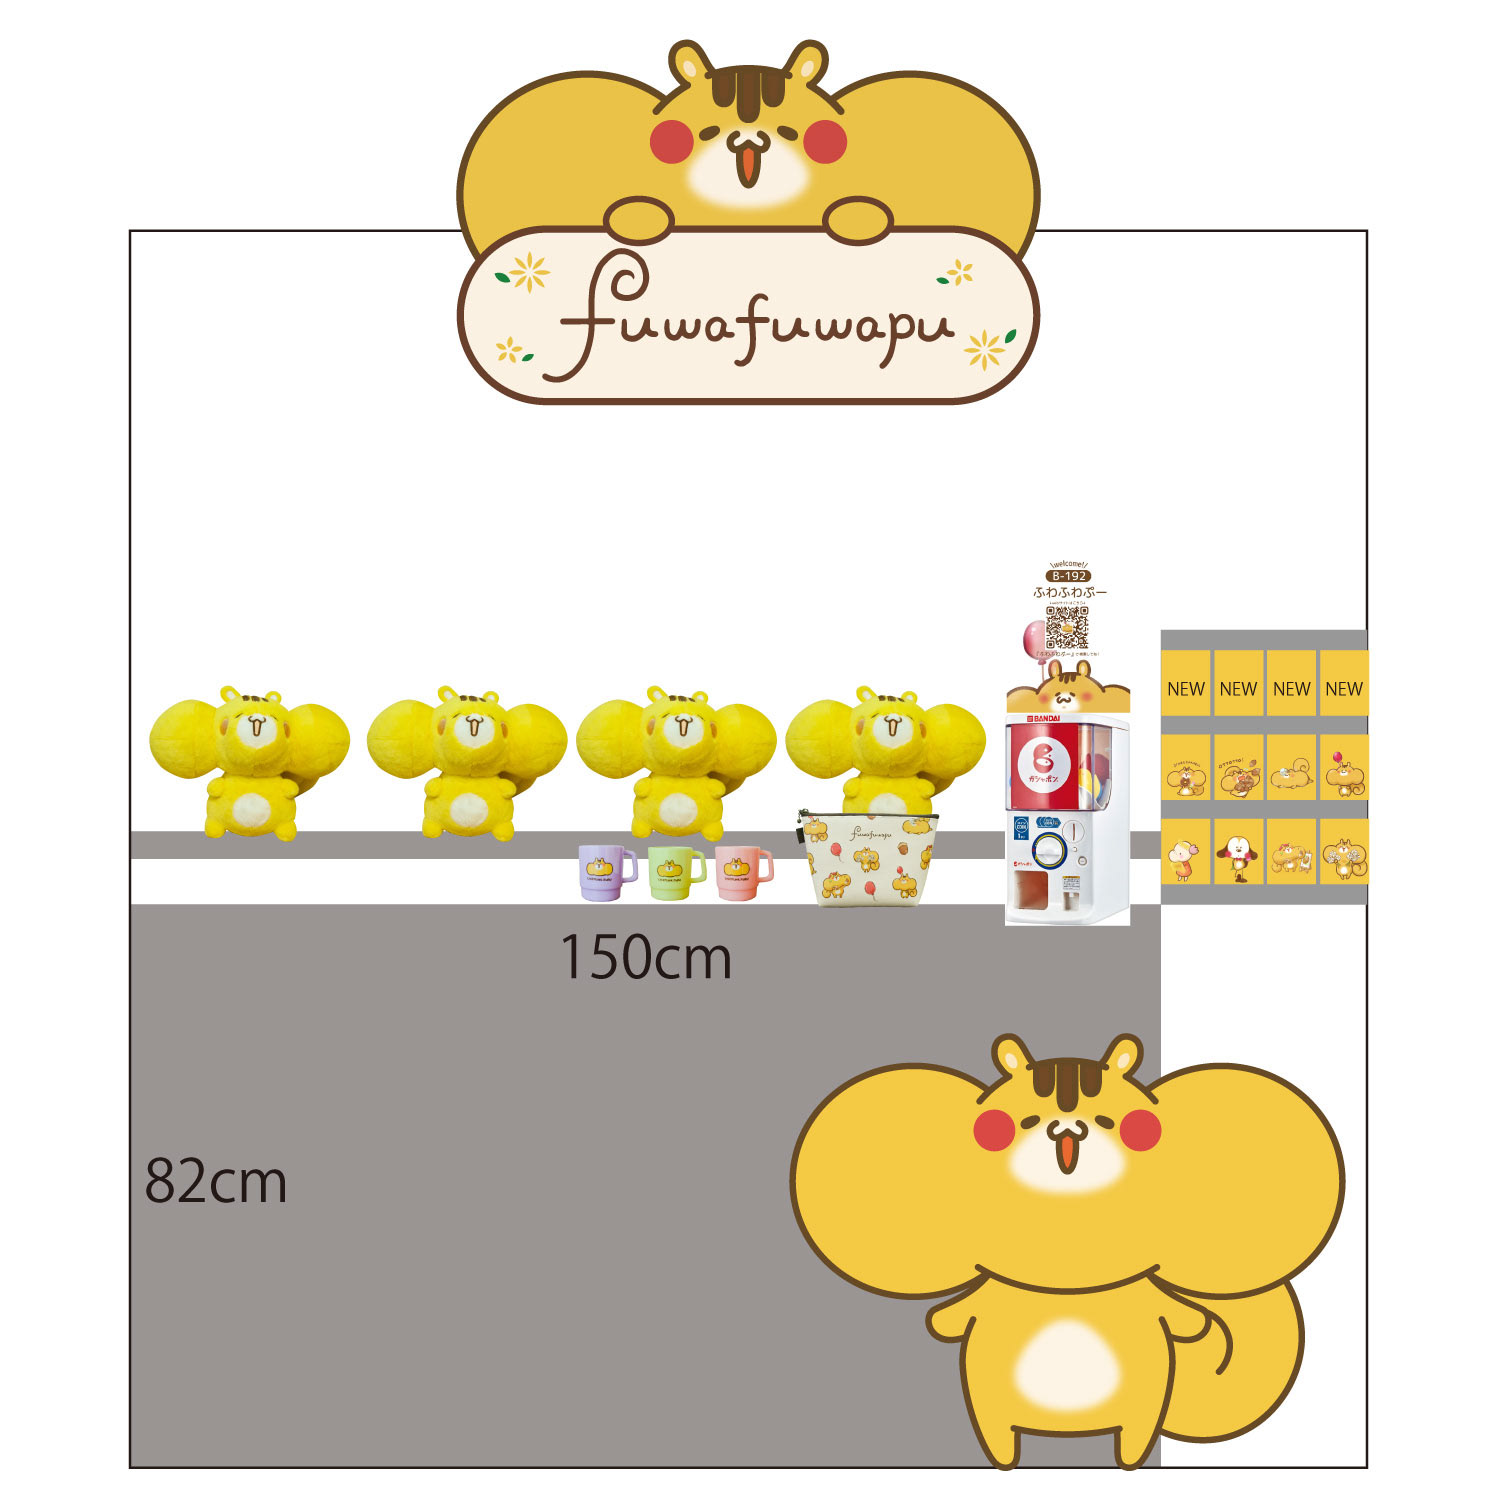
Booth Design Plan #1
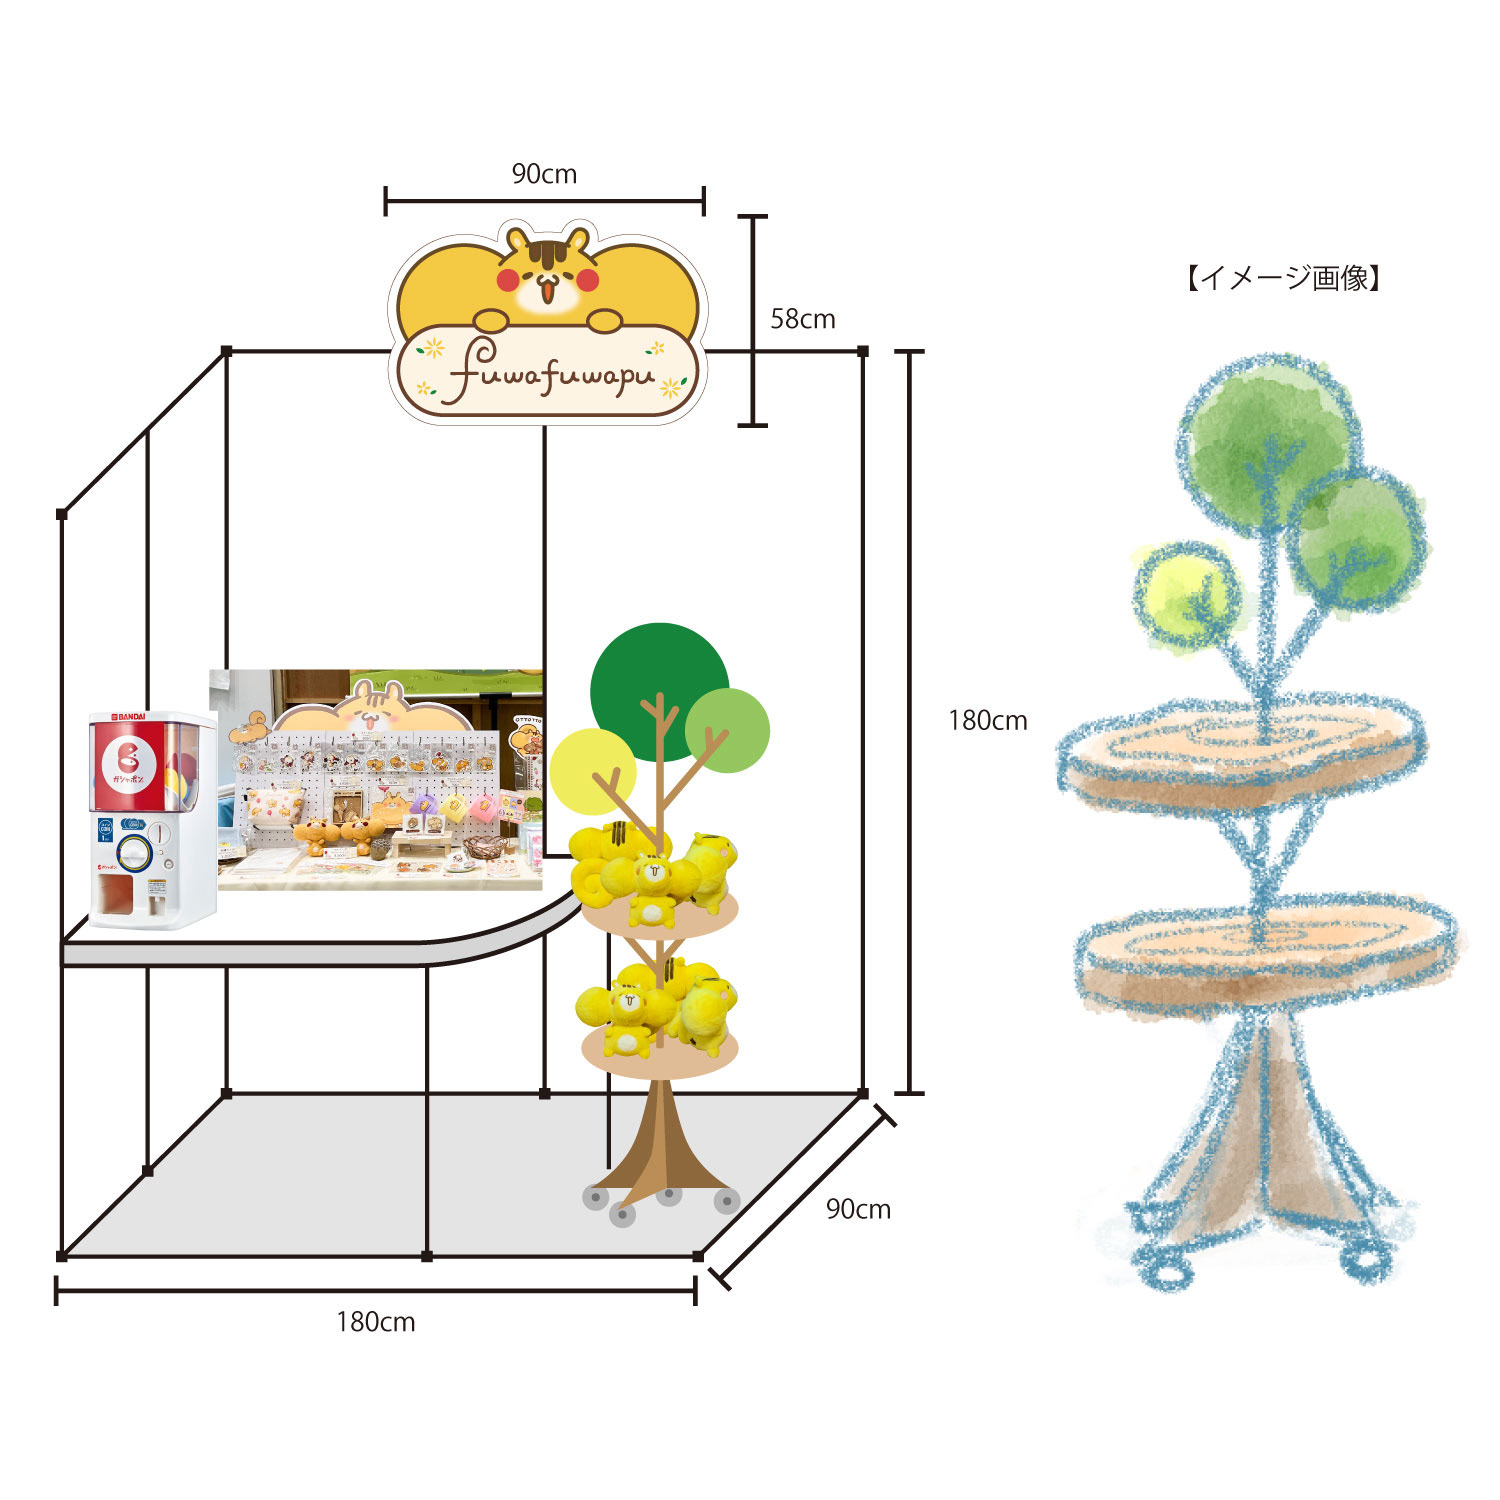
Booth Layout Image #1
Since I’m not very handy, I was fully planning to just rent a table… but my amazing partner, who loves DIY, took charge of everything—from the design to the construction. So grateful!!!
Let’s start with the very first layout draft.
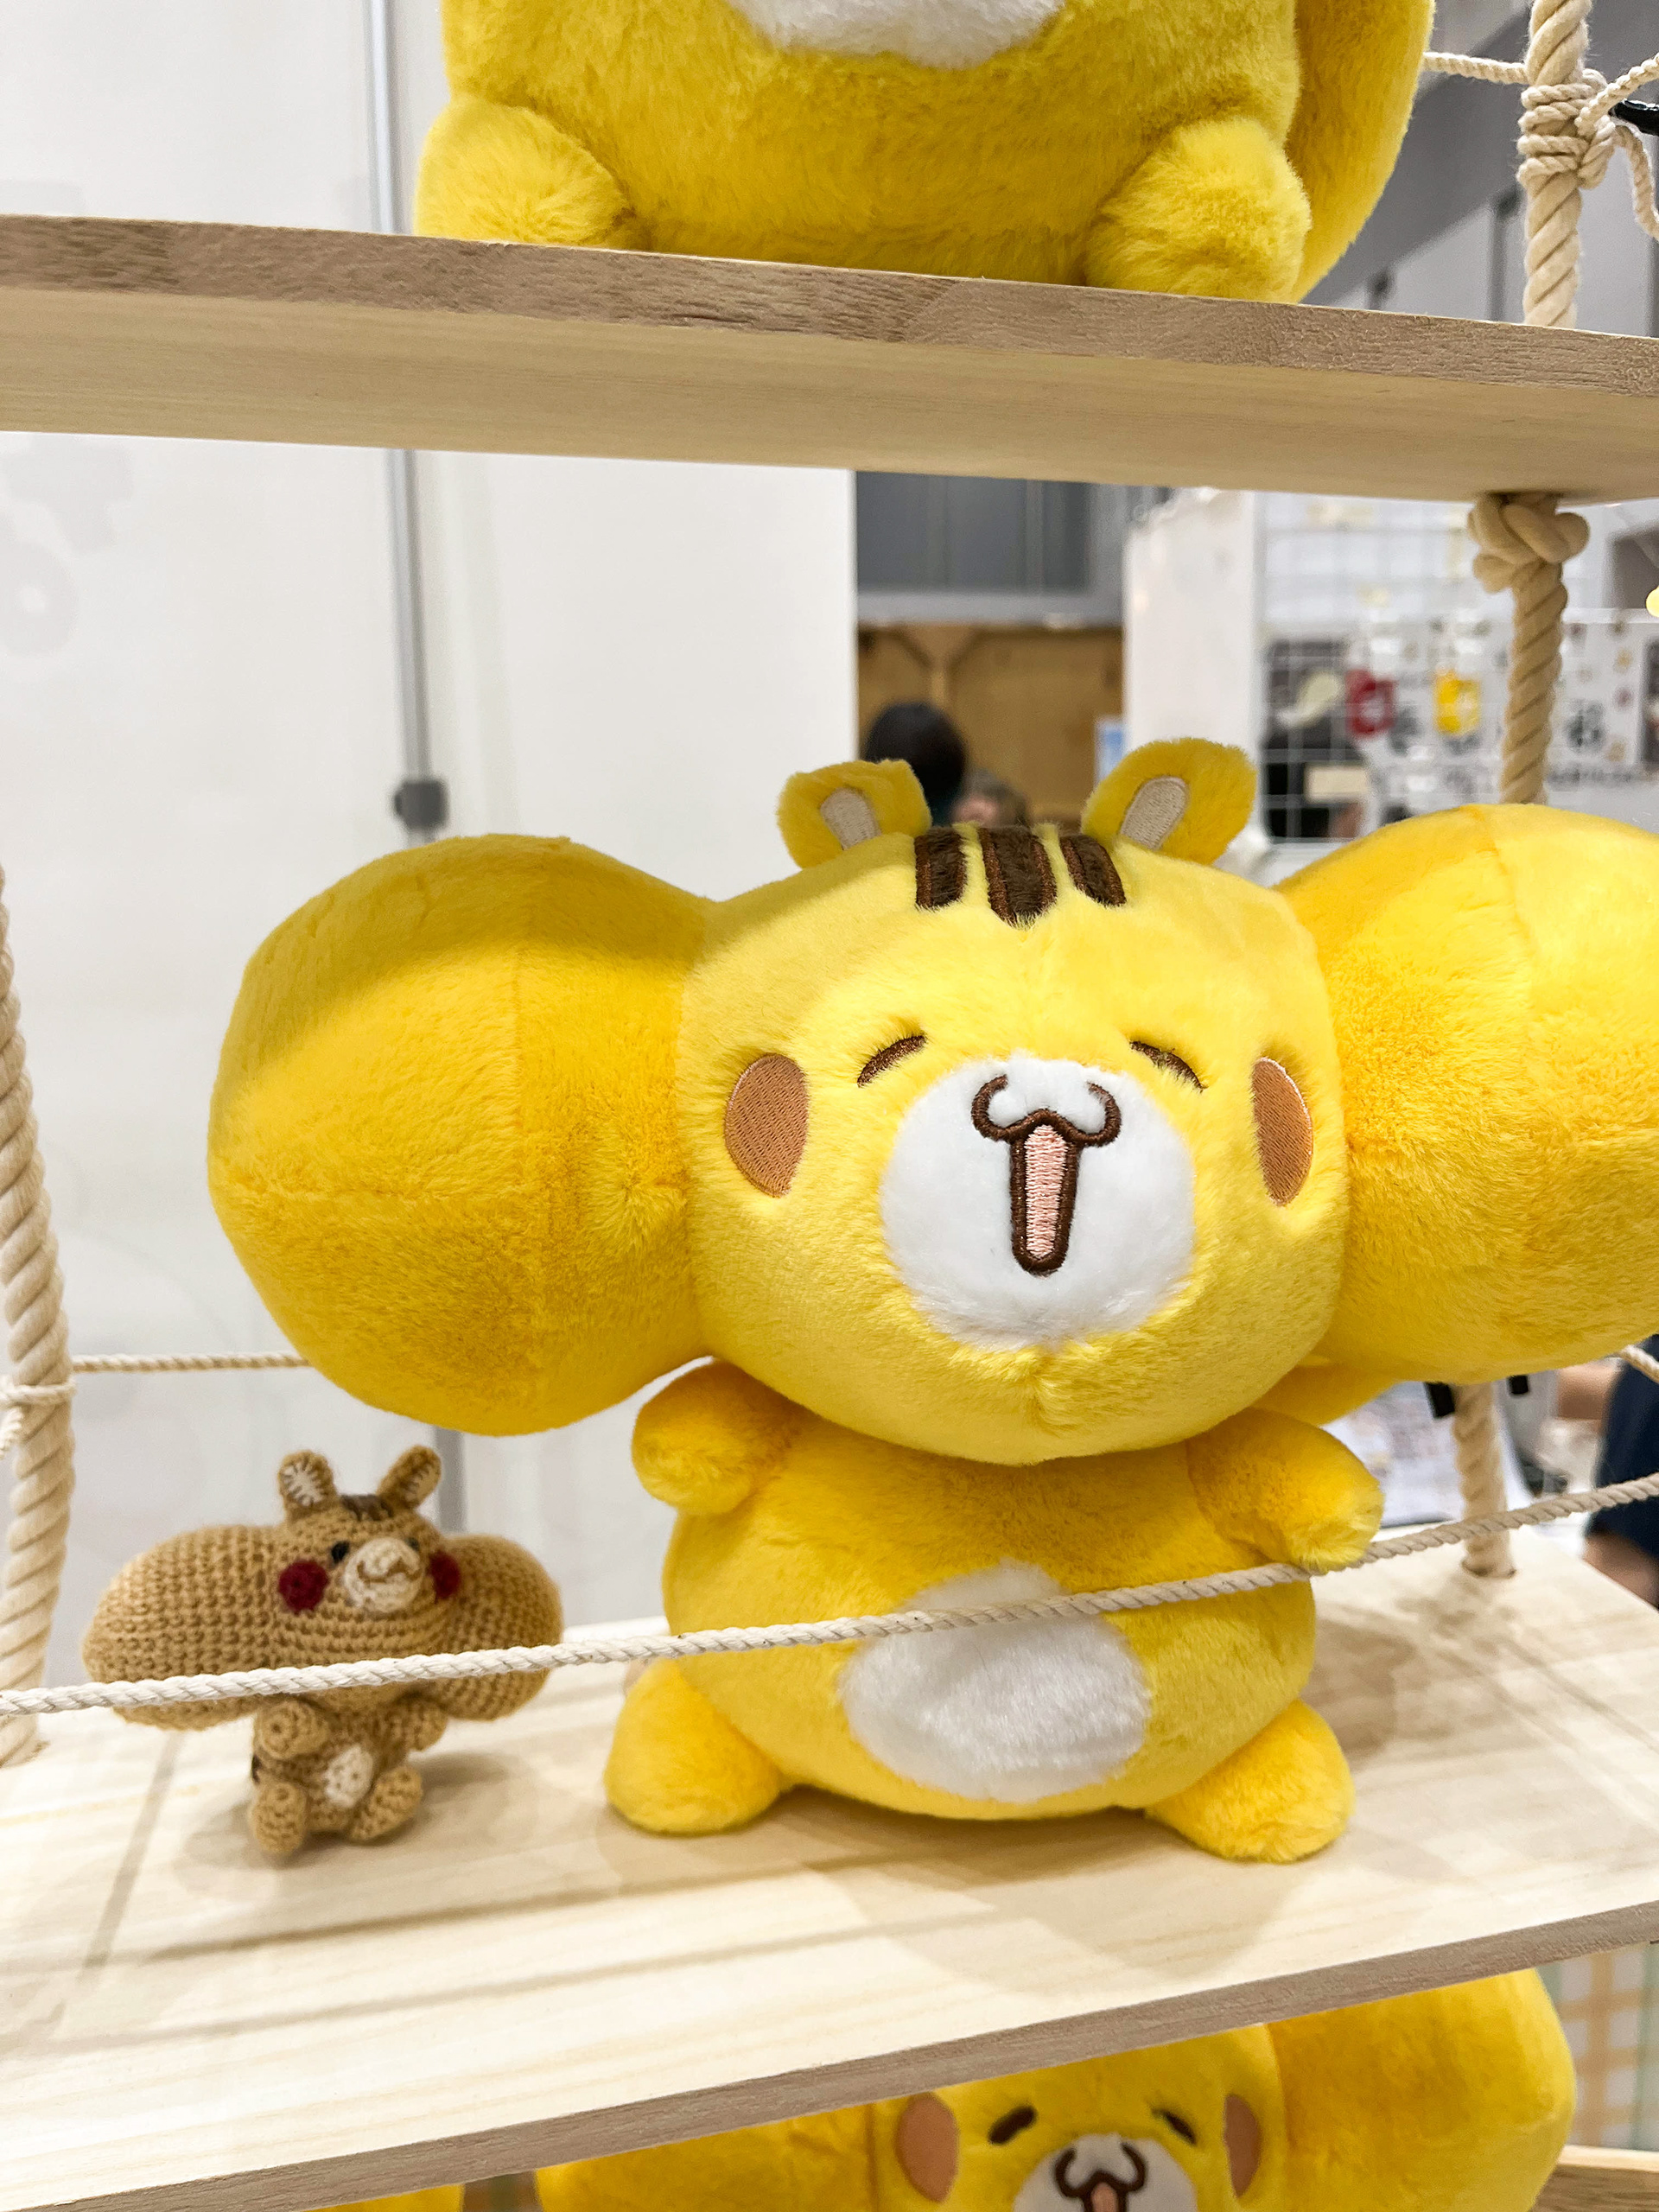
One of the biggest goals was to display our brand-new cuddly toys (the highlight of this event!) in the most eye-catching way possible. So, our initial plan was to create a custom display shelf just for them.
One of the biggest goals was to display our brand-new cuddly toys (the highlight of this event!) in the most eye-catching way possible. So, our initial plan was to create a custom display shelf just for them.
However, we had to consider the Design Festa regulations—like using flame-retardant fabric and avoiding cardboard structures outside of tables.
Plus, since we always bring everything in by train on the day of the event, transportability was also a key concern.
We asked for quotes from several companies, but unfortunately, the costs and weight were way over our budget, so we had to give up on that plan.
Plus, since we always bring everything in by train on the day of the event, transportability was also a key concern.
We asked for quotes from several companies, but unfortunately, the costs and weight were way over our budget, so we had to give up on that plan.

Booth Design Plan #2
Booth Layout Image #2
Then came the revised second plan!
We decided to give up on the custom display shelf and instead transformed the table itself into a two-level structure.
The new idea was to use a perforated board with a foldable door, allowing us to create a layout that combined both a walkway and a display area.
We decided to give up on the custom display shelf and instead transformed the table itself into a two-level structure.
The new idea was to use a perforated board with a foldable door, allowing us to create a layout that combined both a walkway and a display area.
However, this version required many connection parts, and the joints—which were especially heavy—ended up pushing the total weight over the limit. So, we had to abandon this plan too.
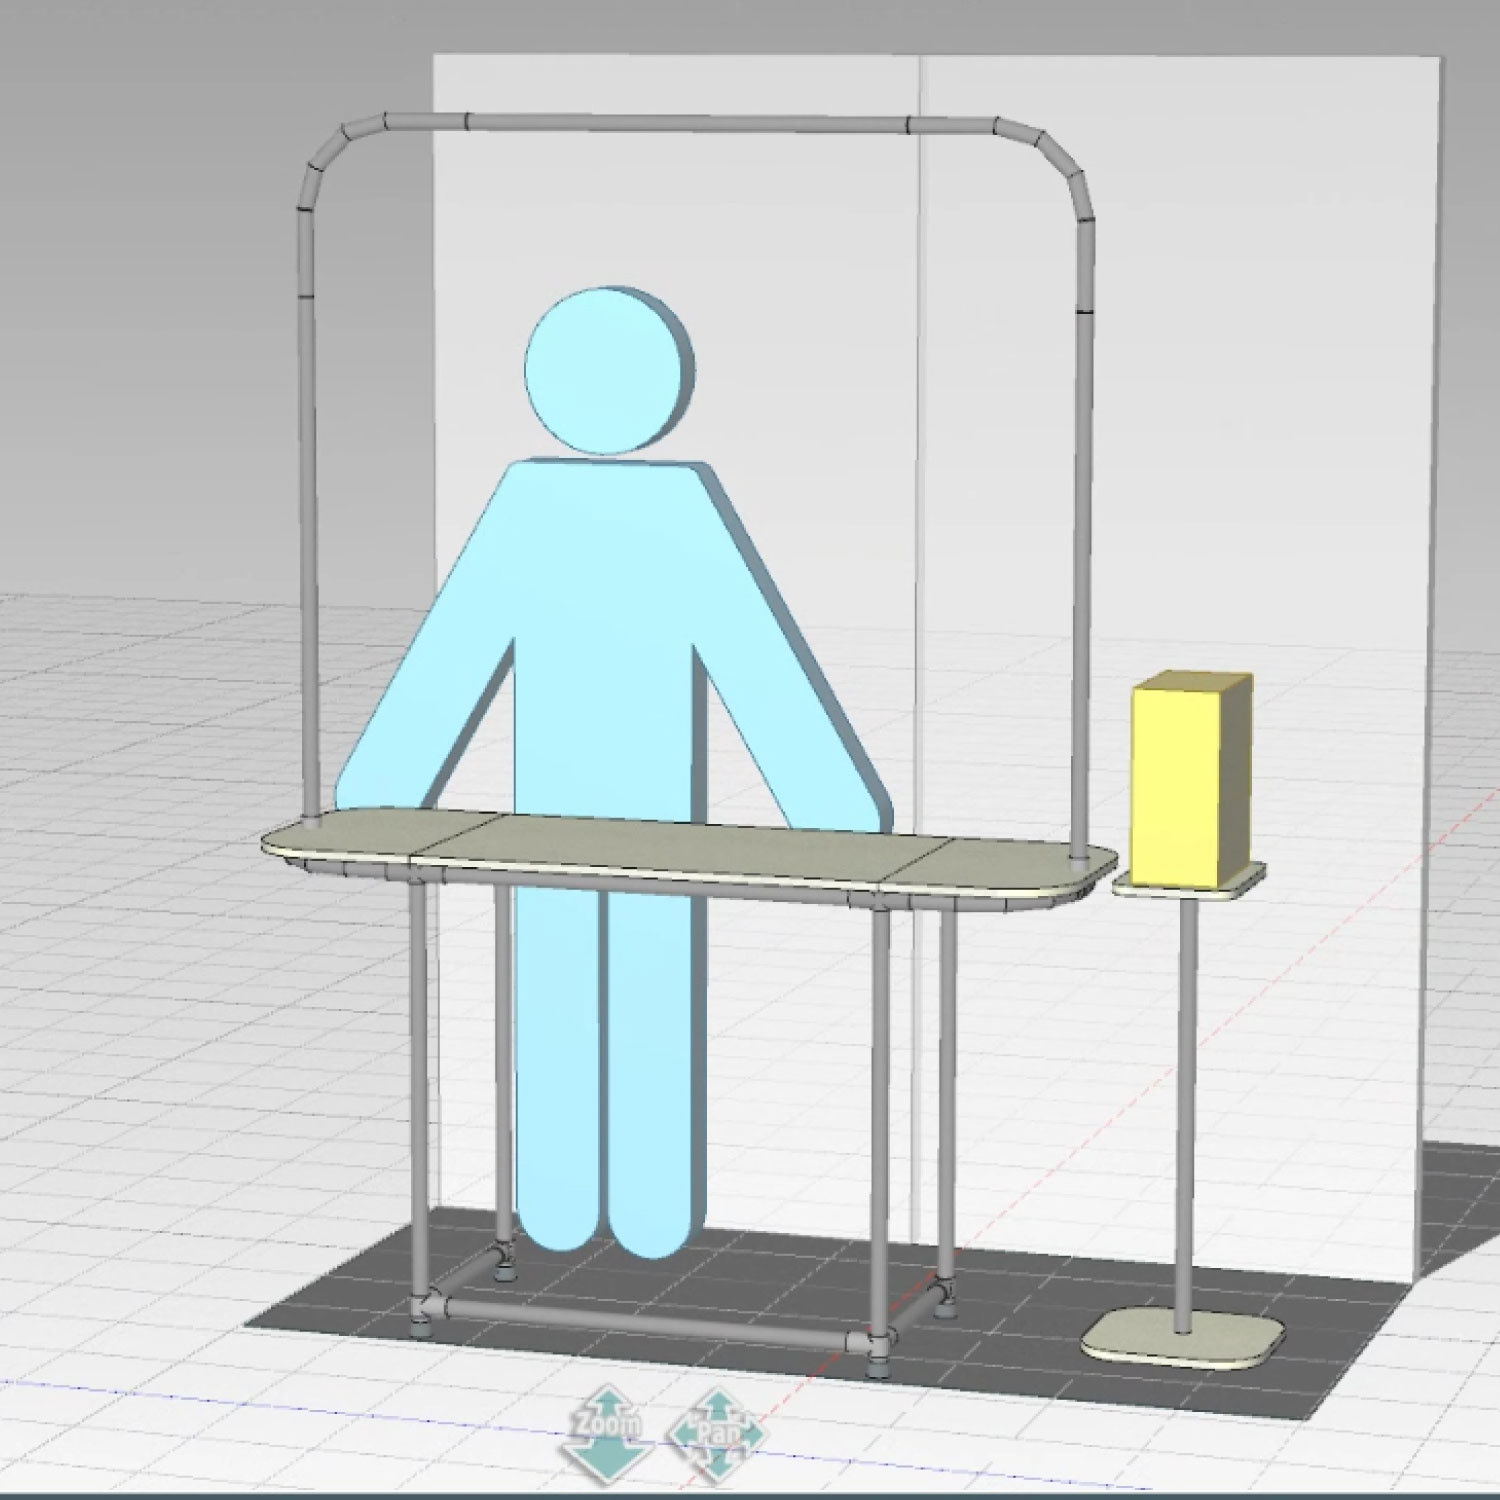
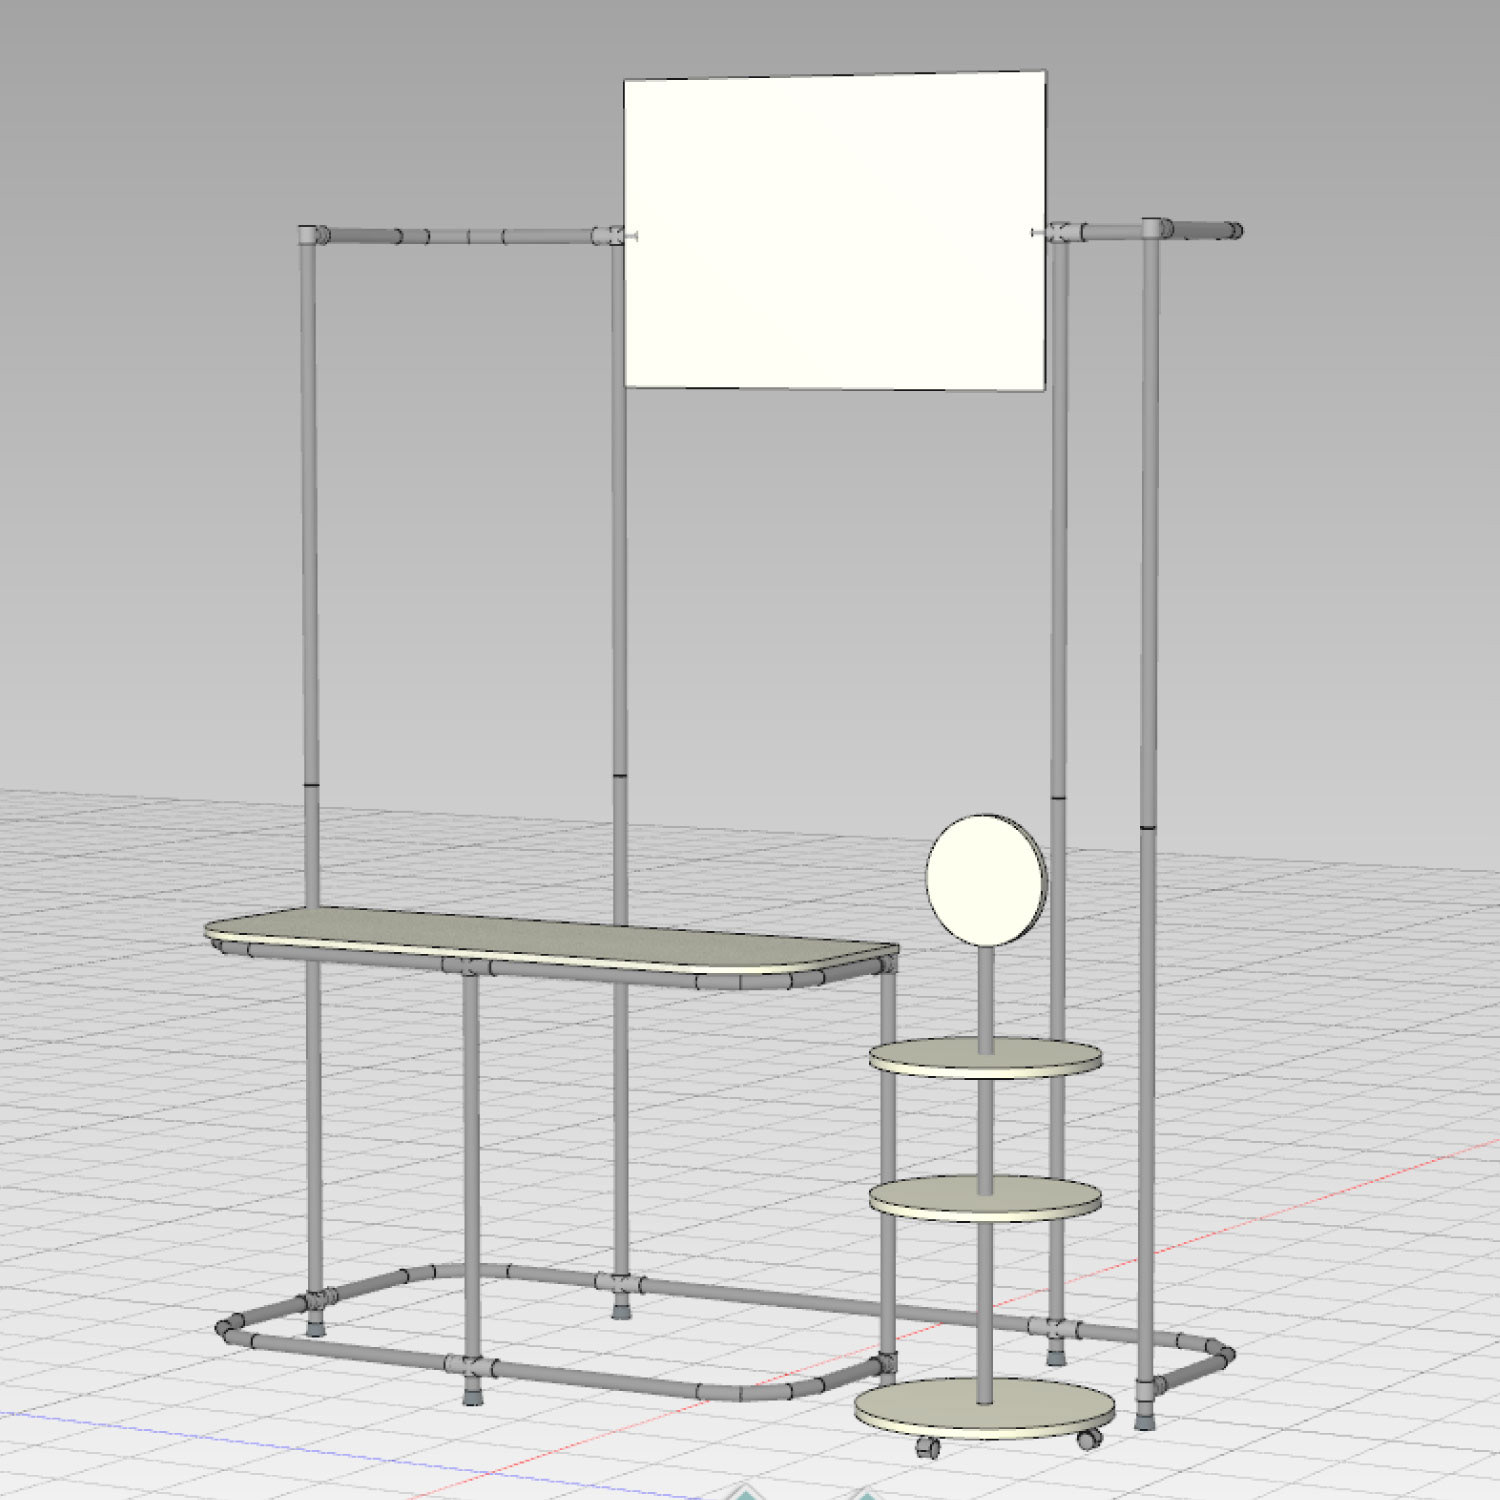
Booth Design Plan #3

Booth Layout Image #3
And here’s the final plan!
As you can see… it ended up being much more simplified! (Haha)
We separated the table and the gashapon machine stand, and made the stand movable with casters so we could ensure a clear walkway.
As you can see… it ended up being much more simplified! (Haha)
We separated the table and the gashapon machine stand, and made the stand movable with casters so we could ensure a clear walkway.
In the end, the main materials we used were boards and Erector pipes.
There are so many creative examples using Erector pipes out there—they're fun to look at for inspiration, and I highly recommend them!
We focused on keeping the structure lightweight, simple, and sturdy.
I wanted something I could reuse long-term—and possibly set up on my own in the future!
There are so many creative examples using Erector pipes out there—they're fun to look at for inspiration, and I highly recommend them!
We focused on keeping the structure lightweight, simple, and sturdy.
I wanted something I could reuse long-term—and possibly set up on my own in the future!
We actually started buying the materials just two weeks before the event!
Even though we thought we had started preparing early…!?
Even though we thought we had started preparing early…!?
There were plenty of mishaps—like ordering the wrong size pipes, realizing the overall design had somehow shrunk by 10cm, and not finding the exact type of board we had planned to buy at our local home center.
But in the end, we pulled it off, and the booth turned out super cute—so I’m calling it a win! ★
But in the end, we pulled it off, and the booth turned out super cute—so I’m calling it a win! ★
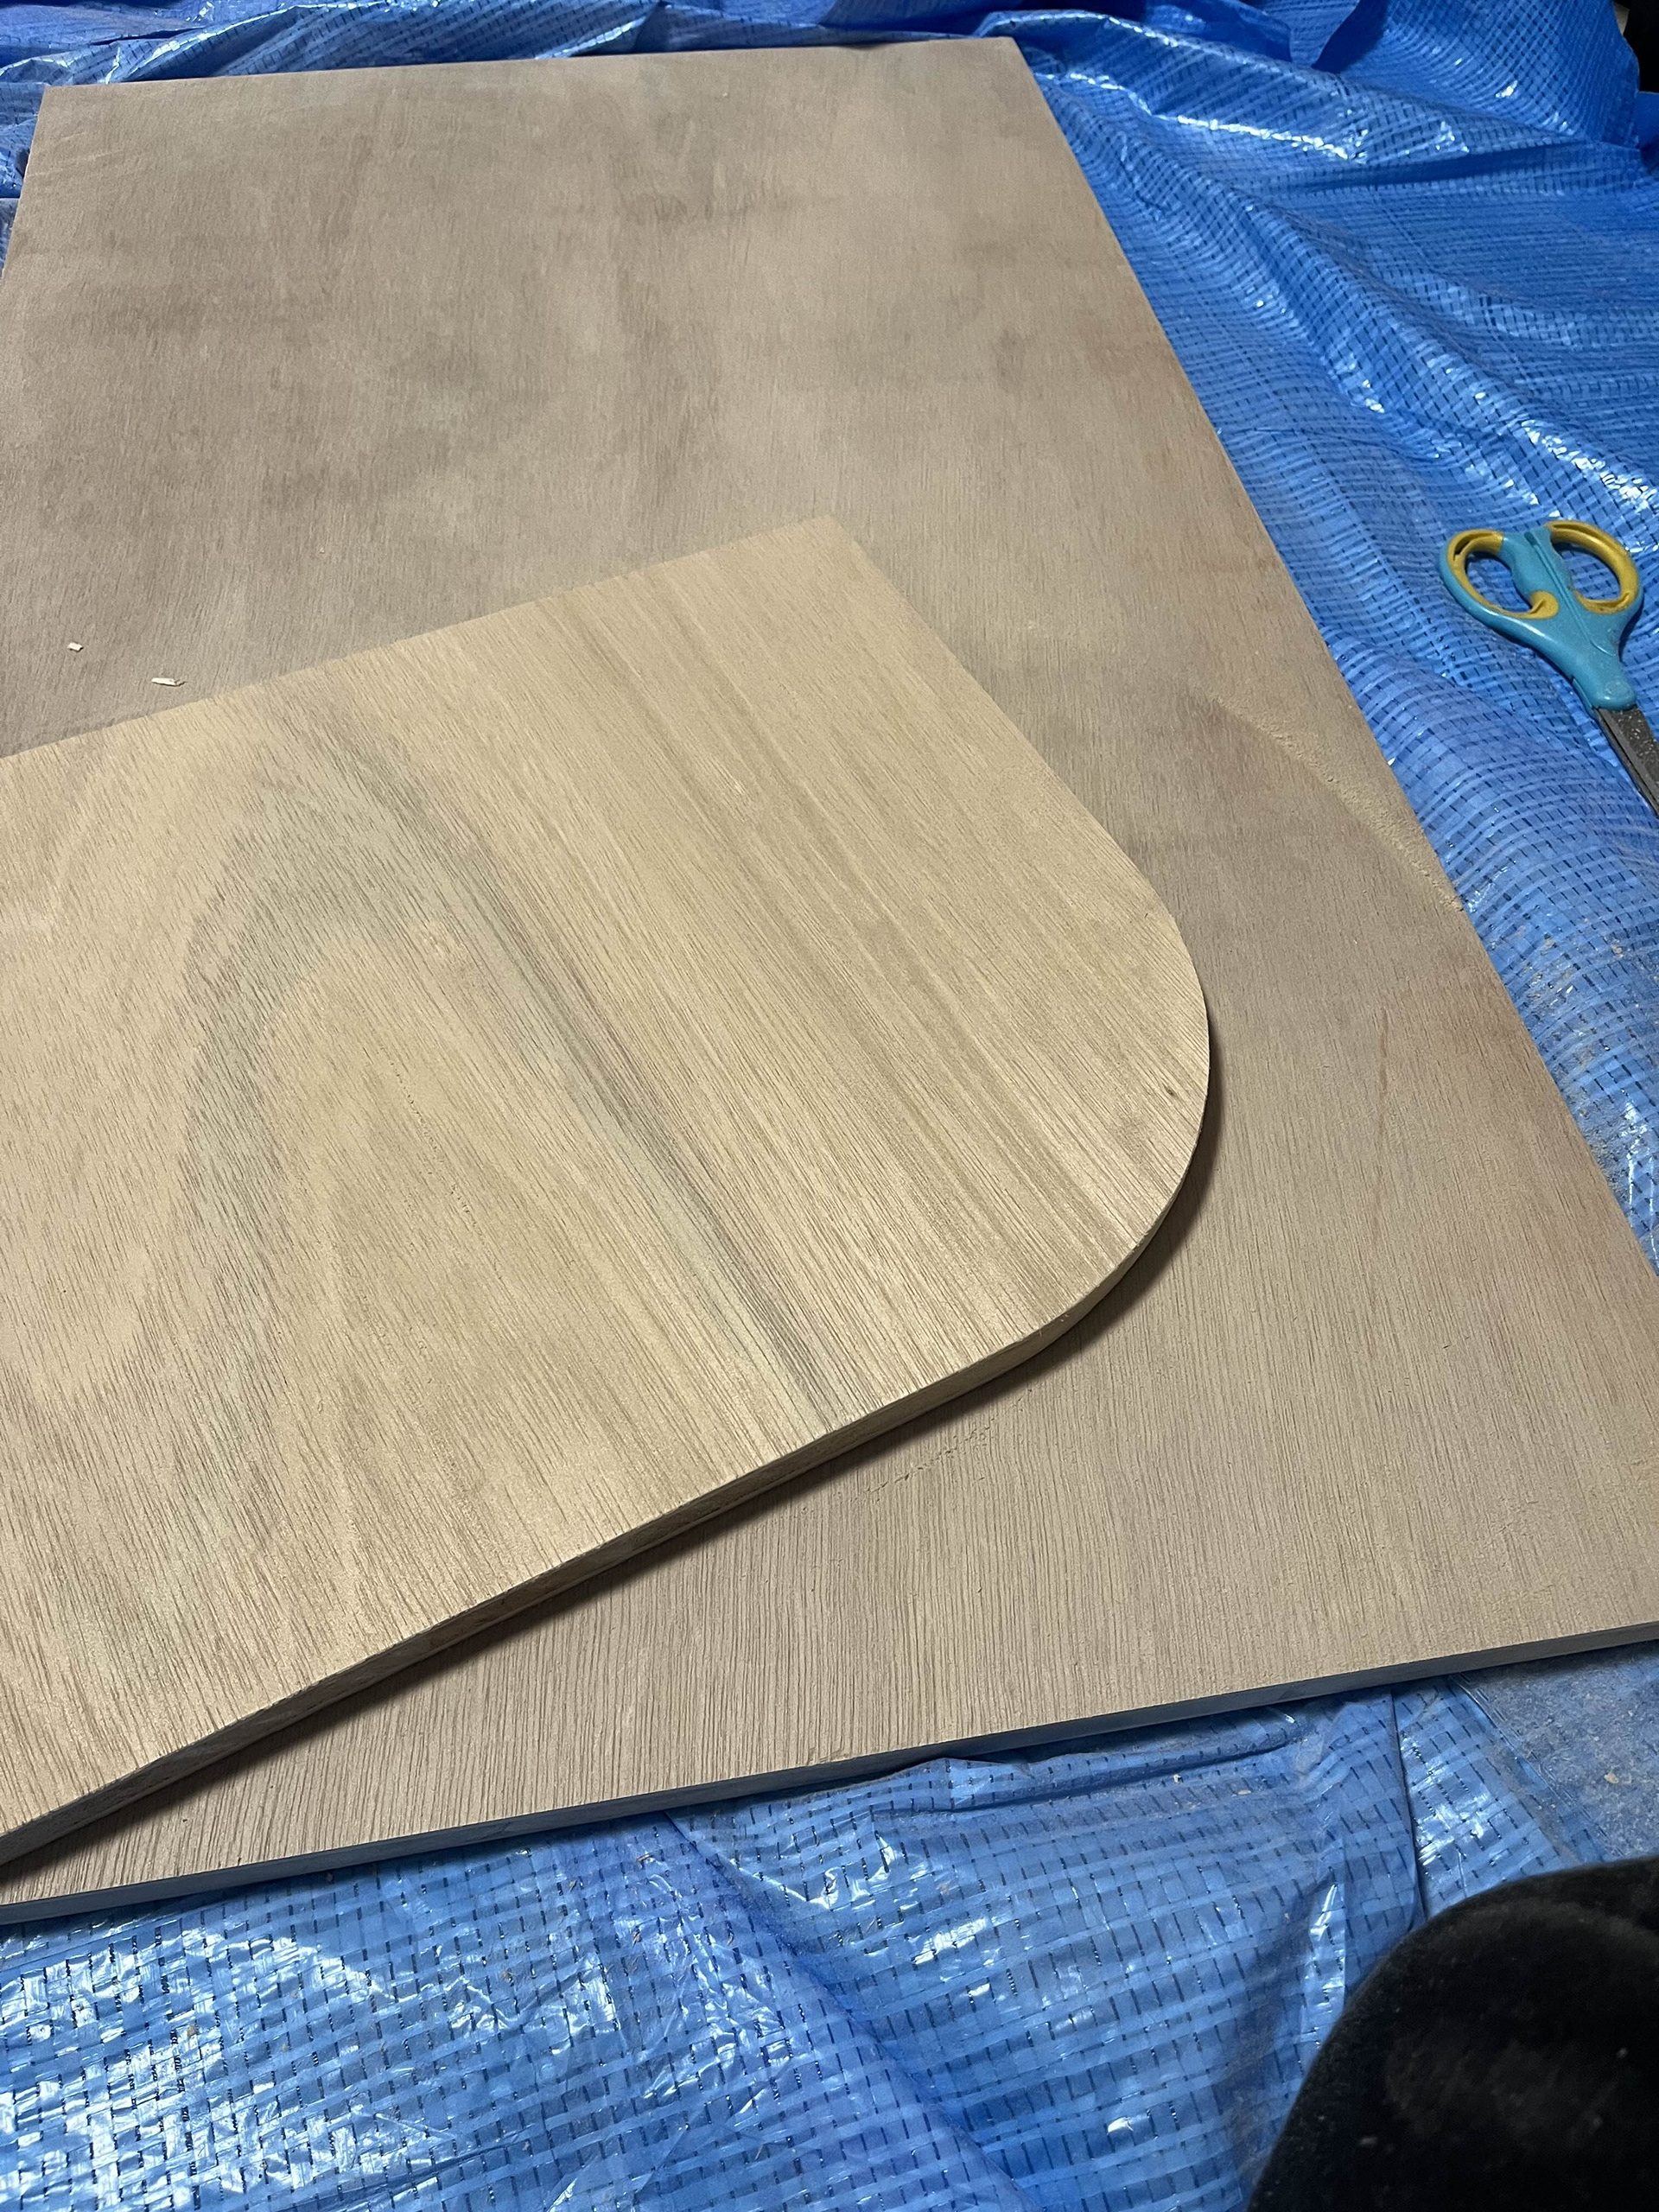
the corners were rounded off
applying sanding sealer
Then we hand-painted everything with water-based pain
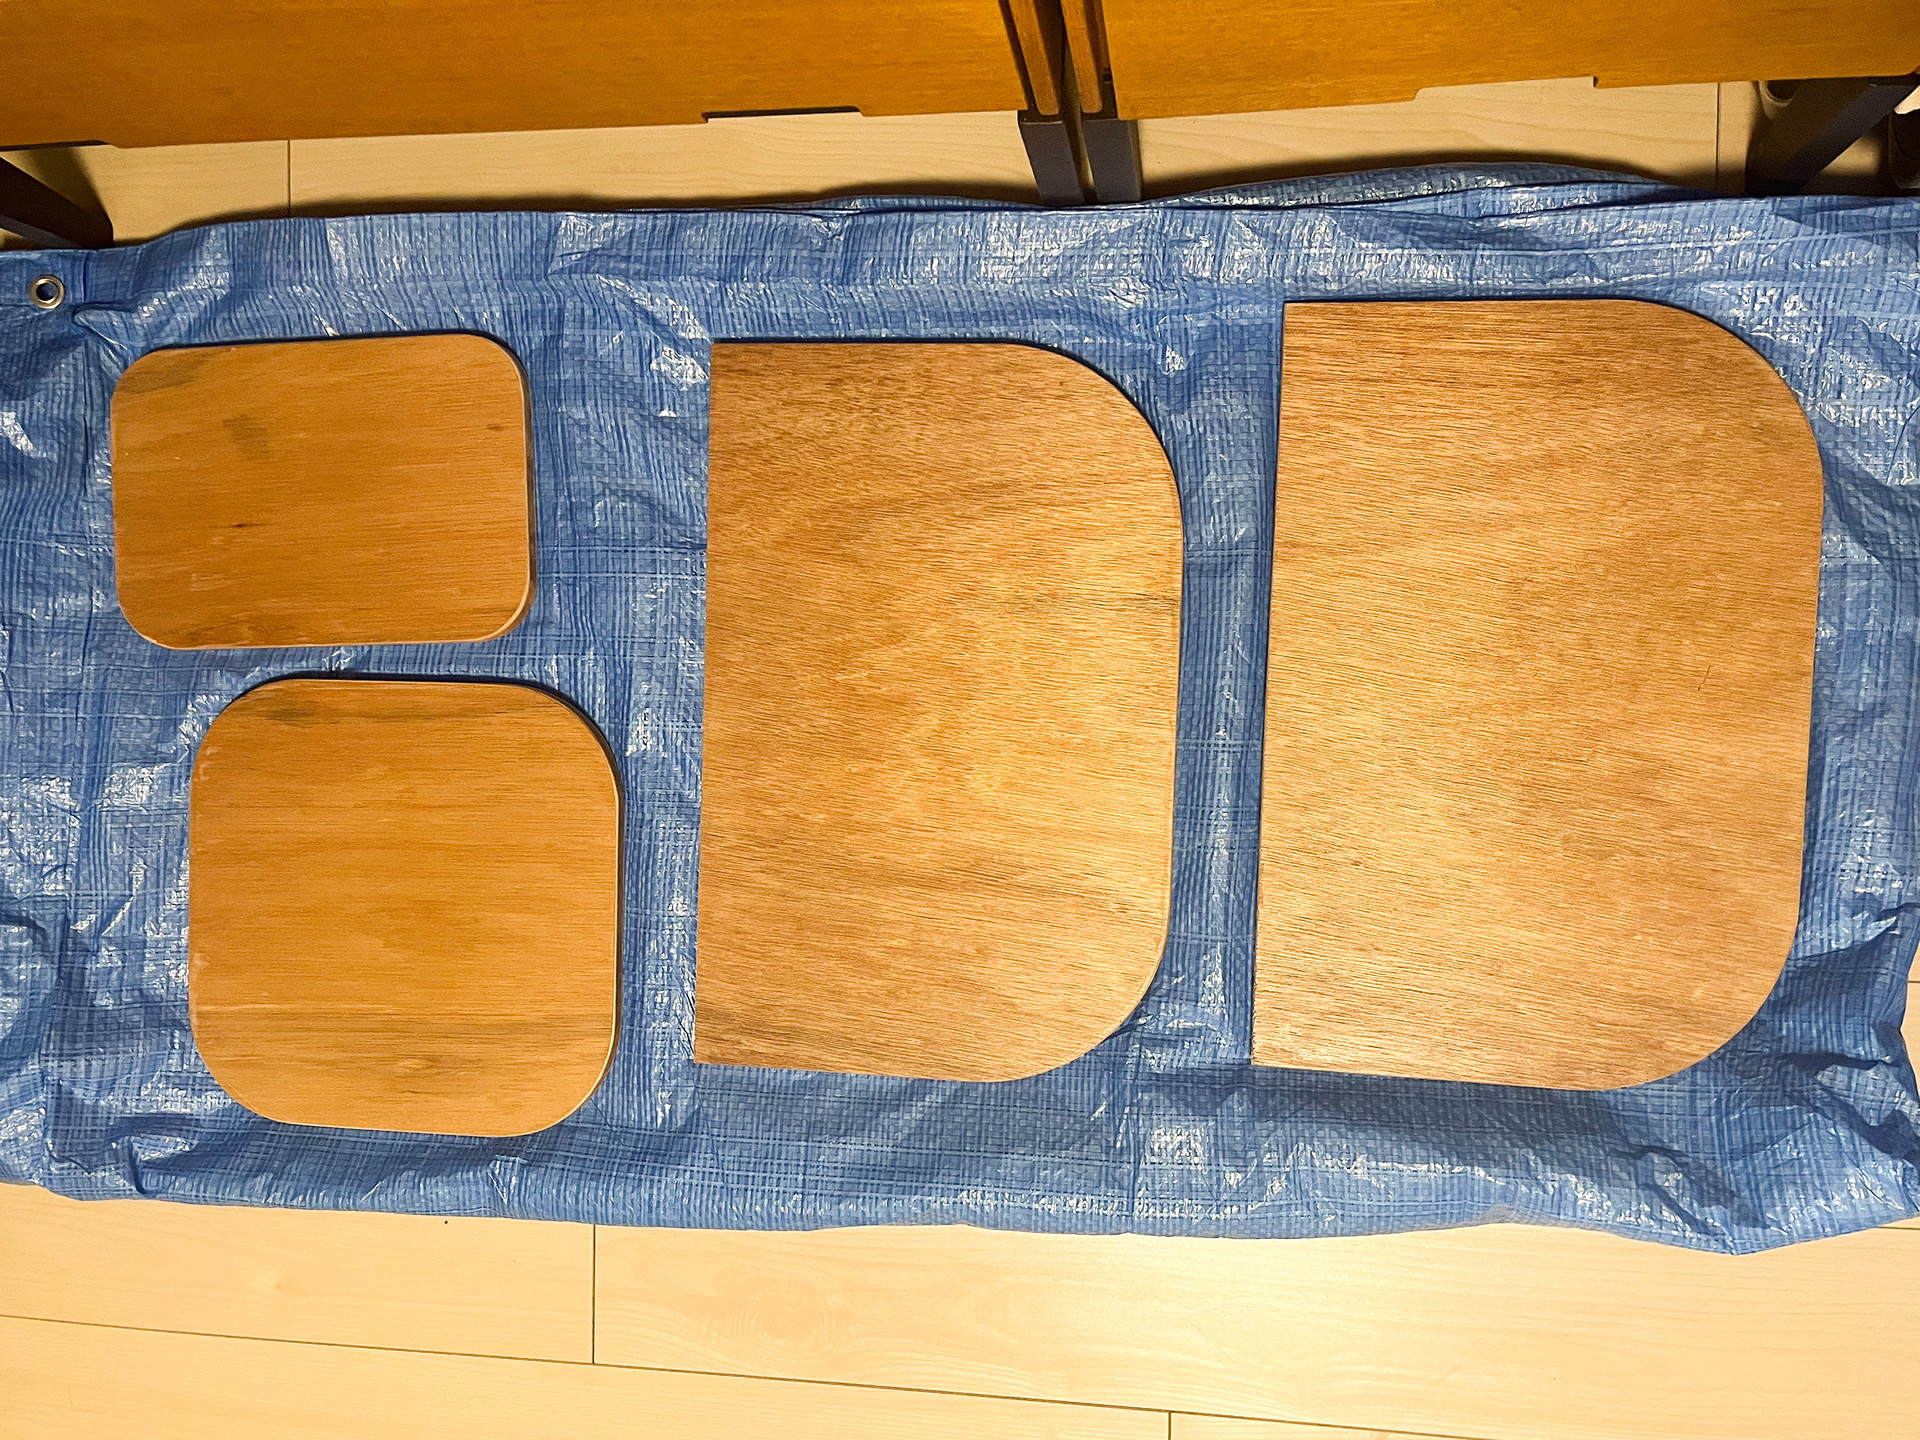
We use the wood had it cut to the necessary sizes before.
As for the Erector pipes, we had them pre-cut to the required lengths by the supplier.
※ We did have to buy a few extra pipes at the hardware store due to miscalculations, and even had to cut some by hand using a pipe cutter for minor adjustments… which I absolutely don’t recommend. It was so exhausting—seriously, please don’t try this at home (tears).
The corners were rounded off (my partner hand-sawed each one so beautifully it was basically wizardry), then we sanded everything down (I think we used two different grits?).
Definitely not something you should be doing in a rental apartment living room at midnight—so kids, please don’t copy us...
Since we couldn’t get the exact material we wanted, we had to add an extra step to reduce the fuzziness: applying sanding sealer.
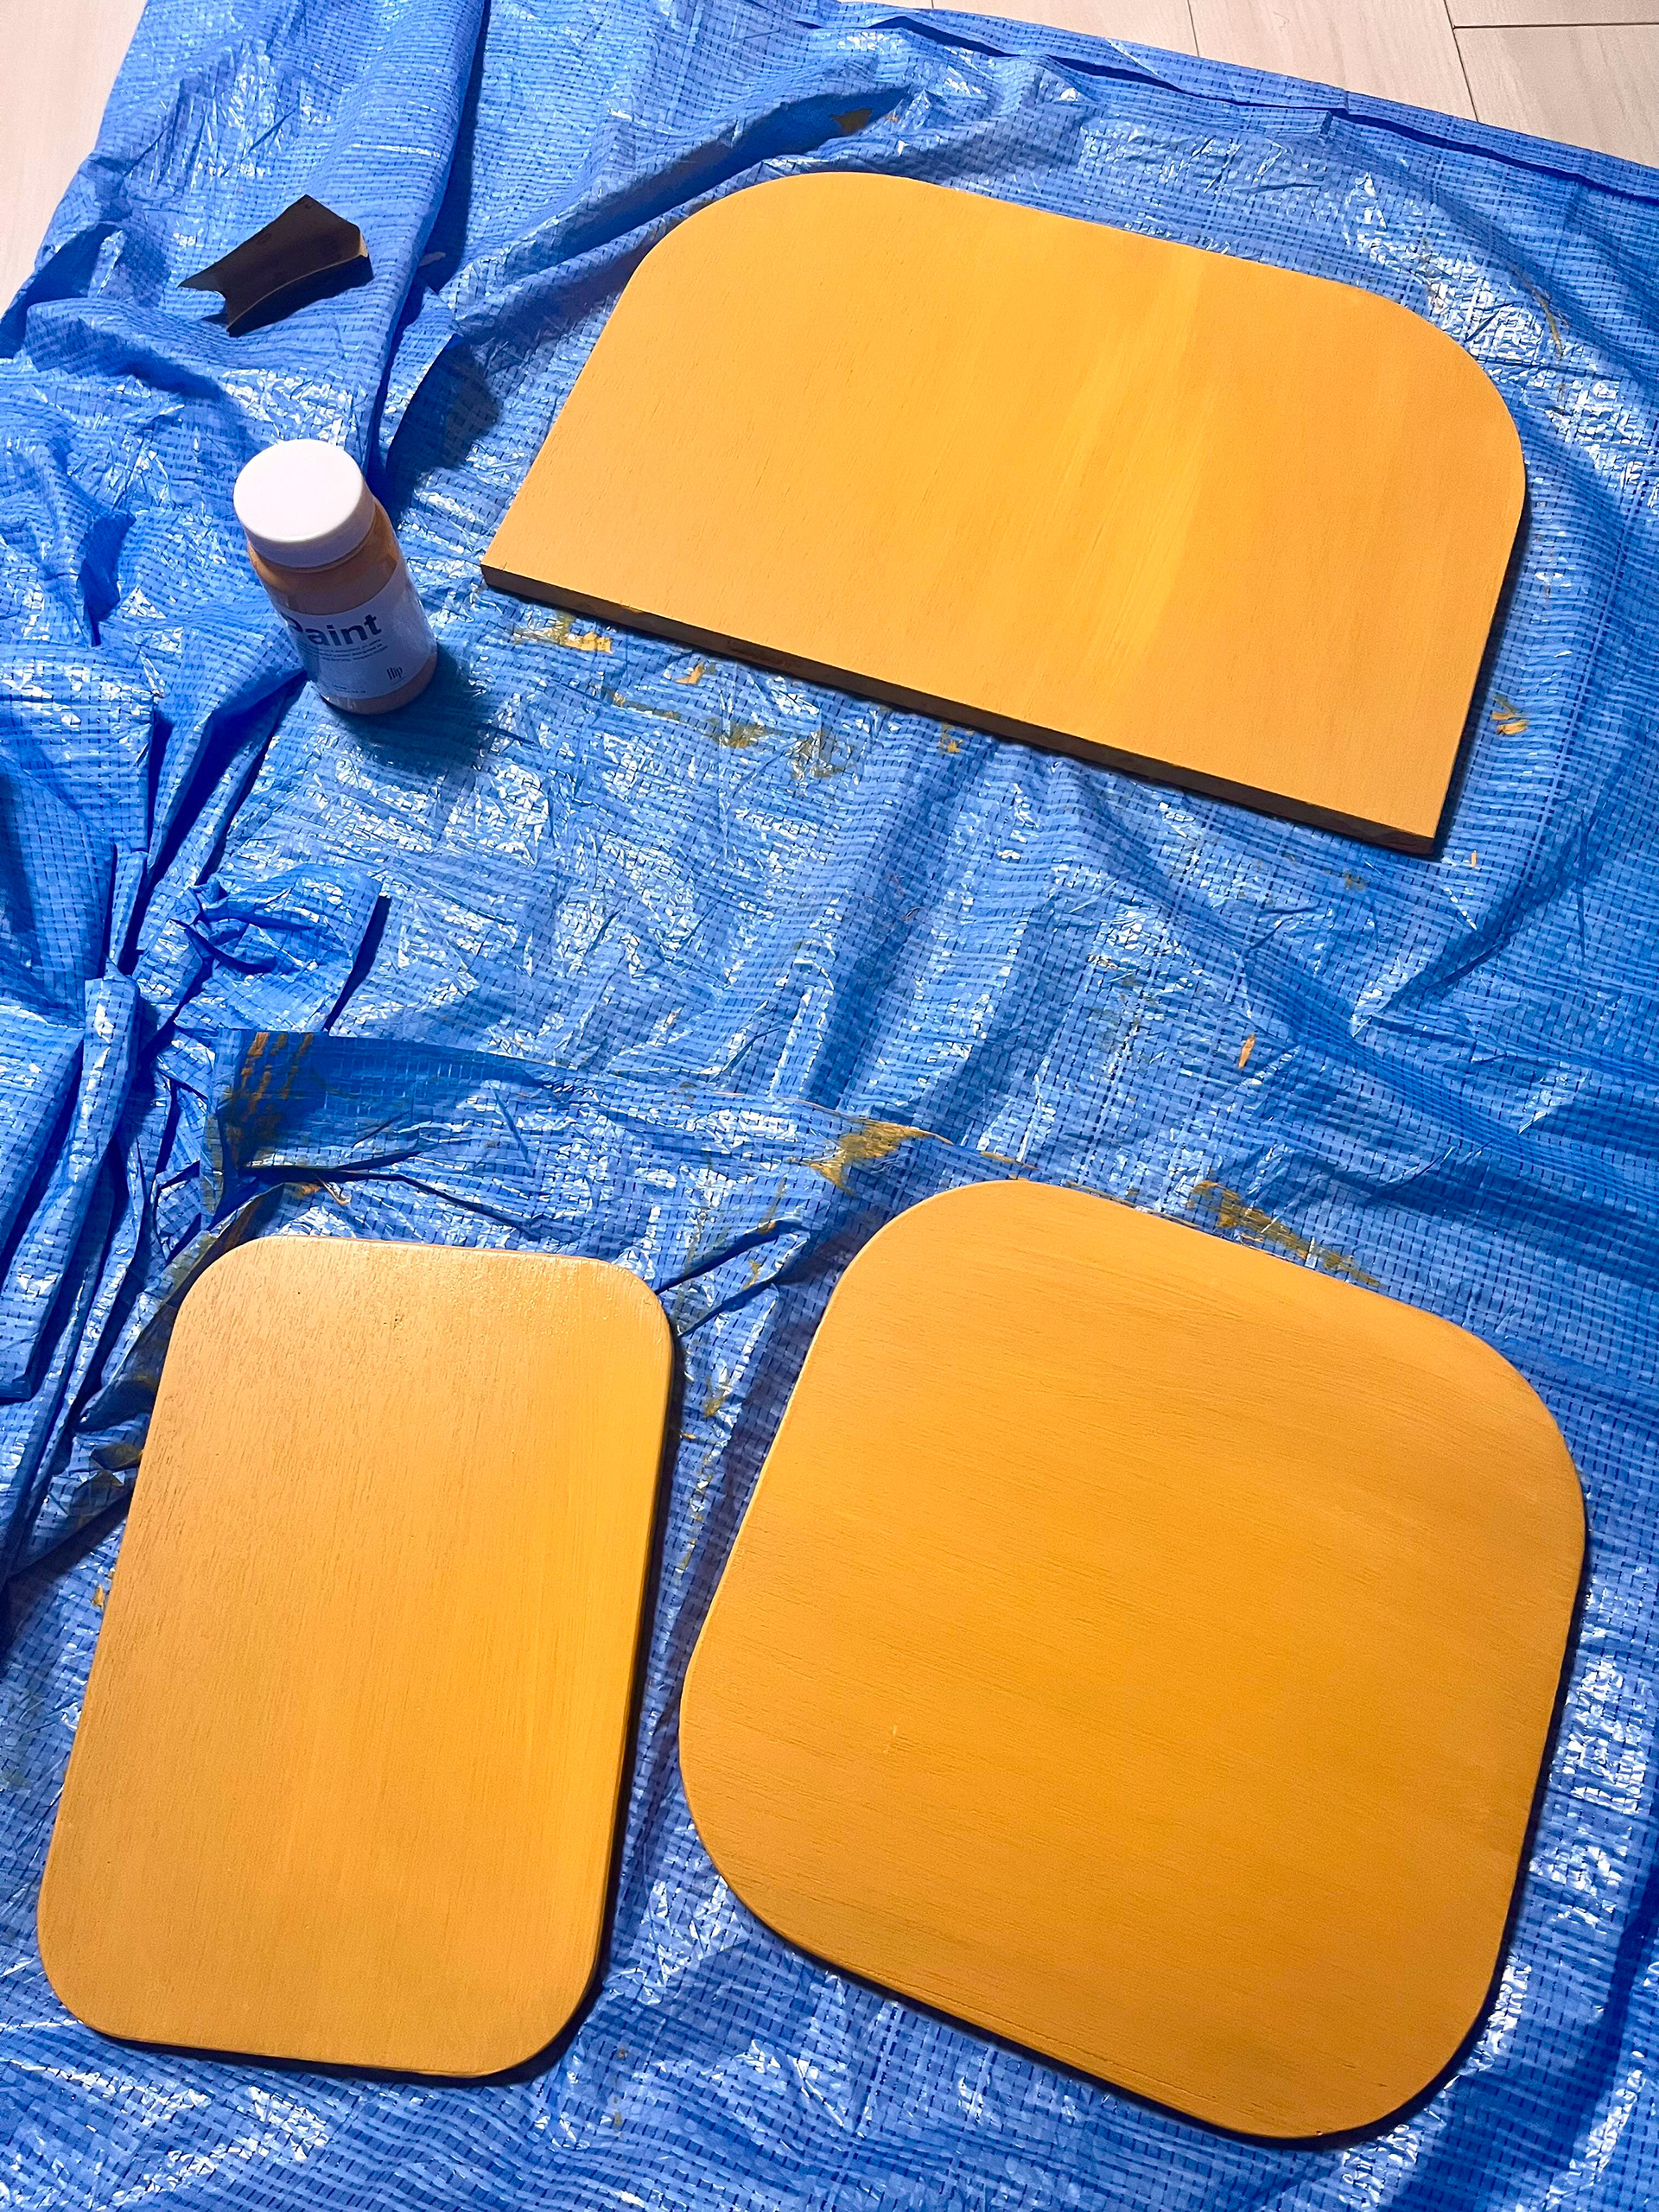
Then we hand-painted everything with water-based paint (several coats with a brush), and finally finished it off with a clear varnish.
Definitely not something you should be doing in a rental apartment living room at midnight—so kids, please don’t copy us...
Since we couldn’t get the exact material we wanted, we had to add an extra step to reduce the fuzziness: applying sanding sealer.
Then we hand-painted everything with water-based paint (several coats with a brush), and finally finished it off with a clear varnish.
All that was left was attaching the joints and putting everything together!
(…Which, to be honest, was pretty hard too. lol)
(…Which, to be honest, was pretty hard too. lol)
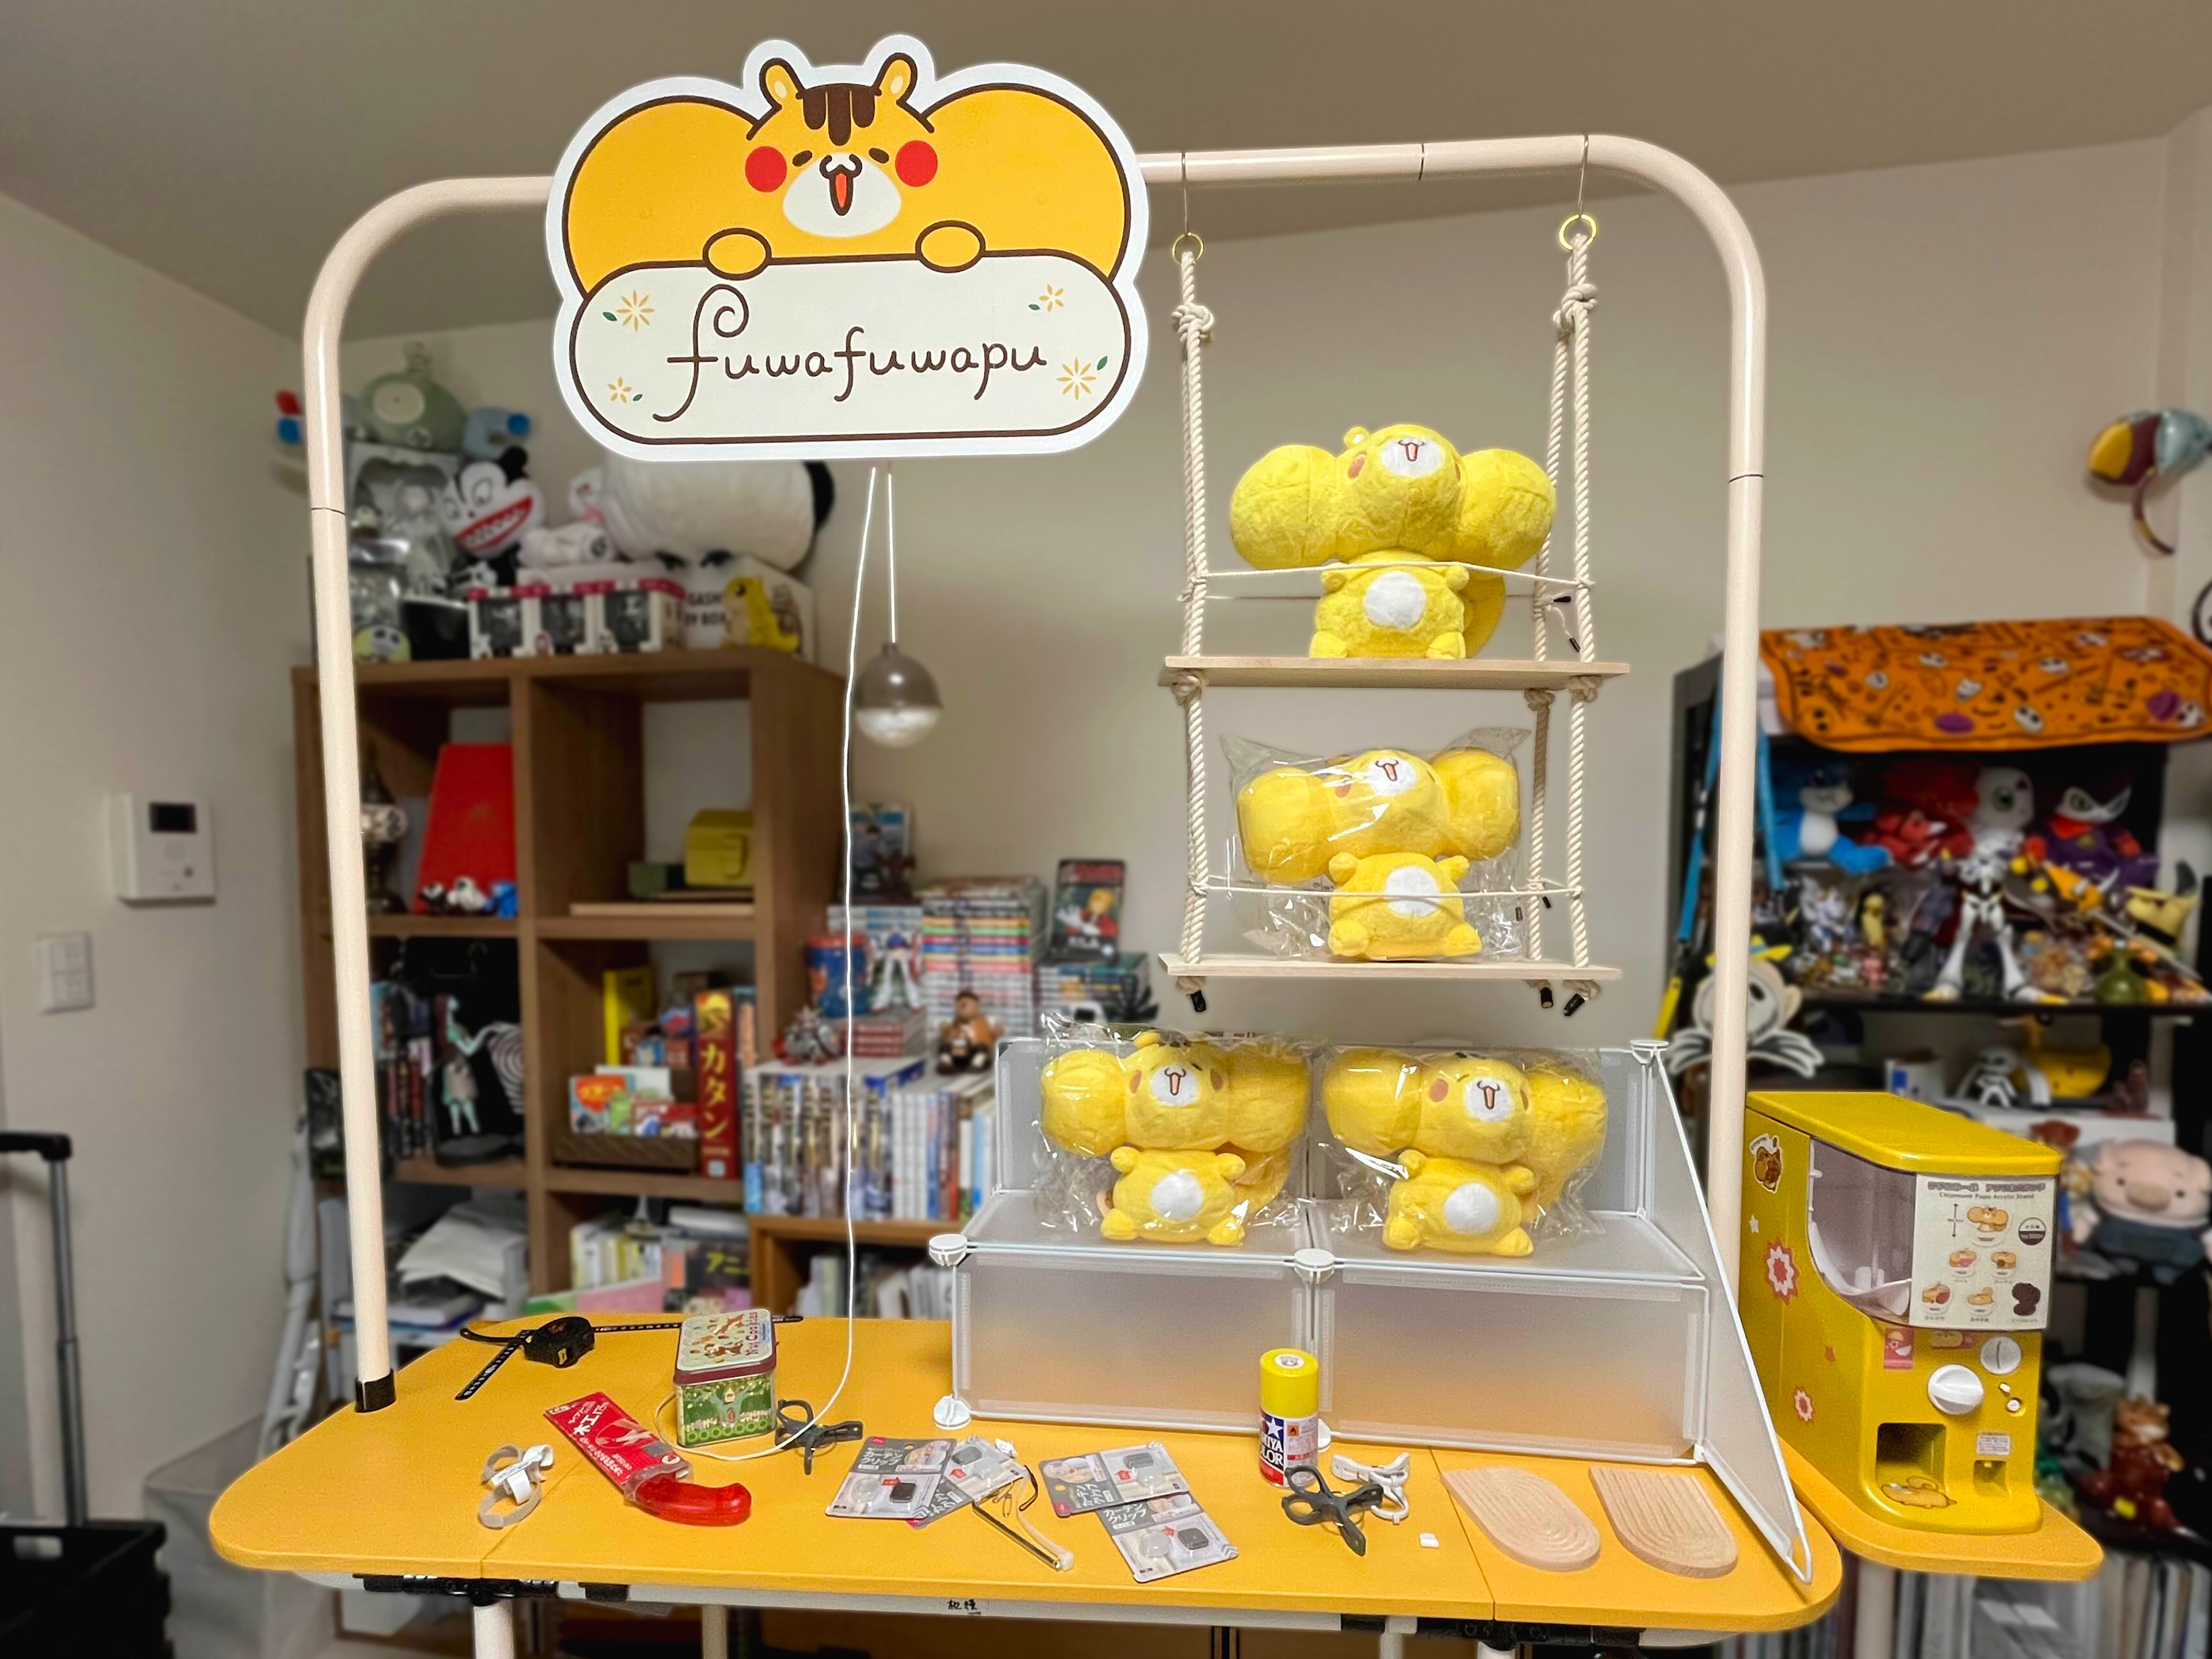
The booth turned out just like fuwafuwapu—soft, rounded, and gentle in design!
Sorry the photos are a bit messy—
my room is so full of stuff, there's not a single plain white wall in sight!
Sorry the photos are a bit messy—
my room is so full of stuff, there's not a single plain white wall in sight!
One thing I really struggled with until the end was how to give the plushies some height.
After lots of trial and error, I made a tiered display using panels from the 100-yen shop,
and even set up a little swing on the spot!
After lots of trial and error, I made a tiered display using panels from the 100-yen shop,
and even set up a little swing on the spot!
As a result—more visibility, more cuteness, and more display space! ★
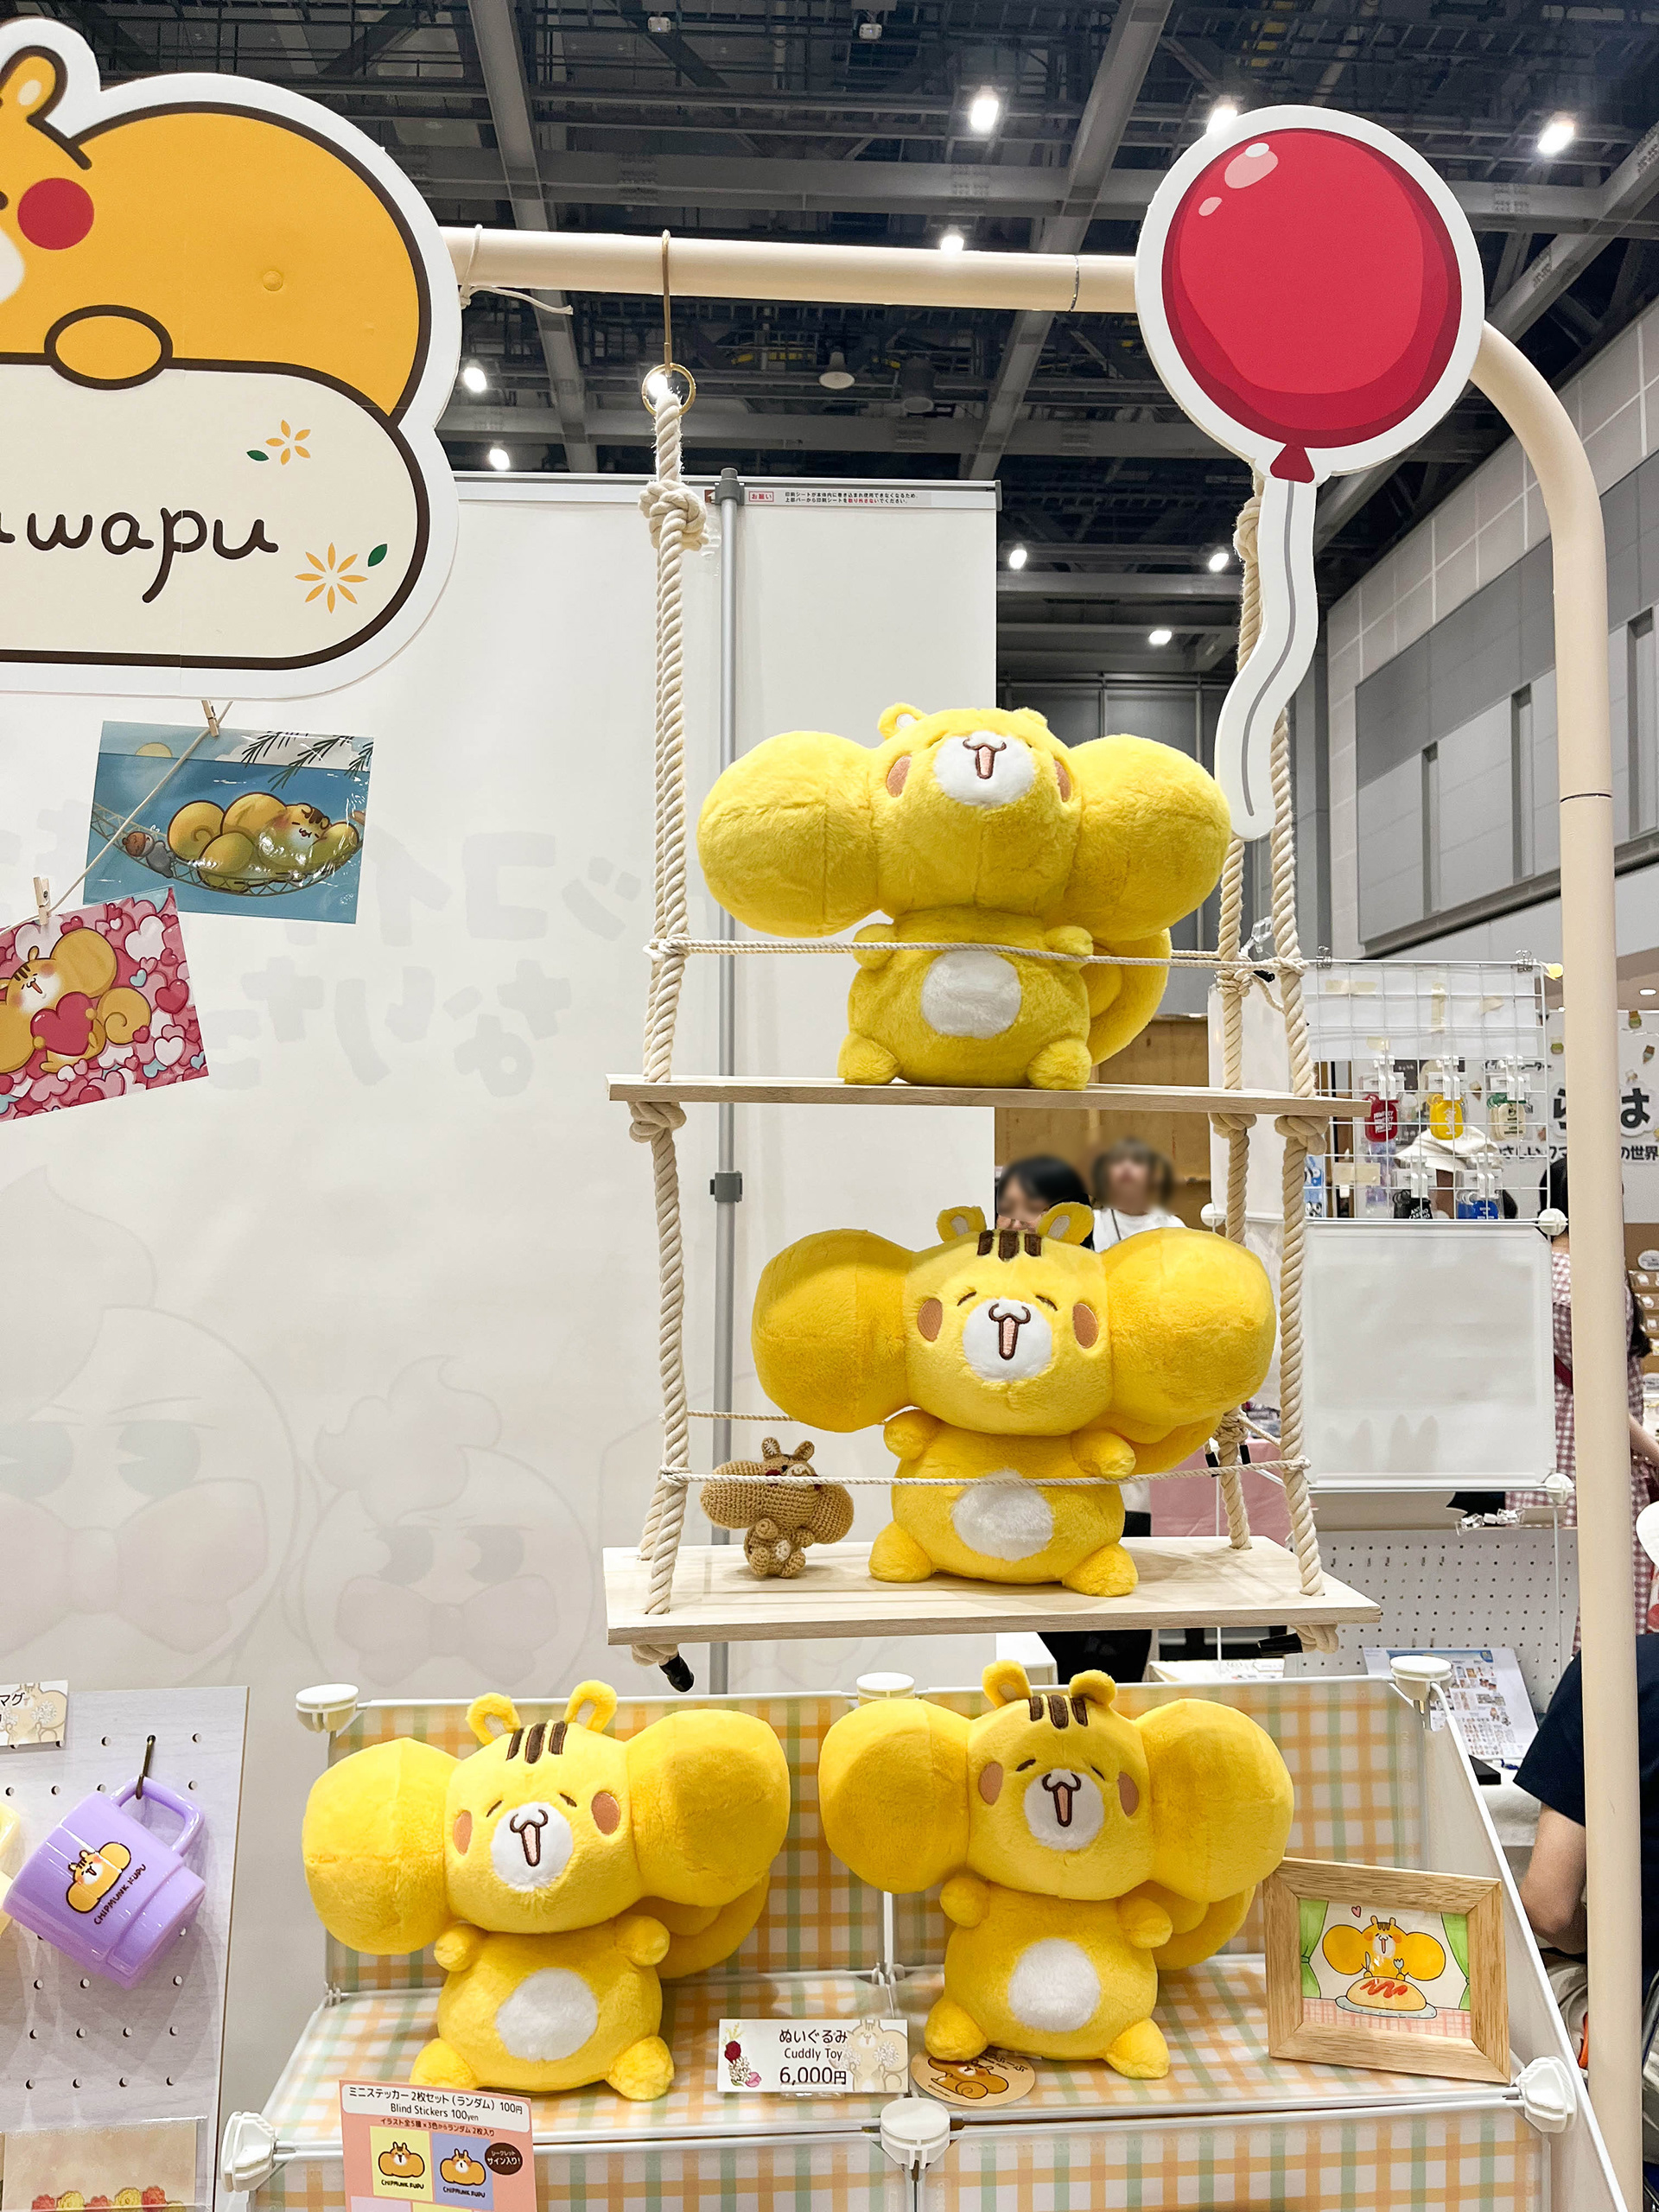
Swing
Swing
Here’s a quick summary of everything!
Items reused from previous setups
・Perforated board (made with 100-yen store boards and accessory parts)
・Flame-retardant fabric (plain fabric purchased online)
・Perforated board (made with 100-yen store boards and accessory parts)
・Flame-retardant fabric (plain fabric purchased online)
Newly prepared for this event
・Main table (painted boards + pre-cut Erector pipes + special joints)
・Movable stand with casters (painted boards + pre-cut Erector pipes + casters)
・Free multi-panel (backed with original printed patterns on paper, attached to 100-yen panels)
・Swing display (100-yen board + rope from home)
・Acorn light (IKEA room light + funnel from a home center, covered with fabric)
・Signage & POPs (printed using “Deko Tack” sticker paper)
All of this was packed into a single foldable carry cart!
It was light enough that we could lift the whole thing in one go.
The assembly does take a bit of practice, but I’m really happy with how it turned out—and I hope to keep using it for a long time!
It was light enough that we could lift the whole thing in one go.
The assembly does take a bit of practice, but I’m really happy with how it turned out—and I hope to keep using it for a long time!
Thank you so much for reading all the way to the end!
If you’d like to see how the booth has evolved over time,
I recommend checking out my past posts from vol.53, vol.57, vol.58, and vol.59.
If you’d like to see how the booth has evolved over time,
I recommend checking out my past posts from vol.53, vol.57, vol.58, and vol.59.
Also, don’t forget to take a look at Design Festa vol.61 – Part 1 too!
I hope you enjoy seeing how it all came together.
I hope you enjoy seeing how it all came together.
↓ONLINE SHOP↓
Follow us on social media for the latest updates!
Twitter : fuwafuwapu_mika
Instagram : fuwafuwapu_mika
2025.07.11
Twitter : fuwafuwapu_mika
Instagram : fuwafuwapu_mika
2025.07.11
