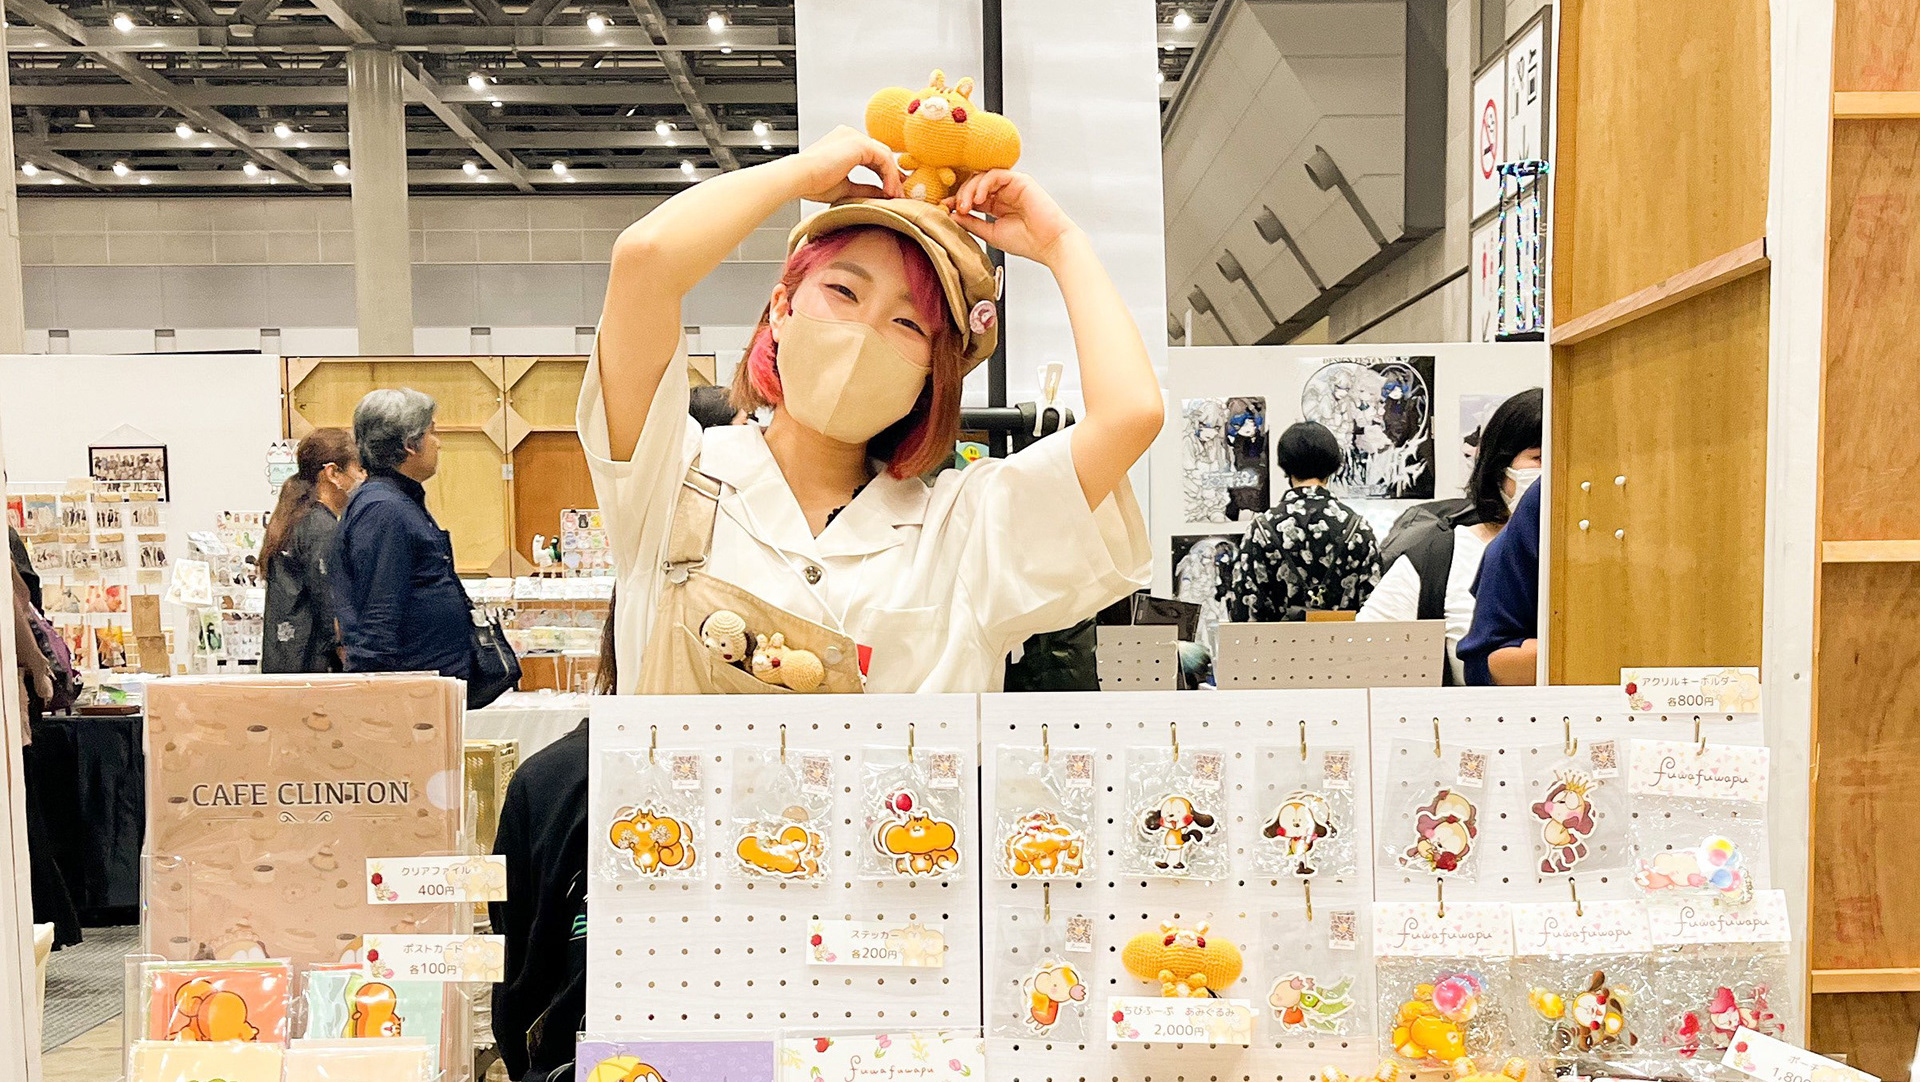
2日目のブースの様子
ブースを1から作っちゃったよ!
Built My Booth from Scratch!
Built My Booth from Scratch!
Part1に続いてPart2では、ブースについて大解剖です!
前回抽選に落ちてしまって出展できていない分、改めて多くの方の目に留まるように今回はブースのレイアウトを大改革してみました!
以前から知ってくださっている方も、はじめましての方も、すごーい!と隅々チェックしてくださって嬉しかったです。
今回はブースの設計やレイアウトも深堀ってレポートしたいと思います!
I had shared a few glimpses of my DIY process on social media, but the full reveal was saved for the event day—so it definitely made a strong impression!
It made me so happy to see both longtime followers and first-time visitors taking a close look at every detail and saying, “Wow!”
This time, I’d love to share more about how I planned and designed my booth!
デザフェスに参加してみたいけど迷っているという方、レイアウトに悩んでいる方の参考になれば幸いです。
前回抽選に落ちてしまって出展できていない分、改めて多くの方の目に留まるように今回はブースのレイアウトを大改革してみました!
If you enjoyed Part 1, get ready—Part 2 is all about the booth! Let’s take a closer look!
Even so, I was so grateful that so many people stopped by my booth.
Even so, I was so grateful that so many people stopped by my booth.
Since I wasn’t able to exhibit last time due to the lottery, I wanted to make the most of this opportunity—so I gave my booth a major makeover to catch as many eyes as possible!
チラチラとSNSでDIYしている様子はアップしていたのですが、全容は当日公開したのでインパクトバッチリでした!以前から知ってくださっている方も、はじめましての方も、すごーい!と隅々チェックしてくださって嬉しかったです。
今回はブースの設計やレイアウトも深堀ってレポートしたいと思います!
I had shared a few glimpses of my DIY process on social media, but the full reveal was saved for the event day—so it definitely made a strong impression!
It made me so happy to see both longtime followers and first-time visitors taking a close look at every detail and saying, “Wow!”
This time, I’d love to share more about how I planned and designed my booth!
デザフェスに参加してみたいけど迷っているという方、レイアウトに悩んでいる方の参考になれば幸いです。
If you're thinking about joining Design Festa but still feeling unsure, or if you're struggling with your booth layout—
I hope this can be a little help or inspiration for you!
I hope this can be a little help or inspiration for you!
ブース設計案①
ブースレイアウトイメージ図①
不器用ではなから机をレンタルする気満々だったわたしに代わり、DIY大好きな相棒が設計から全て行ってくれました…大感謝!!!!
まずは1番最初のレイアウト案…!
やはり今回の注目商品である新作のぬいぐるみをいかに見栄え良く飾るかが大事だったので、ぬいぐるみ専用の陳列棚を作成する作戦でした。
デザフェスの規約をパスできる素材(防炎布、机の上以外は段ボール禁止など)を考慮する上、搬入(私達はいつも電車で当日運び込んでいます)のことを考えるとなかなか難しく、色々な会社さんでお見積りしましたが予算も重量も大幅にオーバーするため断念しました。
まずは1番最初のレイアウト案…!
やはり今回の注目商品である新作のぬいぐるみをいかに見栄え良く飾るかが大事だったので、ぬいぐるみ専用の陳列棚を作成する作戦でした。
デザフェスの規約をパスできる素材(防炎布、机の上以外は段ボール禁止など)を考慮する上、搬入(私達はいつも電車で当日運び込んでいます)のことを考えるとなかなか難しく、色々な会社さんでお見積りしましたが予算も重量も大幅にオーバーするため断念しました。
Since I’m not very handy, I was fully planning to just rent a table… but my amazing partner, who loves DIY, took charge of everything—from the design to the construction. So grateful!!!
Let’s start with the very first layout draft.
One of the biggest goals was to display our brand-new cuddly toys (the highlight of this event!) in the most eye-catching way possible. So, our initial plan was to create a custom display shelf just for them.
One of the biggest goals was to display our brand-new cuddly toys (the highlight of this event!) in the most eye-catching way possible. So, our initial plan was to create a custom display shelf just for them.
However, we had to consider the Design Festa regulations—like using flame-retardant fabric and avoiding cardboard structures outside of tables.
Plus, since we always bring everything in by train on the day of the event, transportability was also a key concern.
We asked for quotes from several companies, but unfortunately, the costs and weight were way over our budget, so we had to give up on that plan.
Plus, since we always bring everything in by train on the day of the event, transportability was also a key concern.
We asked for quotes from several companies, but unfortunately, the costs and weight were way over our budget, so we had to give up on that plan.
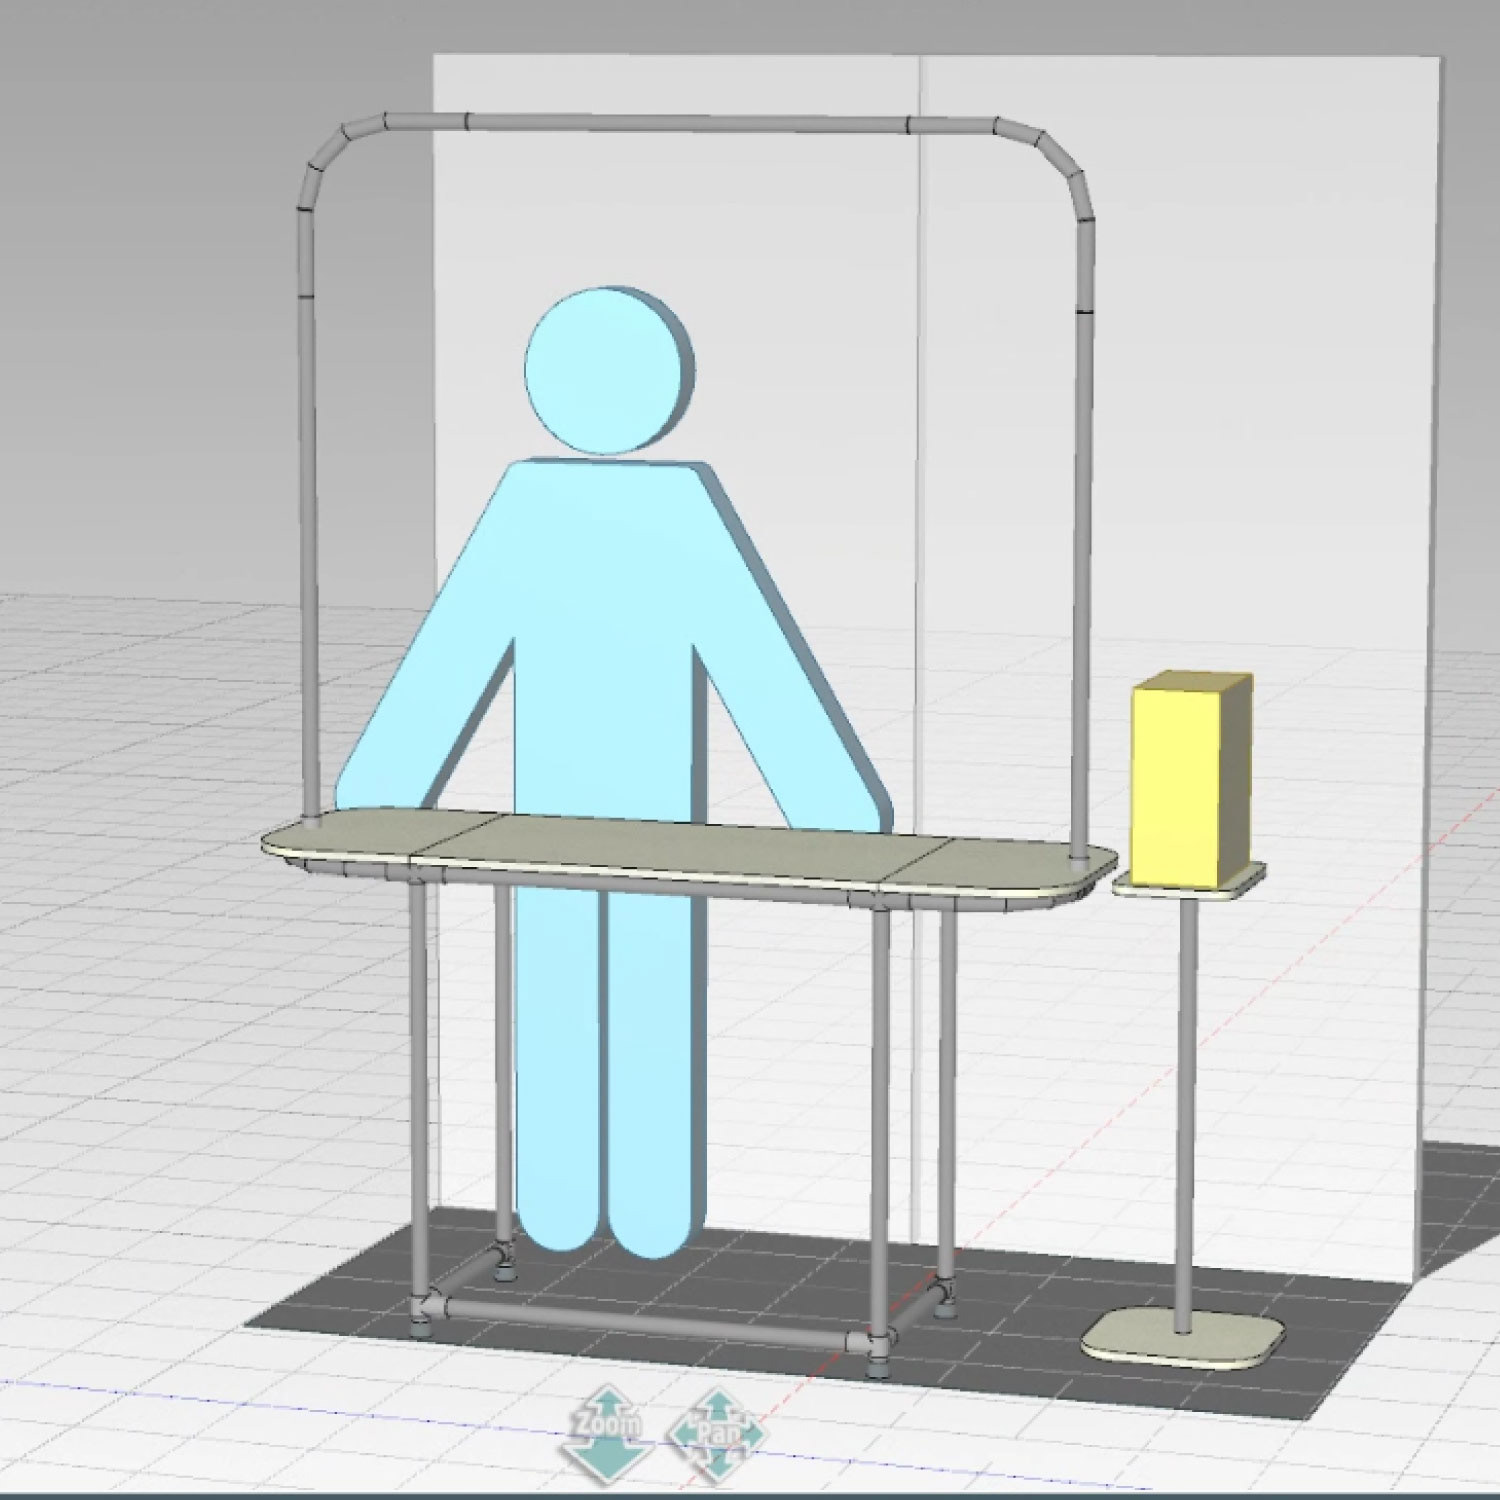
ブース設計案②
ブースレイアウトイメージ②
そして改良した第2案!
専用陳列棚を諦め、テーブル自体を2段の構造に、また、有孔ボードを使って開閉扉を設置することで通路と陳列スペースを共存させる作戦です!
こちらは接続部が多くなってしまい、一番ネックなジョイントの重さで重量オーバーになり断念しました。
専用陳列棚を諦め、テーブル自体を2段の構造に、また、有孔ボードを使って開閉扉を設置することで通路と陳列スペースを共存させる作戦です!
こちらは接続部が多くなってしまい、一番ネックなジョイントの重さで重量オーバーになり断念しました。
Then came the revised second plan!
We decided to give up on the custom display shelf and instead transformed the table itself into a two-level structure.
The new idea was to use a perforated board with a foldable door, allowing us to create a layout that combined both a walkway and a display area.
We decided to give up on the custom display shelf and instead transformed the table itself into a two-level structure.
The new idea was to use a perforated board with a foldable door, allowing us to create a layout that combined both a walkway and a display area.
However, this version required many connection parts, and the joints—which were especially heavy—ended up pushing the total weight over the limit. So, we had to abandon this plan too.
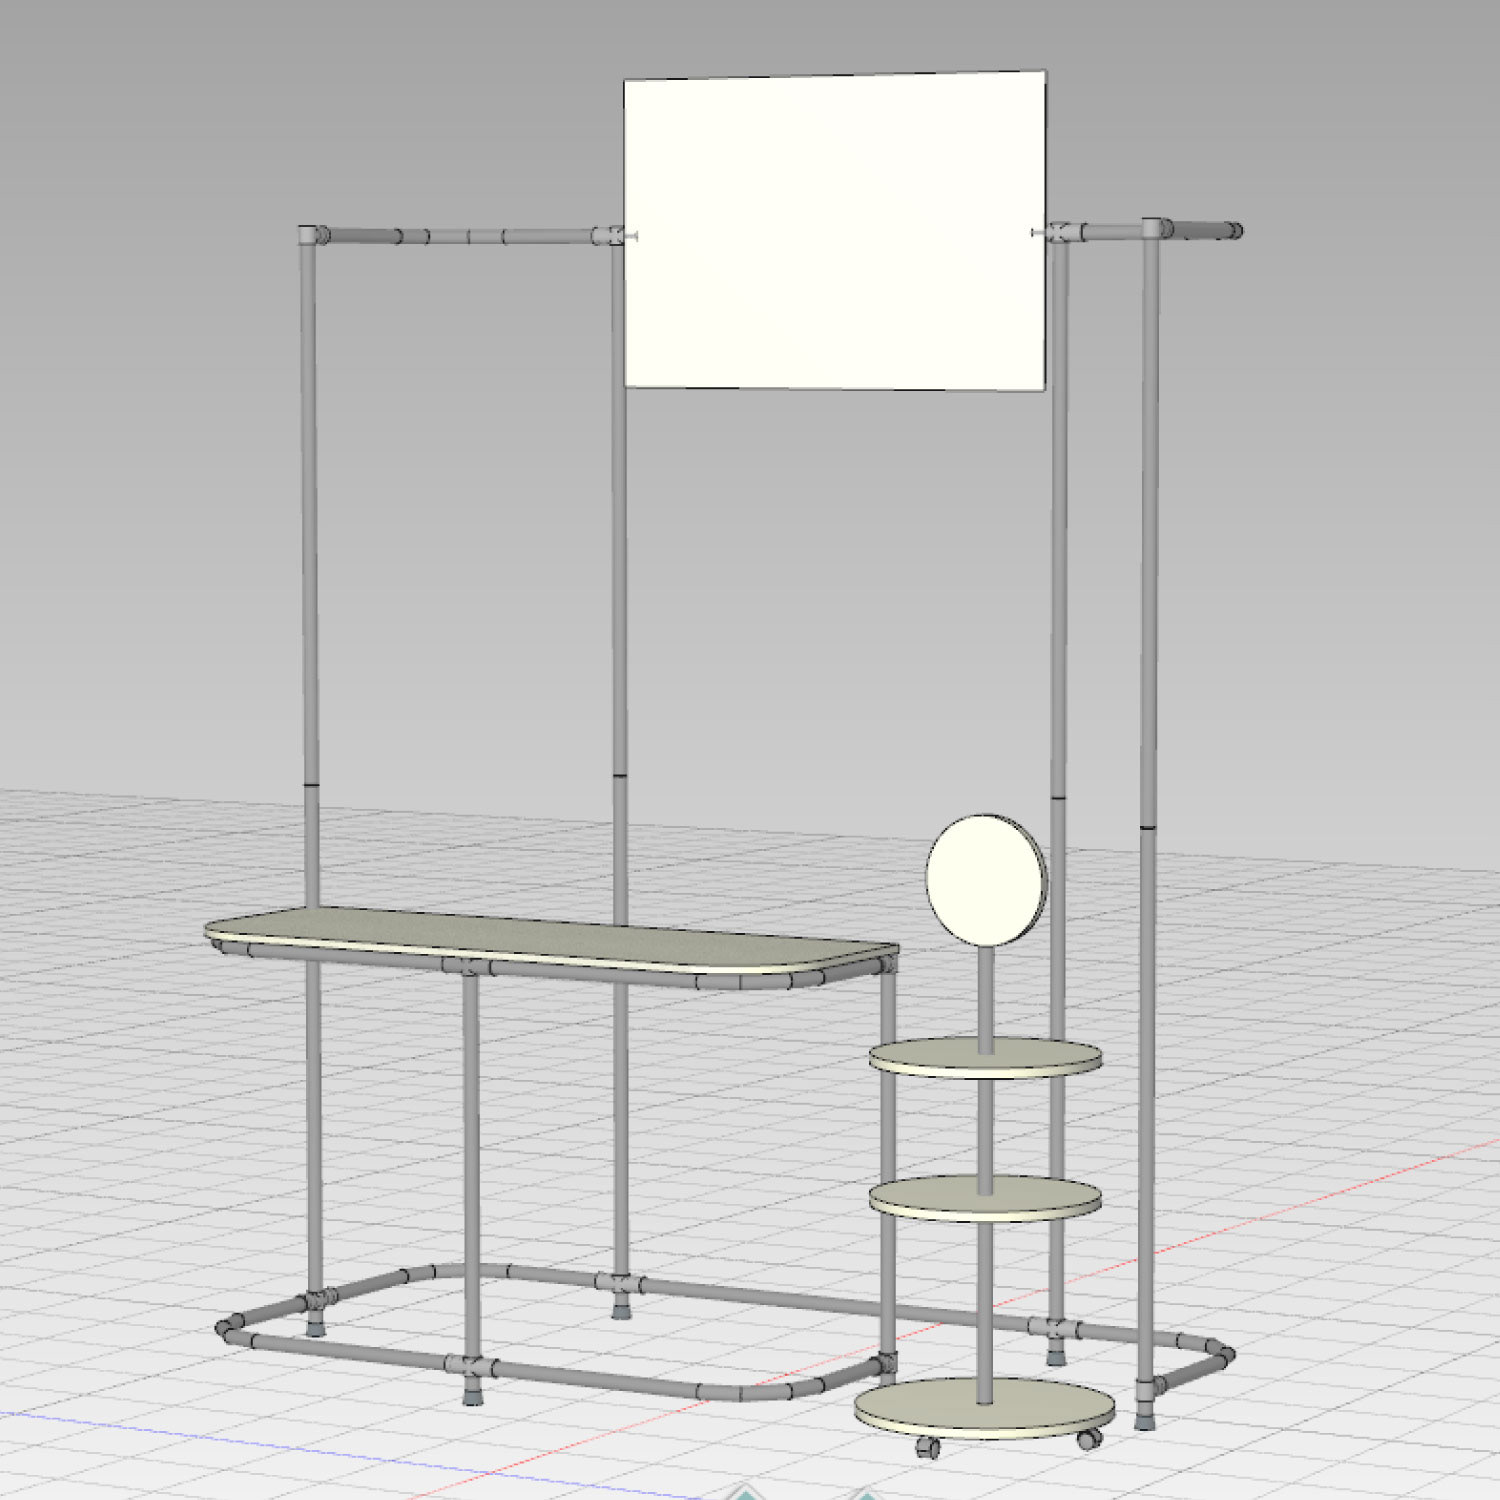
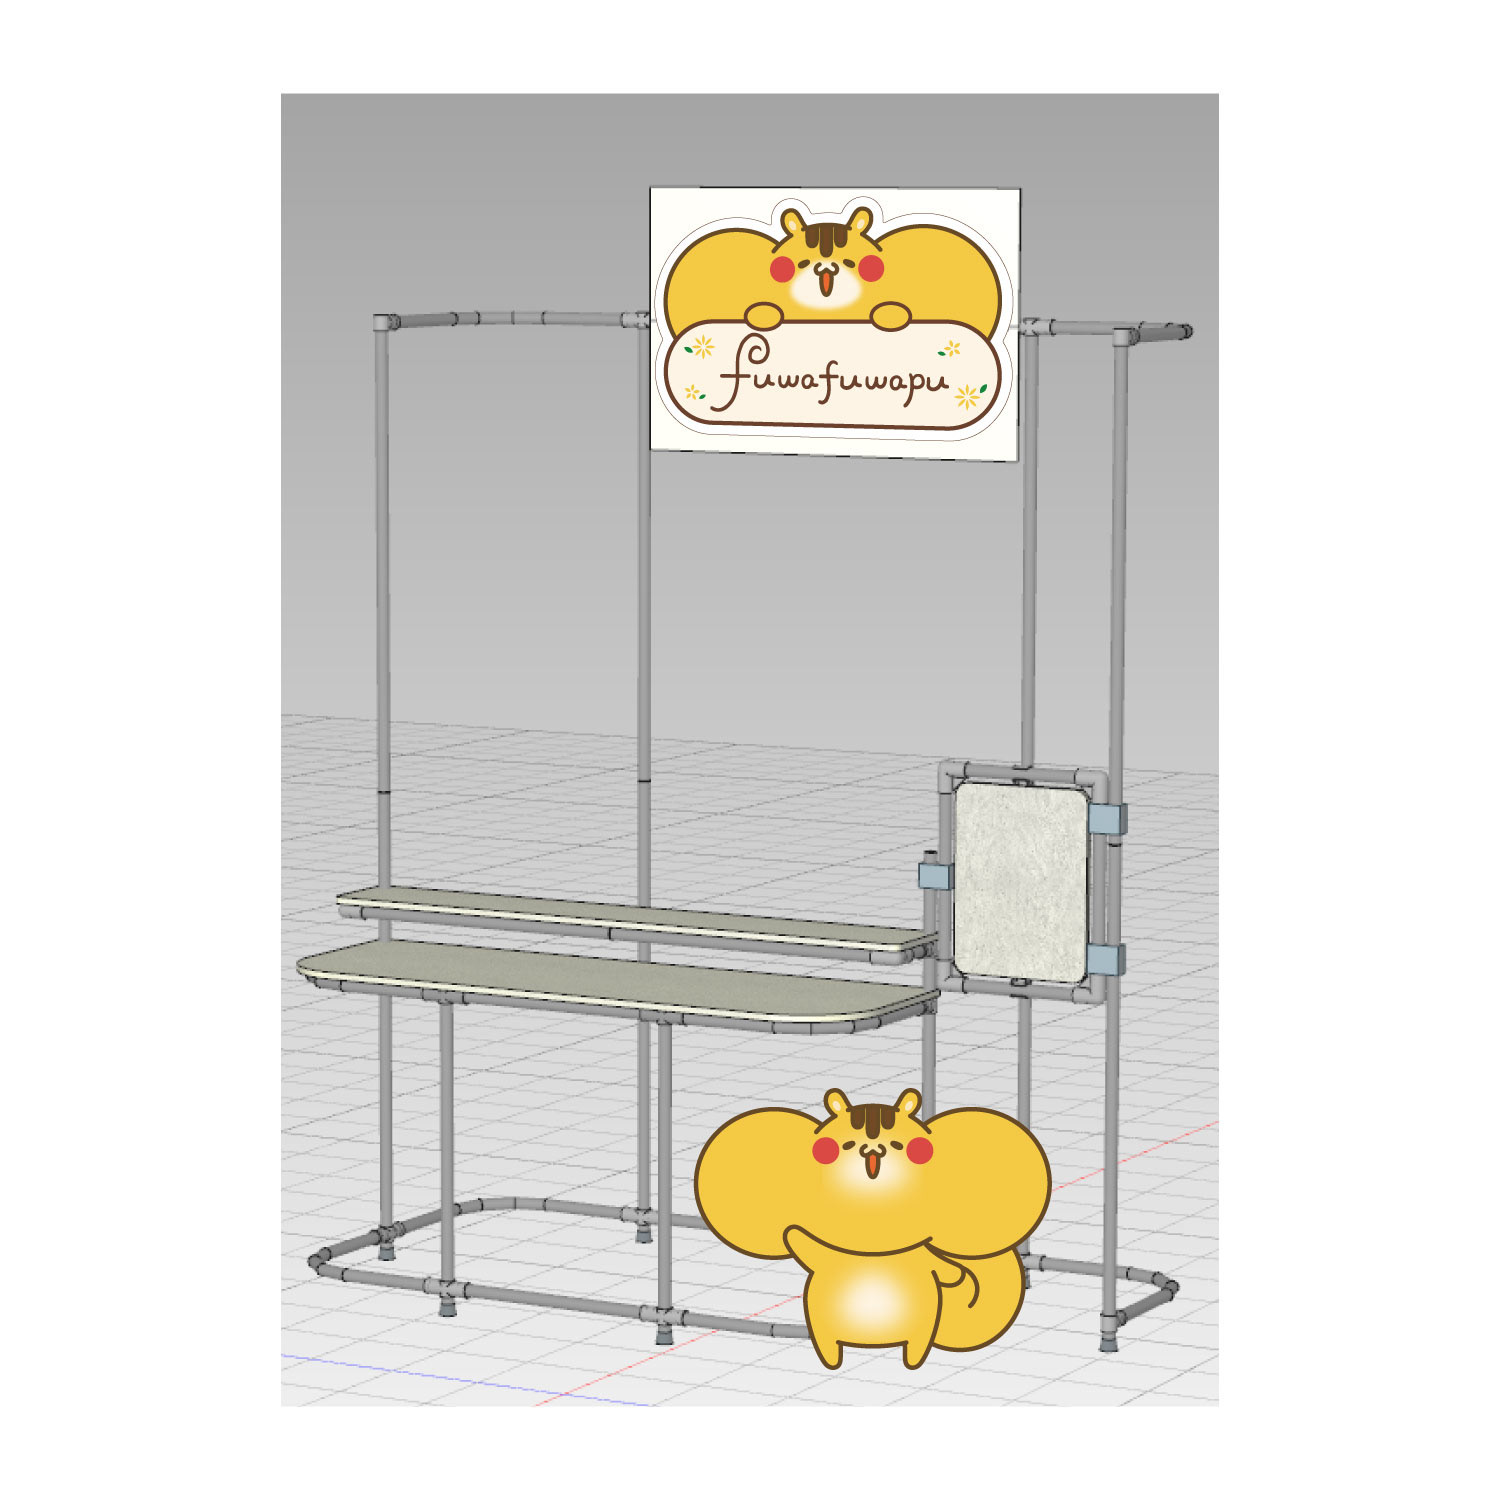
ブース設計図③
ブースレイアウトイメージ③
そしてこちらが最終案!
随分スッキリしました…!笑
机とガシャポン用の台を別にして、キャスターで可動式にすることで通路を確保することにしました。
最終的に用意したものは主に板とイレクターパイプの2つです。
イレクターパイプを使った作例は見てるだけでも楽しいのでおすすめです!
いかに軽く、シンプルに、かつ丈夫に作るかを大事にしました。
長く使っていきたいし、わたし一人で出展することも今後あるかもしれないしね!
材料を購入し始めたのは本番2週間前!!!!だいぶ前から準備を始めていたはずなのに!?
焦りもある中発注したイレクターパイプのサイズを間違ってしまったり、いつの間にか全体の設計自体10cm短くなっていたり、購入予定だった板の種類が近所のホームセンターになかったりなどハプニングだらけ!笑
でもとってもかわいいブースになったんだからOKだよね★
And here’s the final plan!
As you can see… it ended up being much more simplified! (Haha)
We separated the table and the gashapon machine stand, and made the stand movable with casters so we could ensure a clear walkway.
As you can see… it ended up being much more simplified! (Haha)
We separated the table and the gashapon machine stand, and made the stand movable with casters so we could ensure a clear walkway.
In the end, the main materials we used were boards and Erector pipes.
There are so many creative examples using Erector pipes out there—they're fun to look at for inspiration, and I highly recommend them!
We focused on keeping the structure lightweight, simple, and sturdy.
I wanted something I could reuse long-term—and possibly set up on my own in the future!
There are so many creative examples using Erector pipes out there—they're fun to look at for inspiration, and I highly recommend them!
We focused on keeping the structure lightweight, simple, and sturdy.
I wanted something I could reuse long-term—and possibly set up on my own in the future!
We actually started buying the materials just two weeks before the event!
Even though we thought we had started preparing early…!?
Even though we thought we had started preparing early…!?
There were plenty of mishaps—like ordering the wrong size pipes, realizing the overall design had somehow shrunk by 10cm, and not finding the exact type of board we had planned to buy at our local home center.
But in the end, we pulled it off, and the booth turned out super cute—so I’m calling it a win! ★
But in the end, we pulled it off, and the booth turned out super cute—so I’m calling it a win! ★
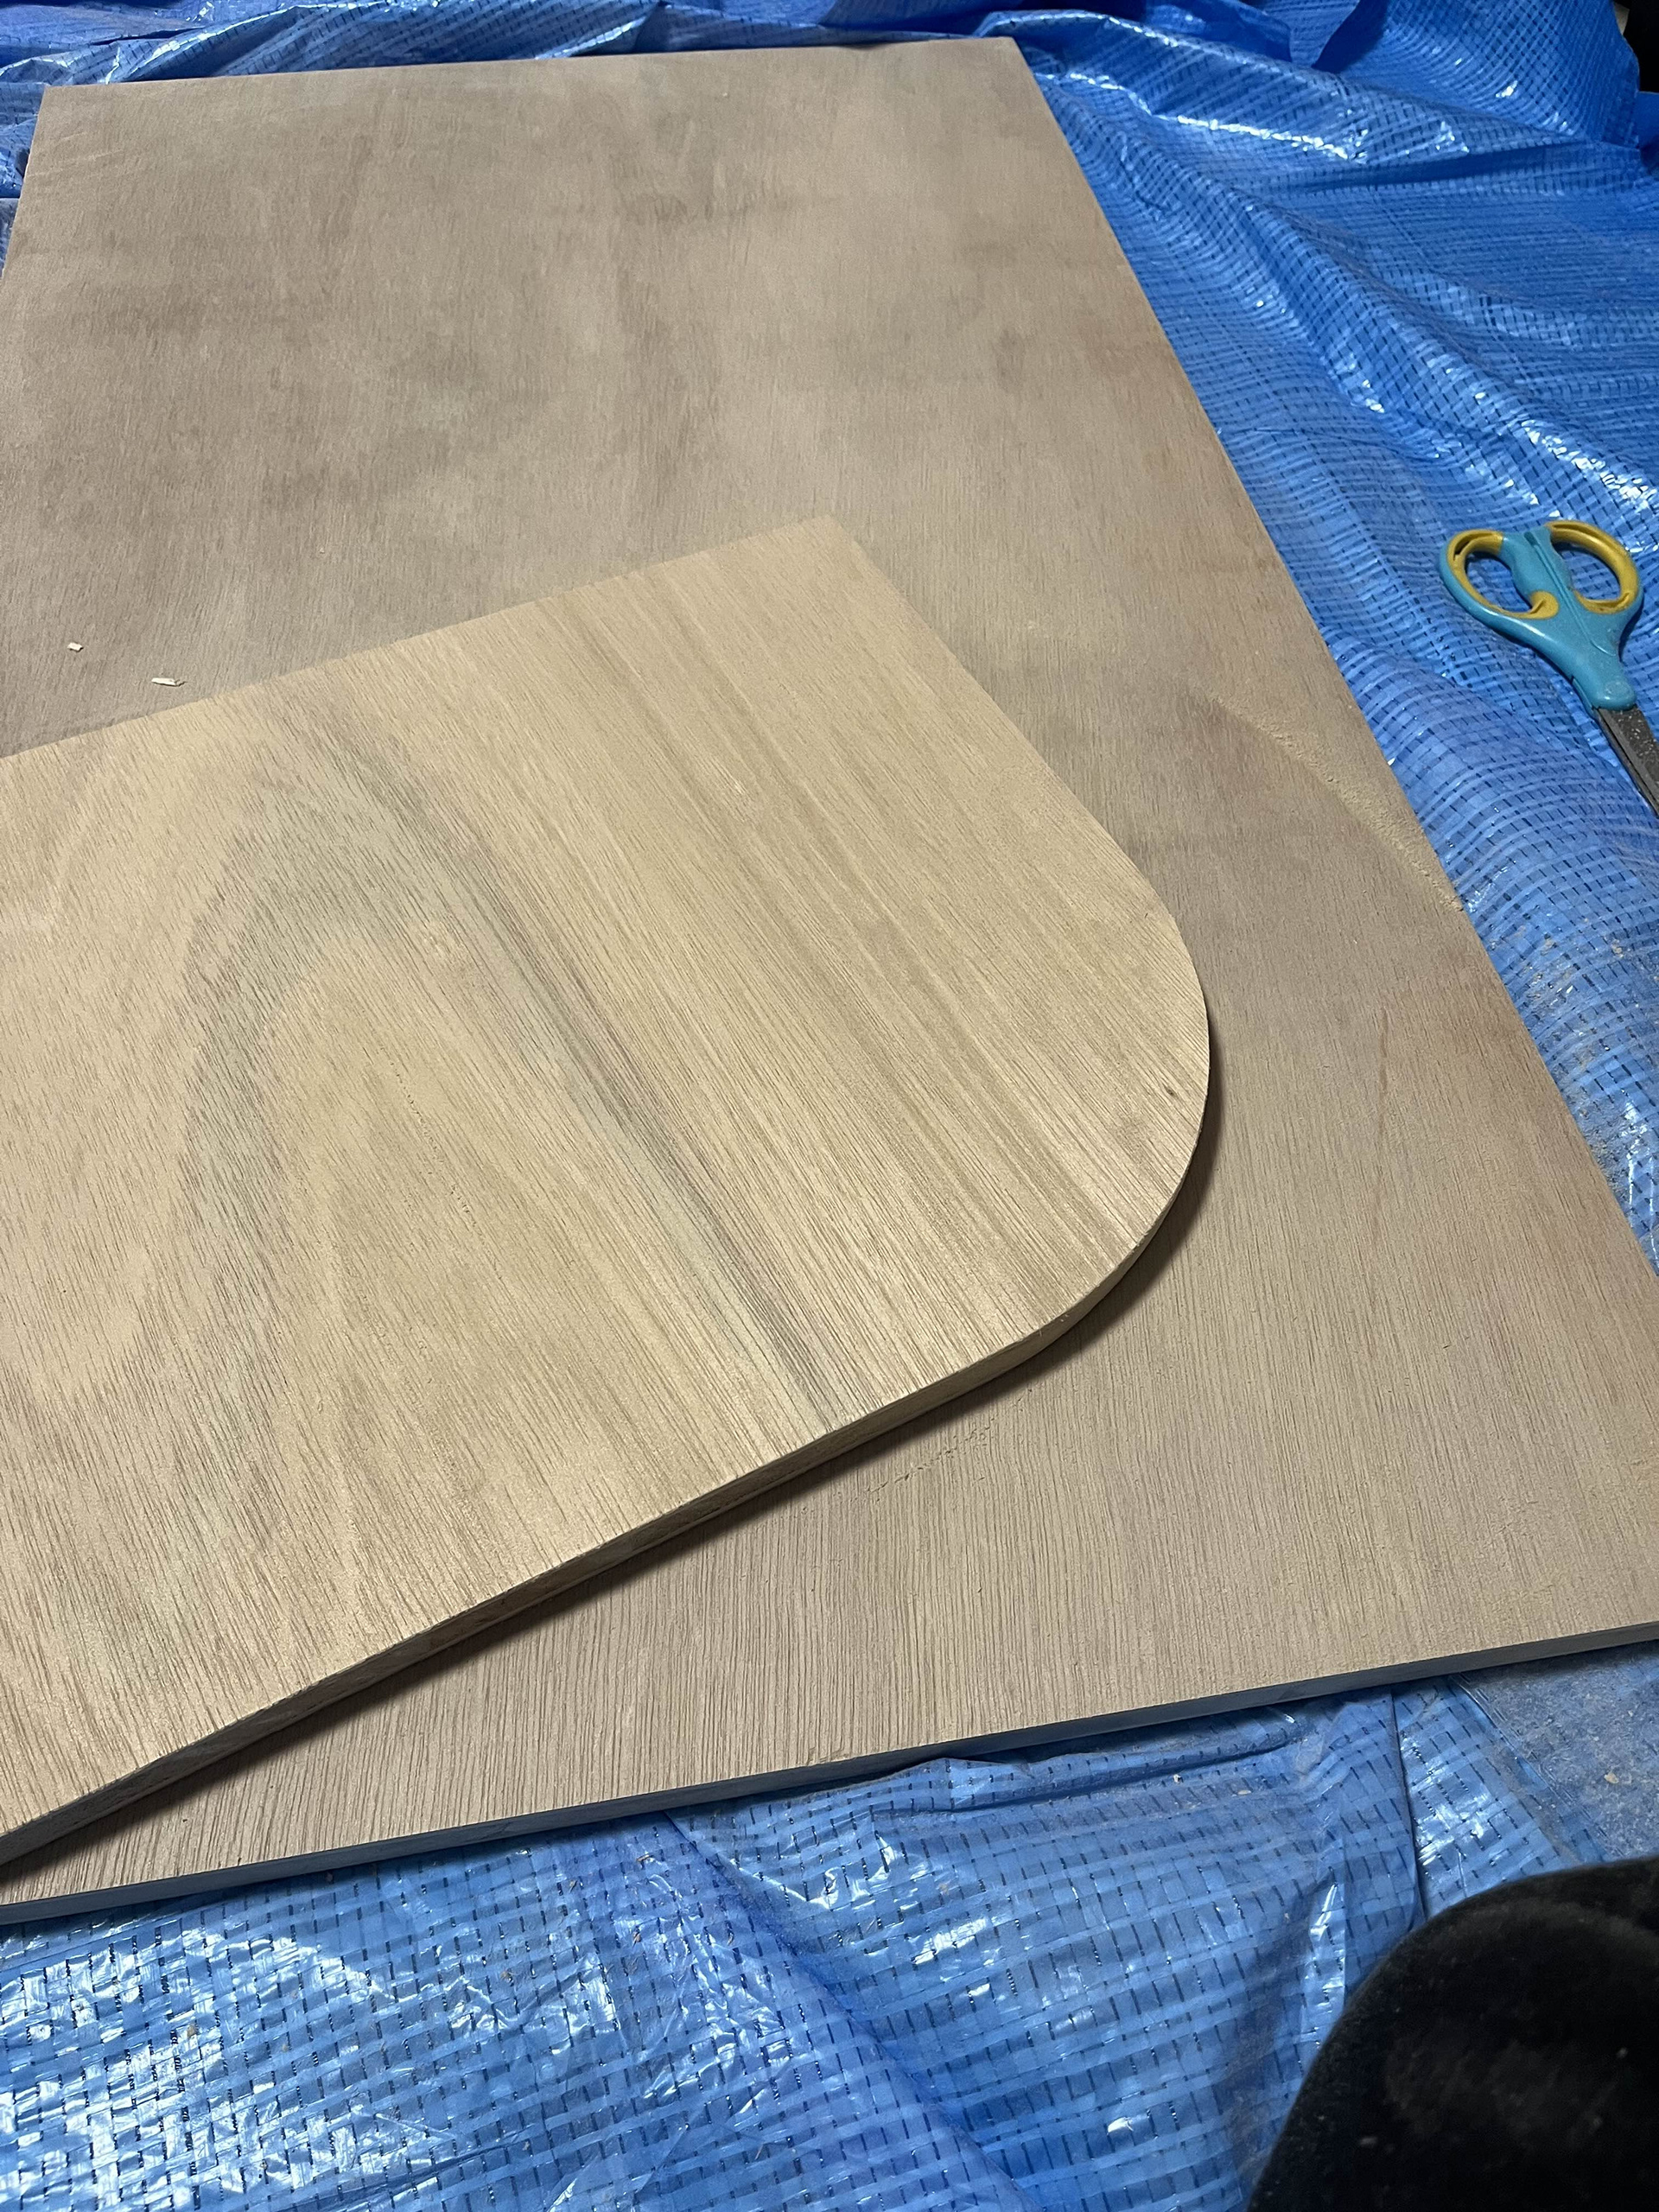
角を丸くする、ヤスリがけ
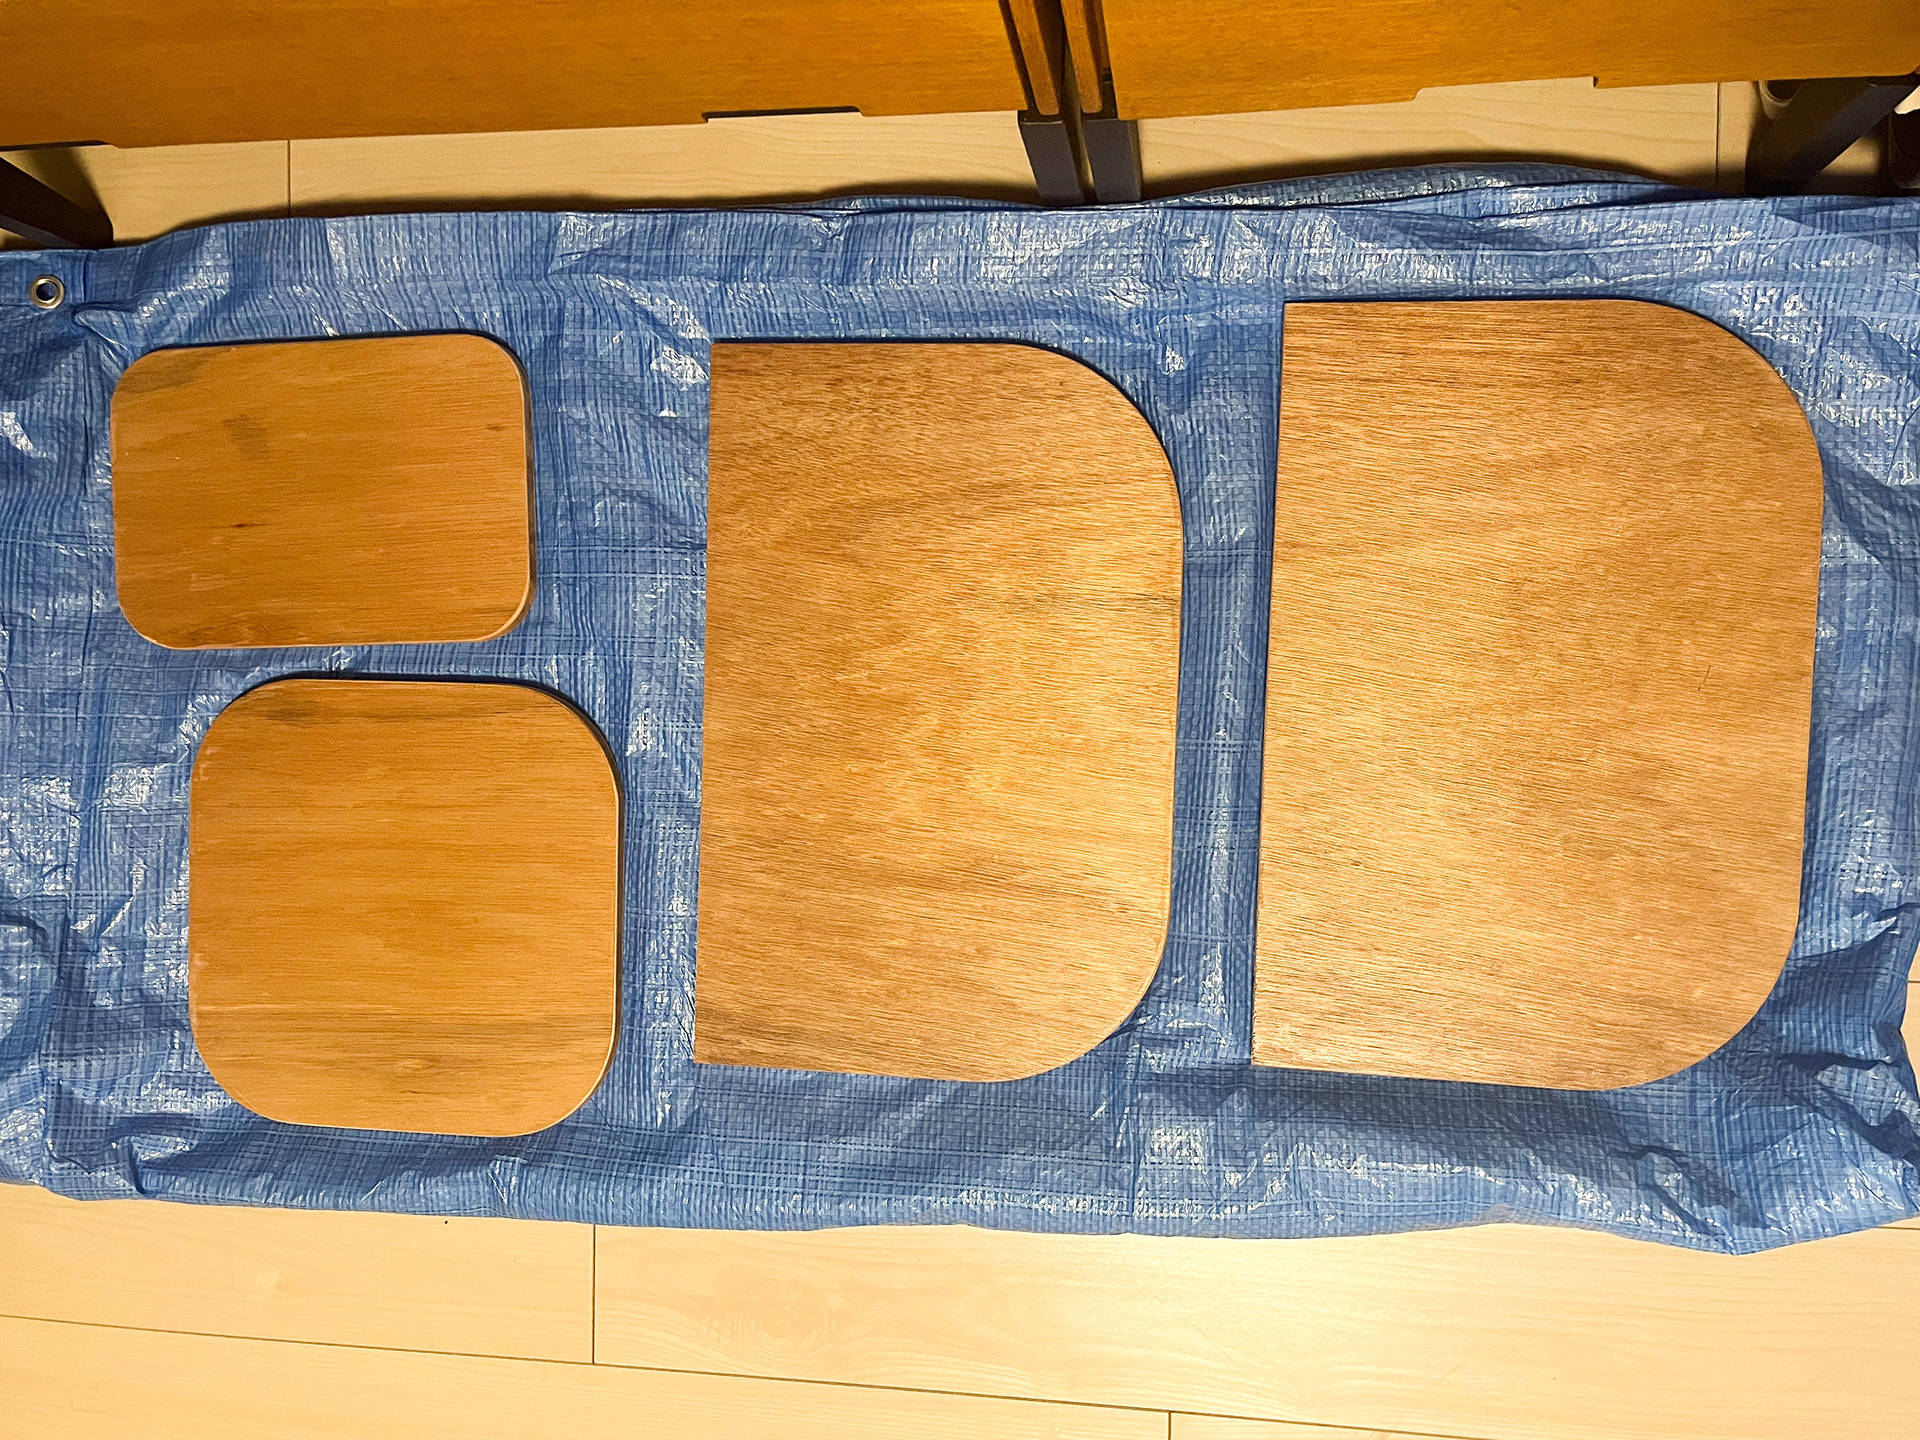
サンディングシーラーで表面加工
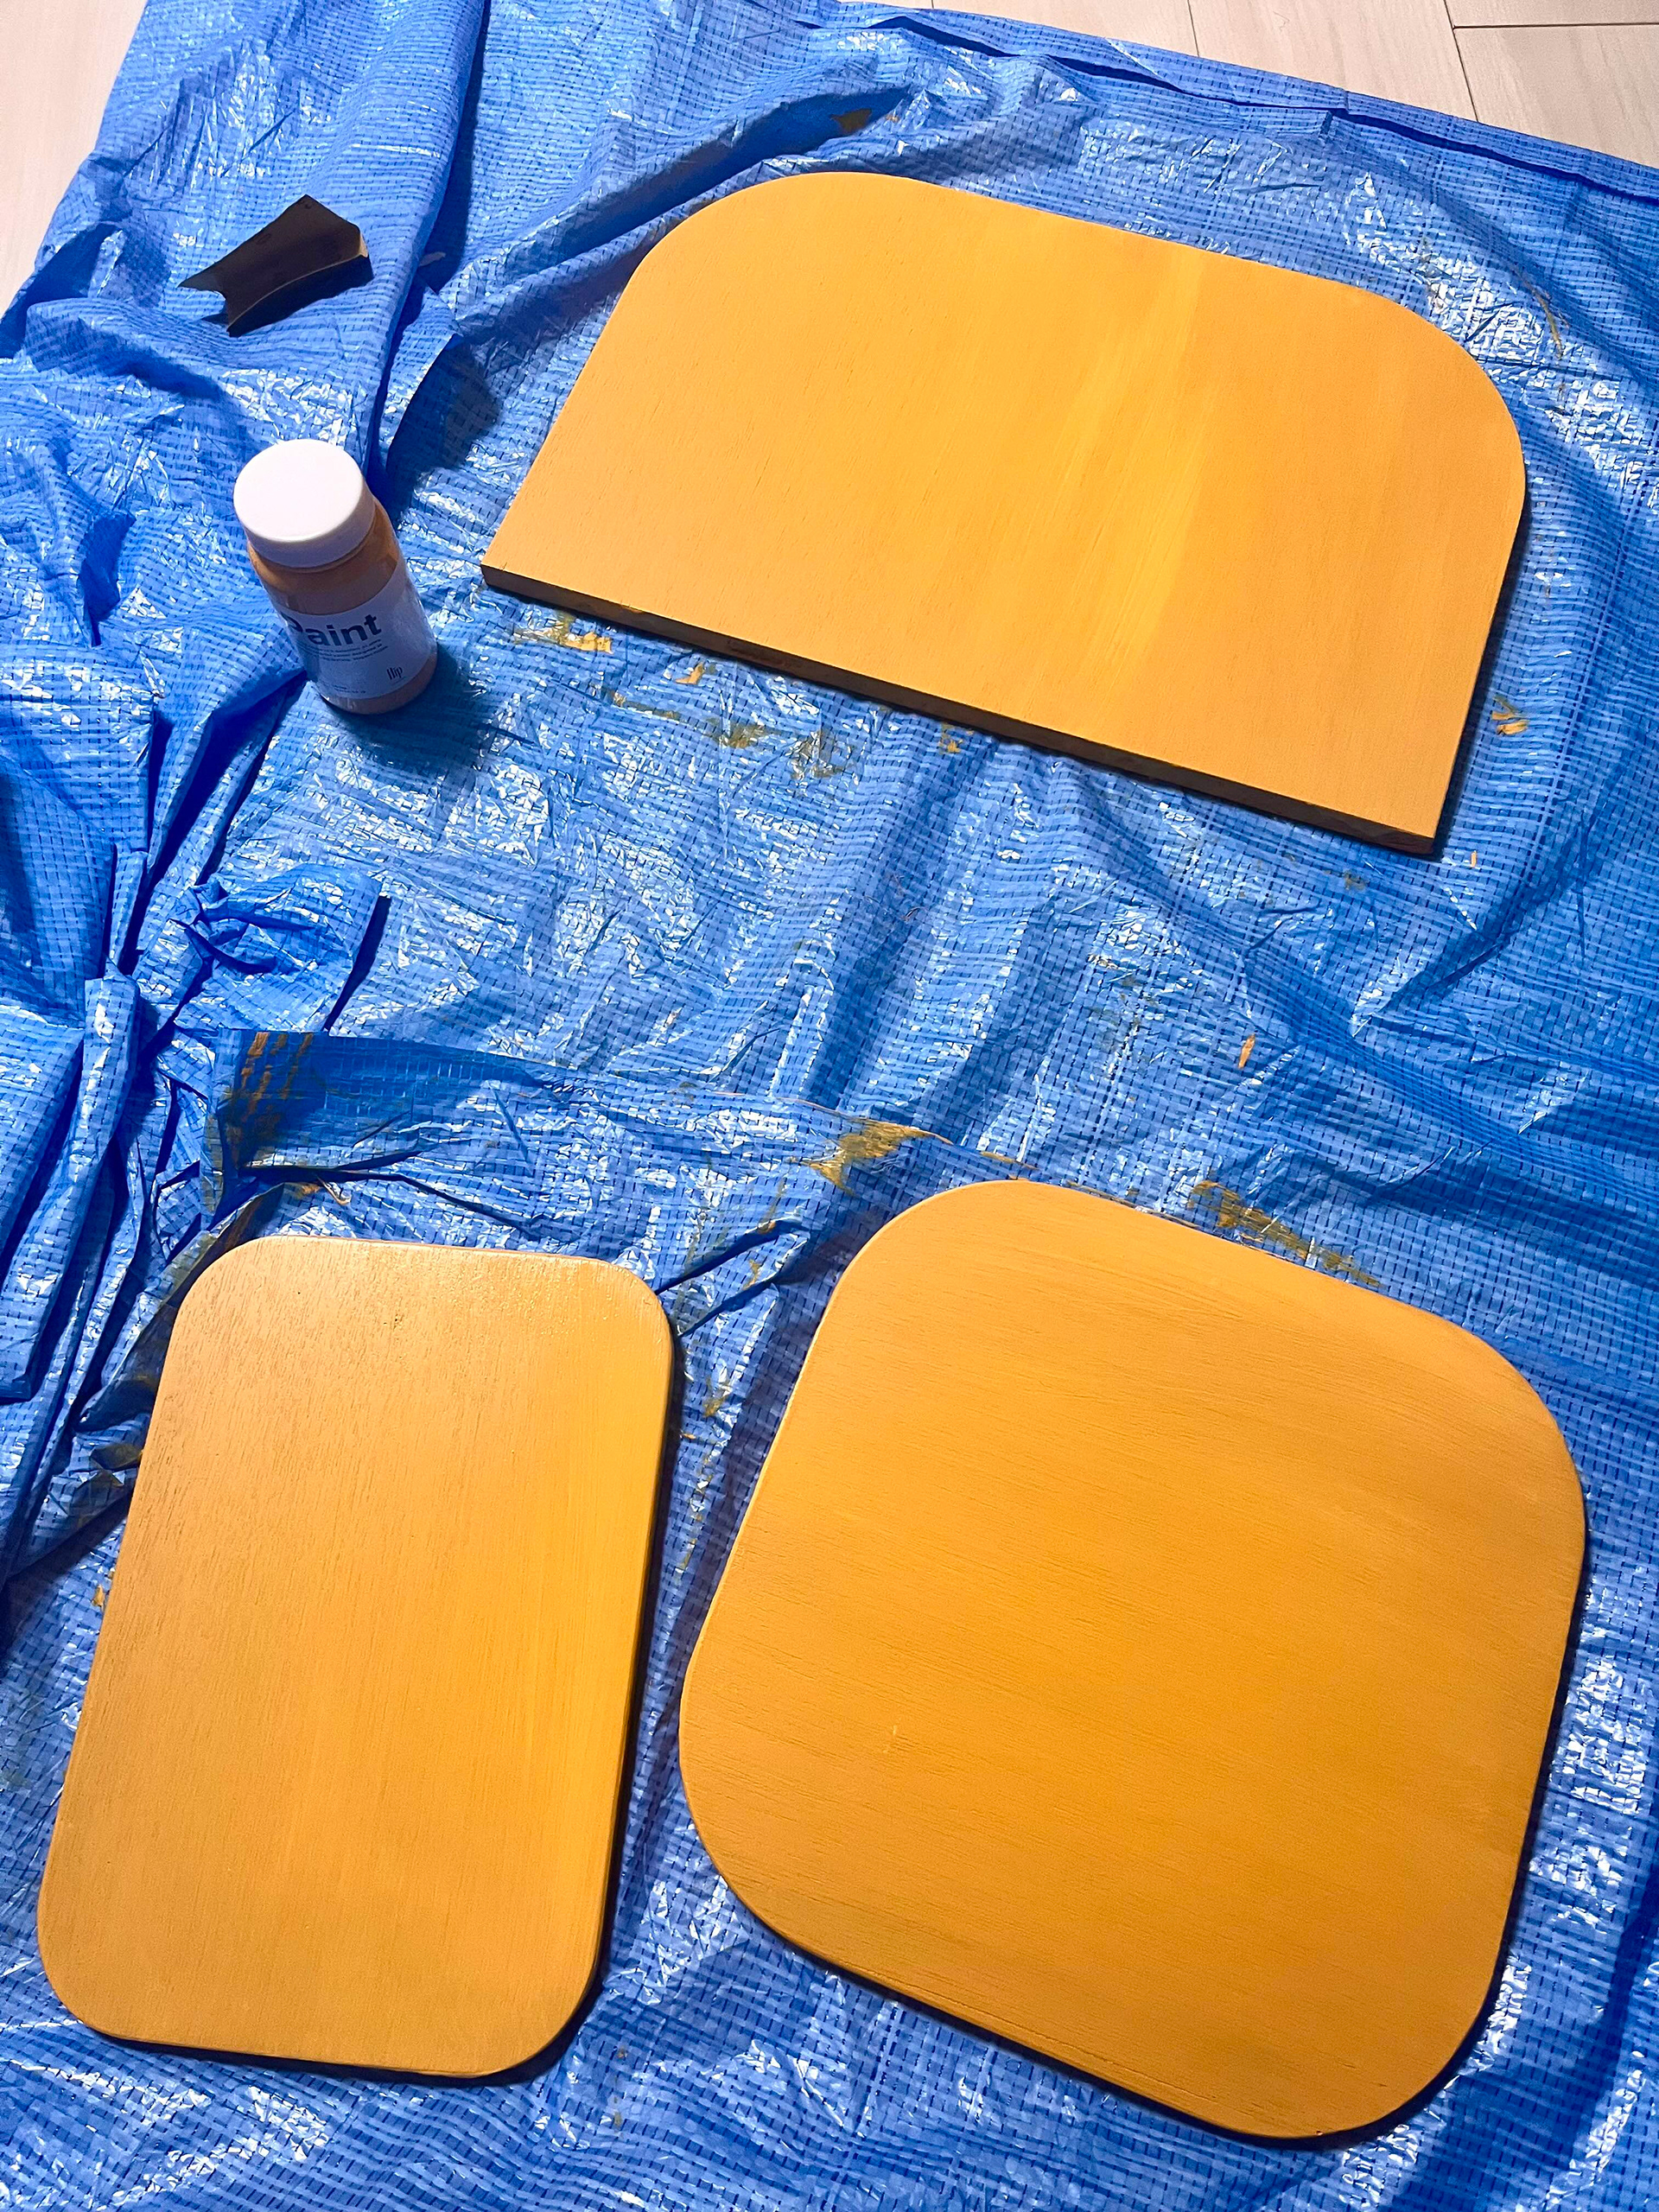
塗料でカラーリング
木材は事前に必要なサイズにカットしてもらったものを使用しています。
骨組みとなるイレクターパイプも事前に業者さんの方で必要な長さにカットしてもらいました。
※間違えたサイズのものはホームセンターで追加購入したり、微調整としてパイプカッターで手作業でカットしましたが、メチャクチャ大変なのでおすすめしません泣
角を丸くする(ノコギリで相棒がひとつひとつめちゃくちゃきれいに切ってくれたけど多分神業)→やすりがけ(2種類使ったかな?絶対賃貸のリビングで夜中にやることじゃないので良い子はまねしないでね泣)サンディングシーラーで表面加工(目当ての素材が手に入らなかったので毛羽立ちを抑える工程が増えました)→塗料でカラーリング(水性塗料を筆塗り数回)→ニス
骨組みとなるイレクターパイプも事前に業者さんの方で必要な長さにカットしてもらいました。
※間違えたサイズのものはホームセンターで追加購入したり、微調整としてパイプカッターで手作業でカットしましたが、メチャクチャ大変なのでおすすめしません泣
角を丸くする(ノコギリで相棒がひとつひとつめちゃくちゃきれいに切ってくれたけど多分神業)→やすりがけ(2種類使ったかな?絶対賃貸のリビングで夜中にやることじゃないので良い子はまねしないでね泣)サンディングシーラーで表面加工(目当ての素材が手に入らなかったので毛羽立ちを抑える工程が増えました)→塗料でカラーリング(水性塗料を筆塗り数回)→ニス
We use the wood had it cut to the necessary sizes before.
As for the Erector pipes, we had them pre-cut to the required lengths by the supplier.
※ We did have to buy a few extra pipes at the hardware store due to miscalculations, and even had to cut some by hand using a pipe cutter for minor adjustments… which I absolutely don’t recommend. It was so exhausting—seriously, please don’t try this at home (tears).
The corners were rounded off (my partner hand-sawed each one so beautifully it was basically wizardry), then we sanded everything down (I think we used two different grits?).
Definitely not something you should be doing in a rental apartment living room at midnight—so kids, please don’t copy us...
Since we couldn’t get the exact material we wanted, we had to add an extra step to reduce the fuzziness: applying sanding sealer.
Then we hand-painted everything with water-based paint (several coats with a brush), and finally finished it off with a clear varnish.
あとはジョイントをそれぞれ取り付けて、組み立てるだけ!
(…それも、まぁまぁ大変だったんだけど!笑)
(…それも、まぁまぁ大変だったんだけど!笑)
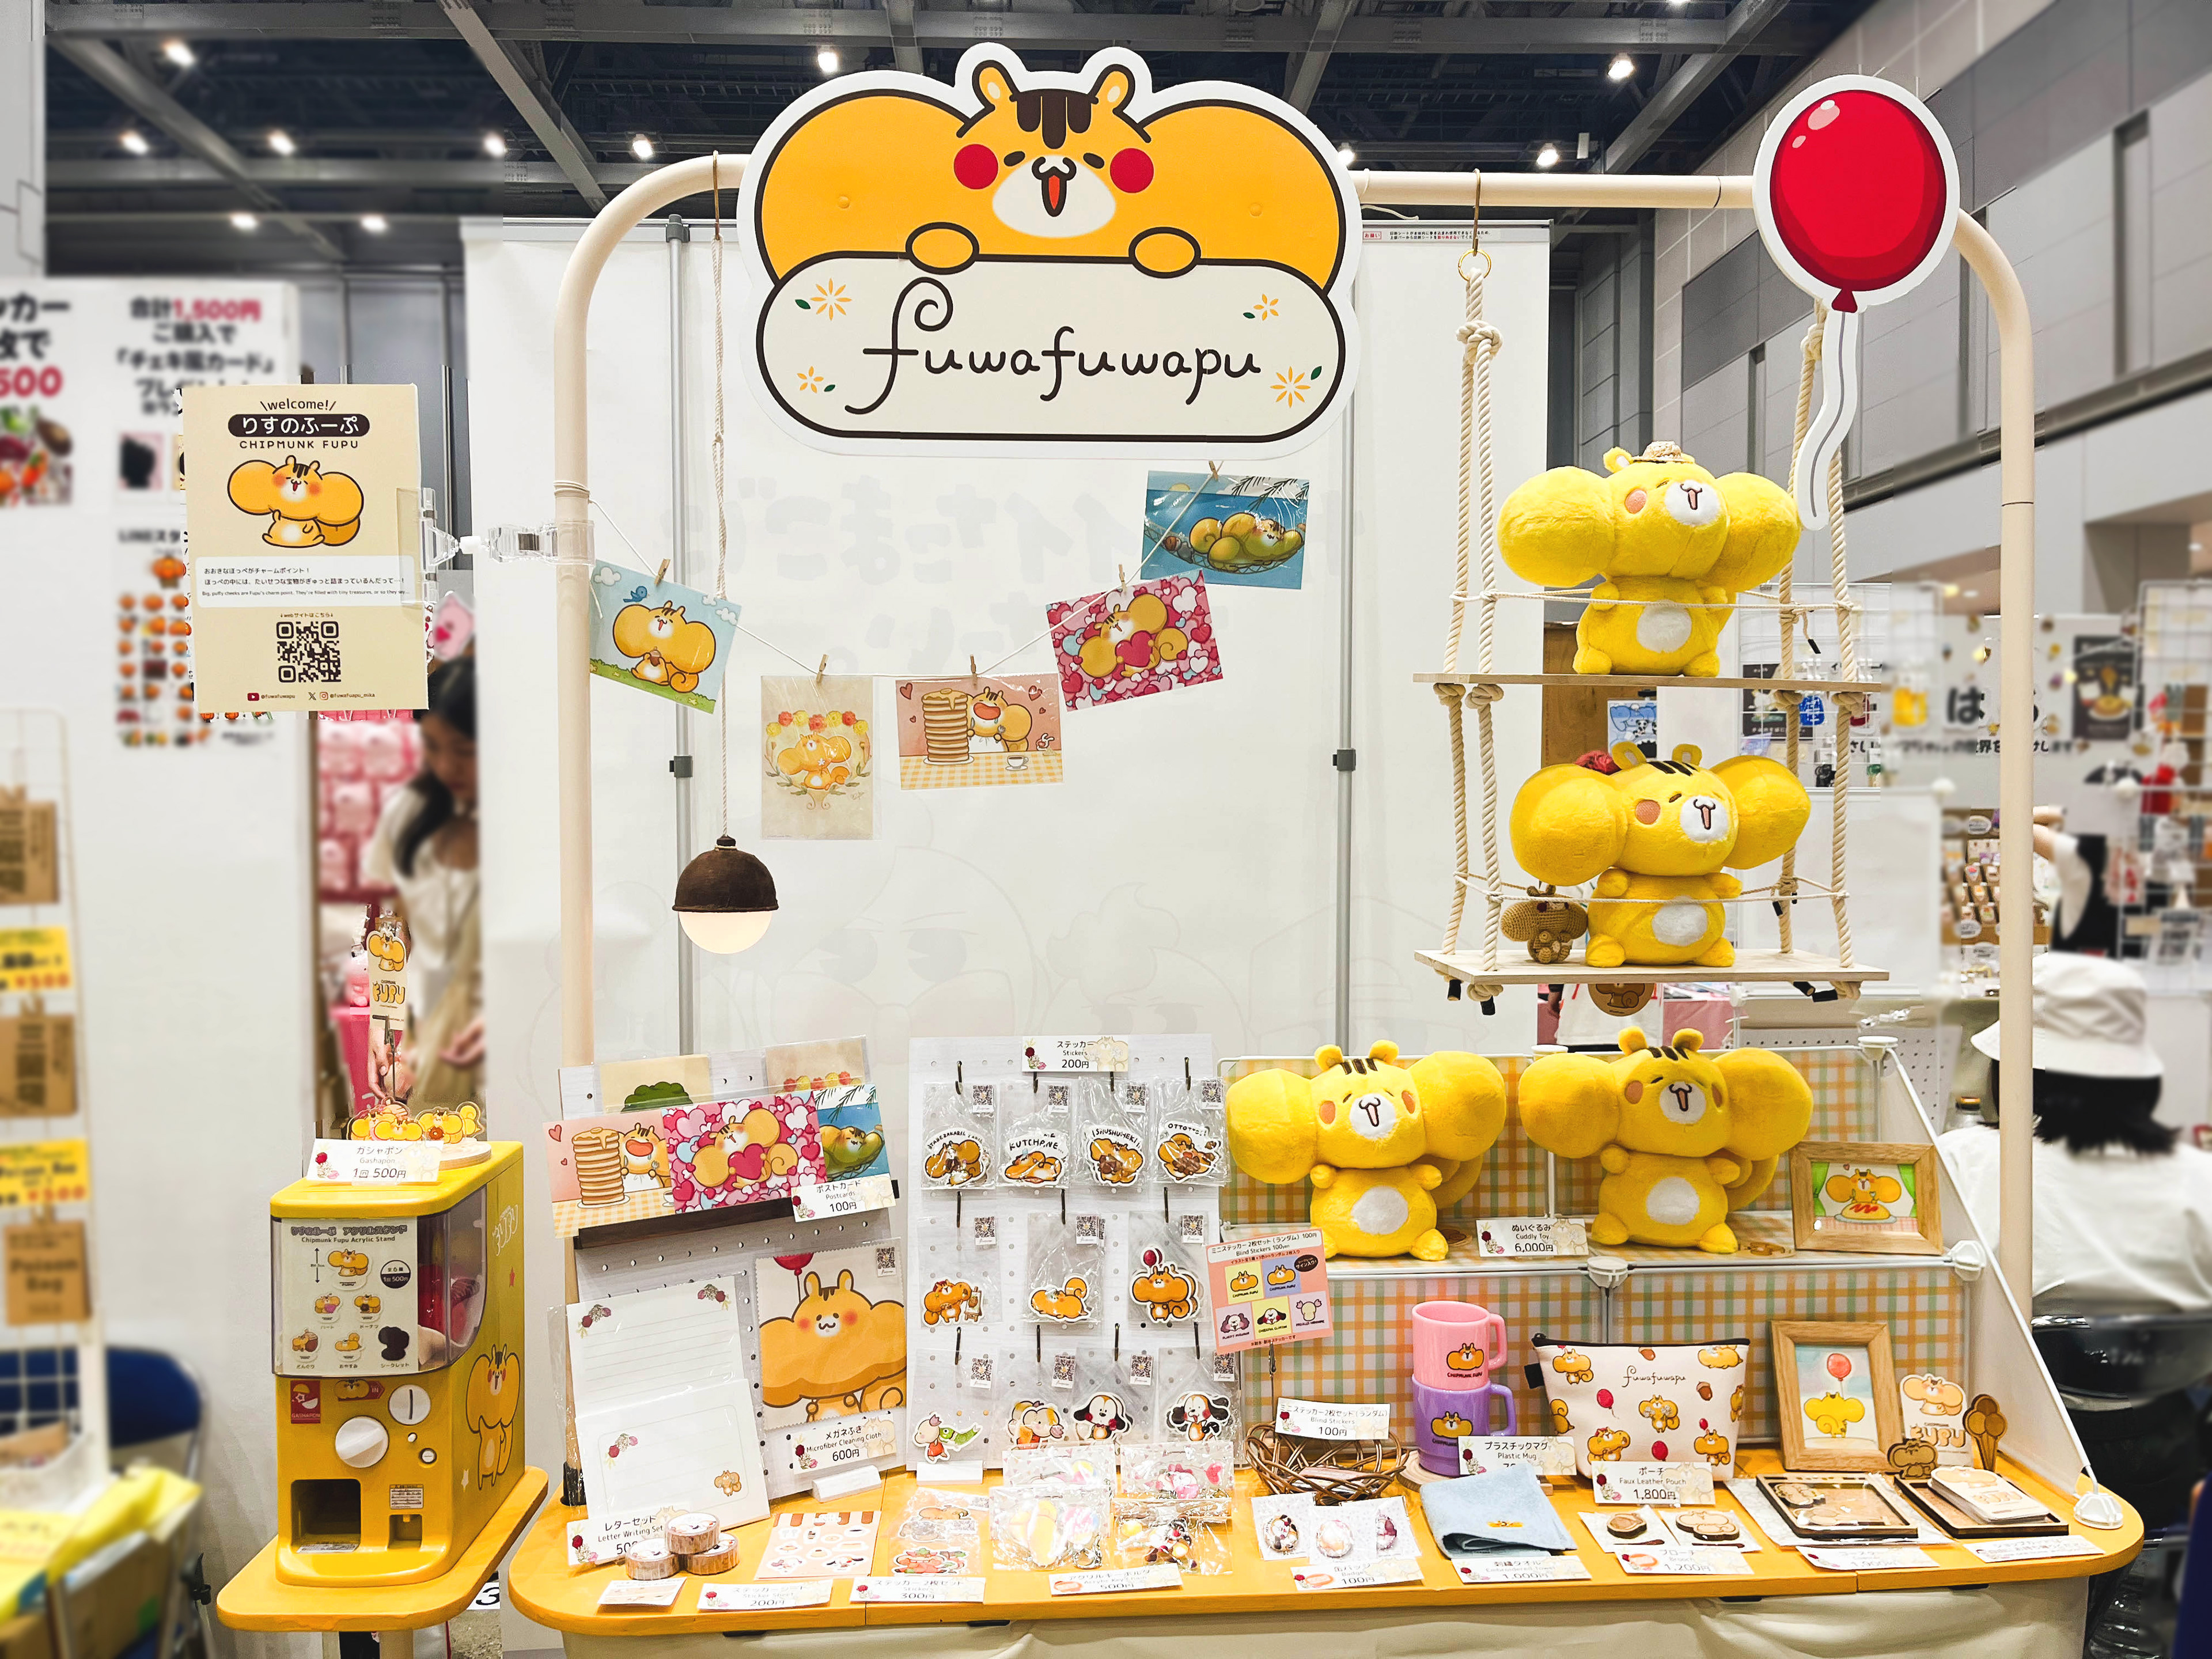
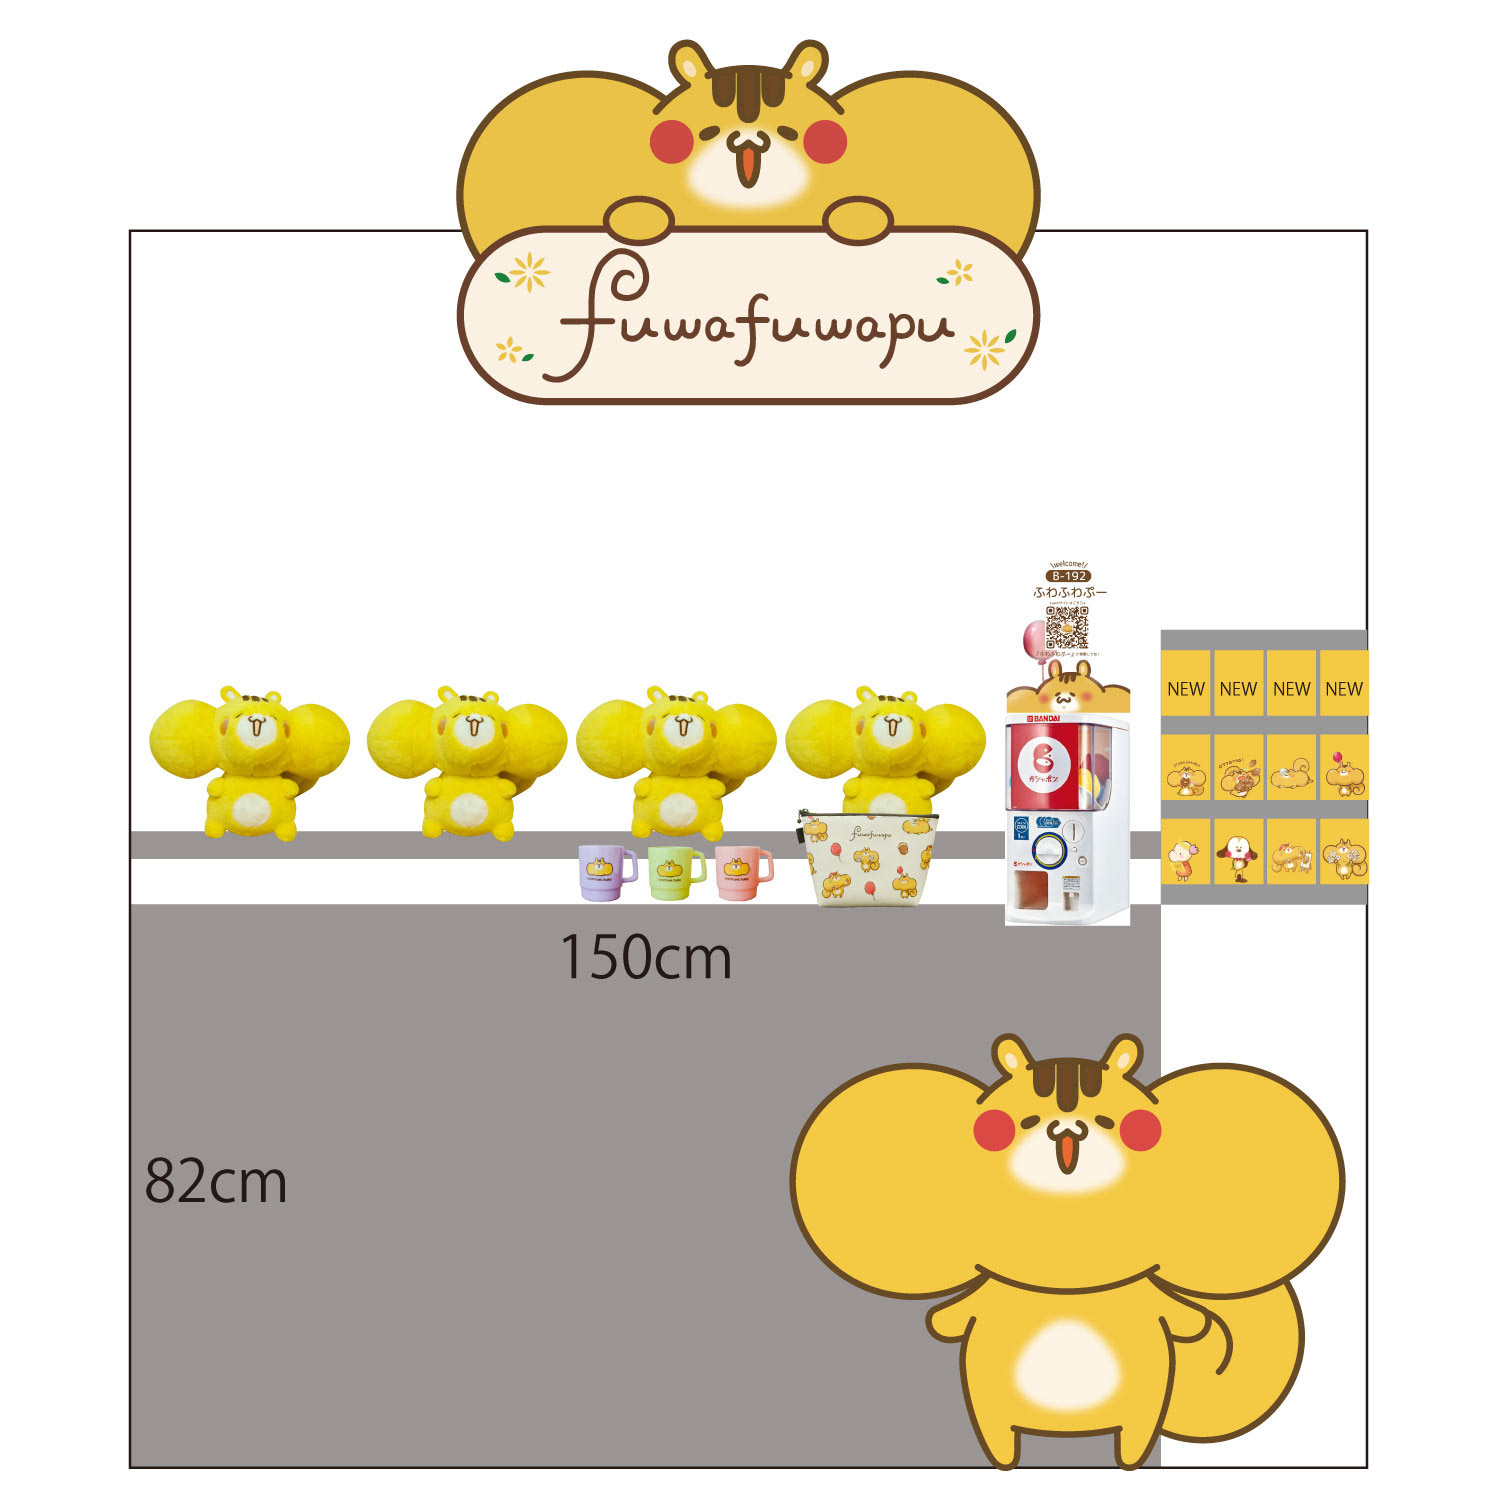
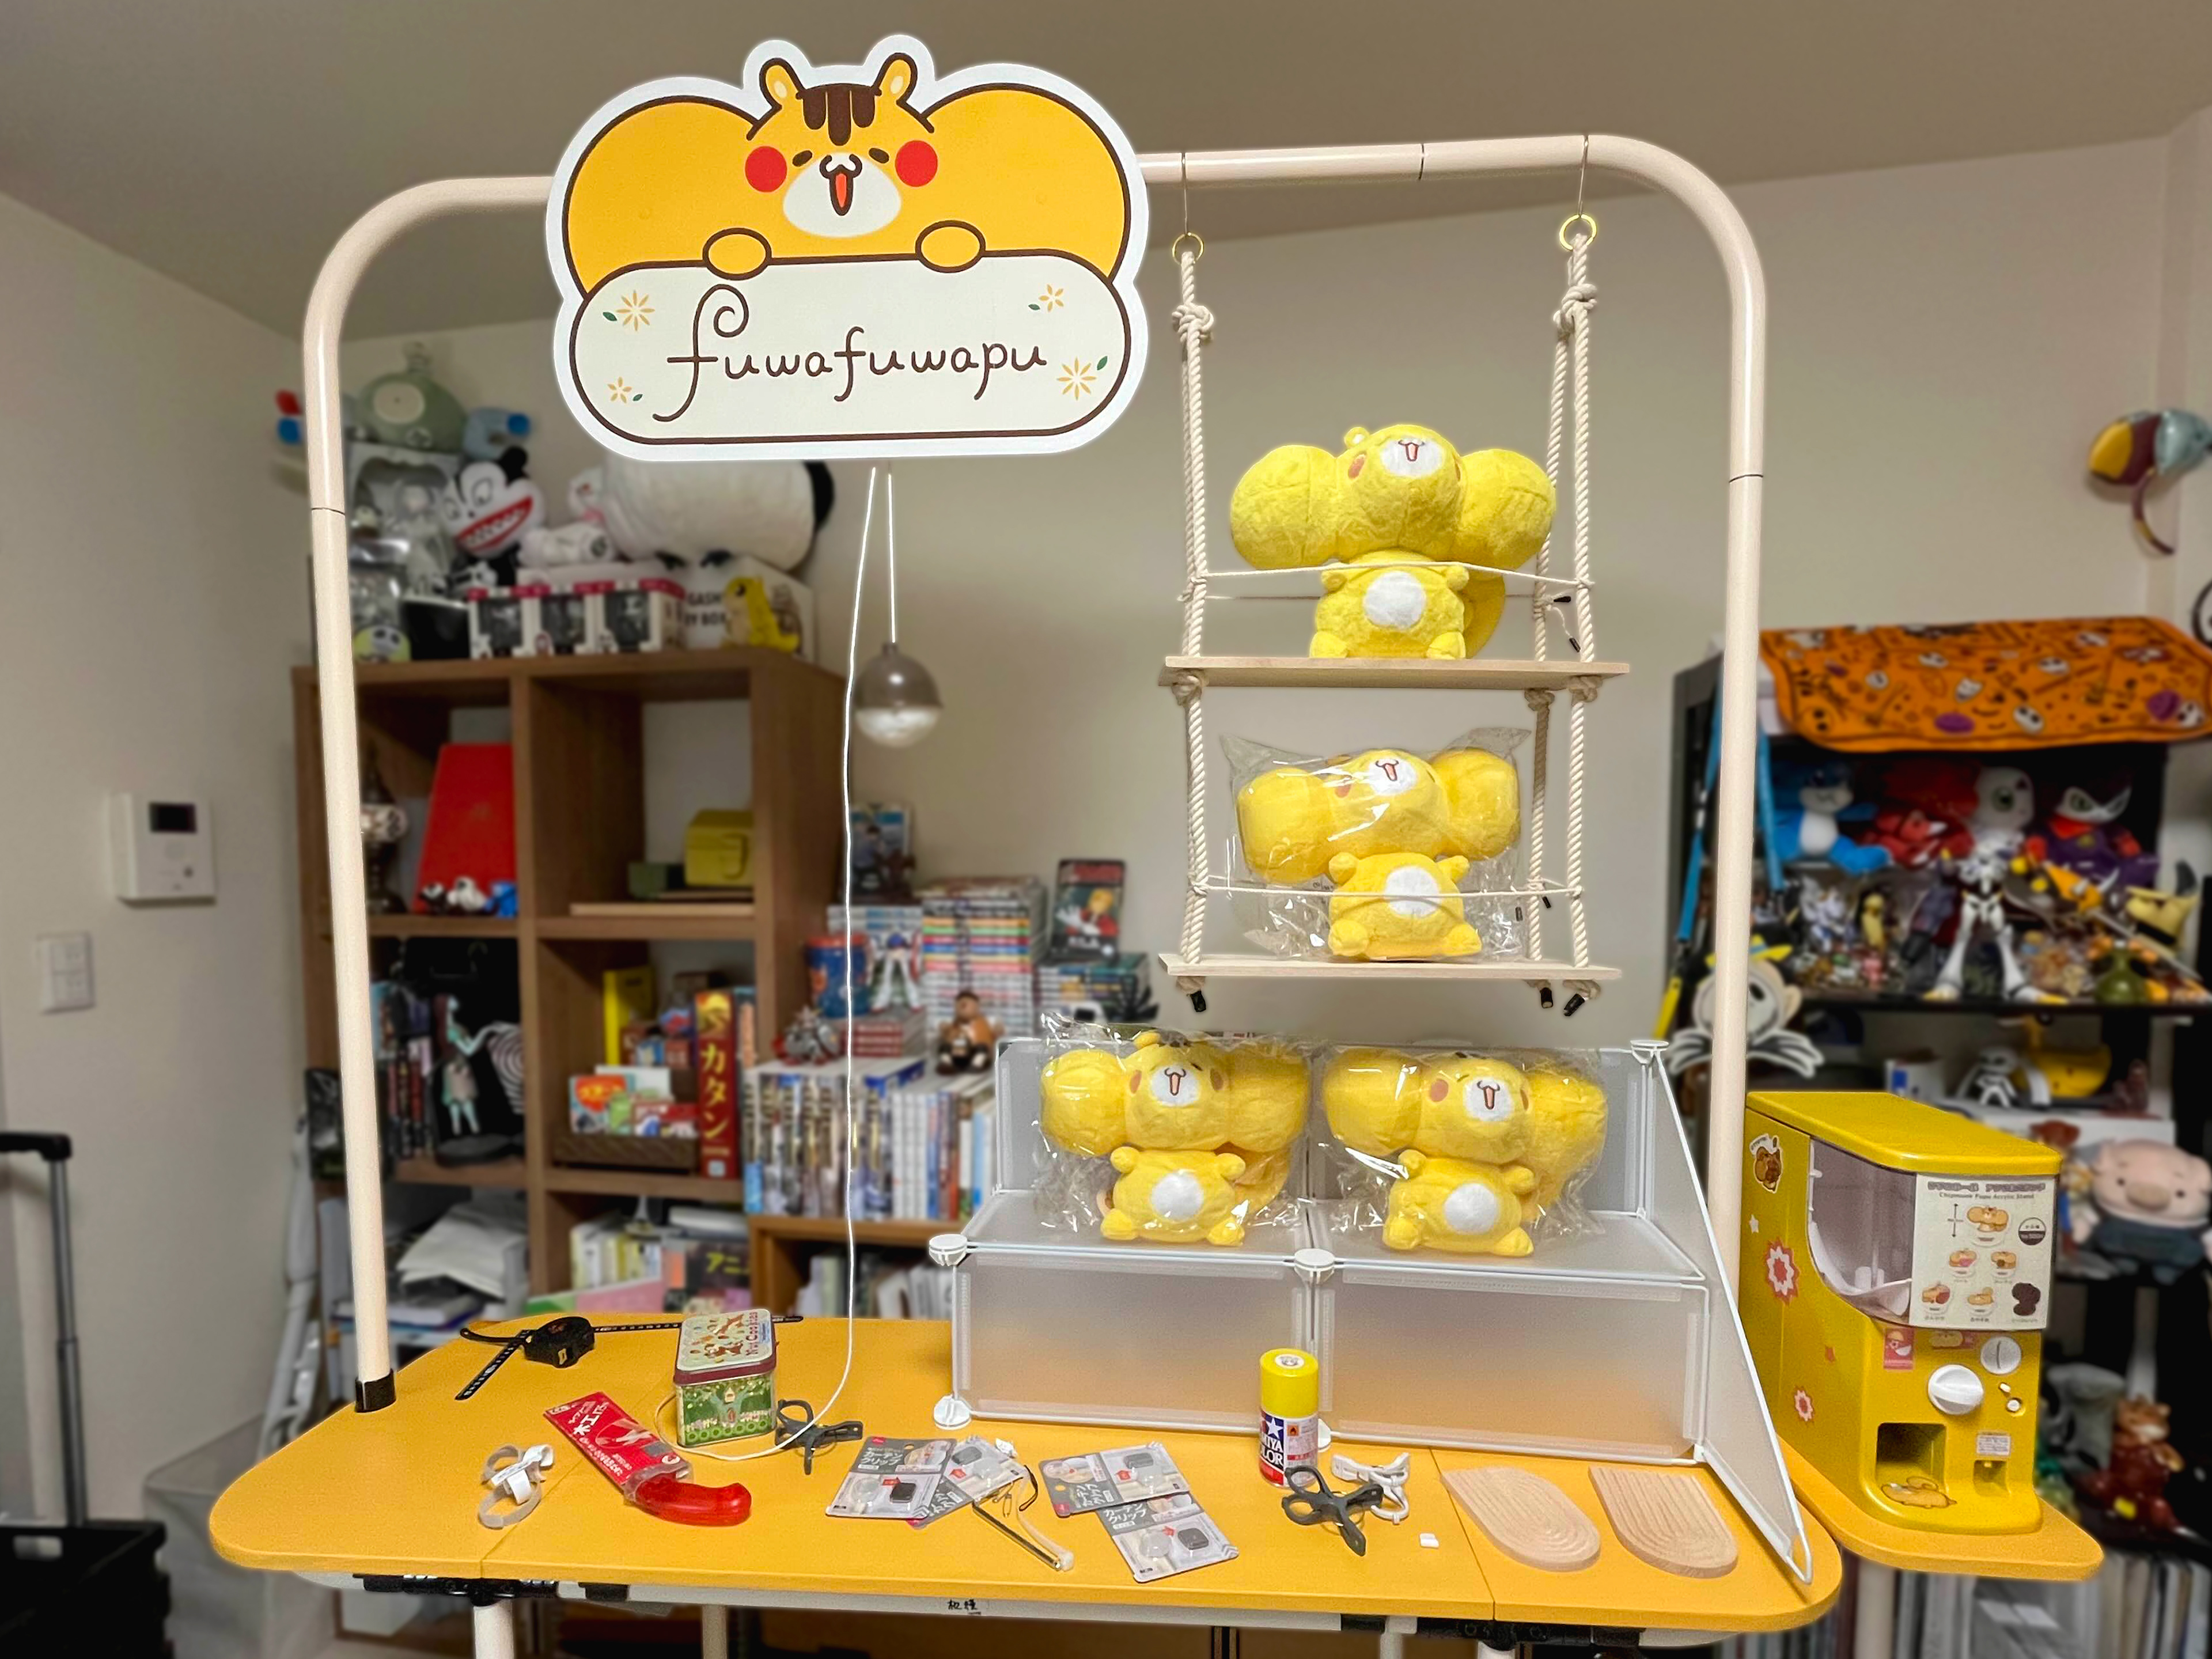
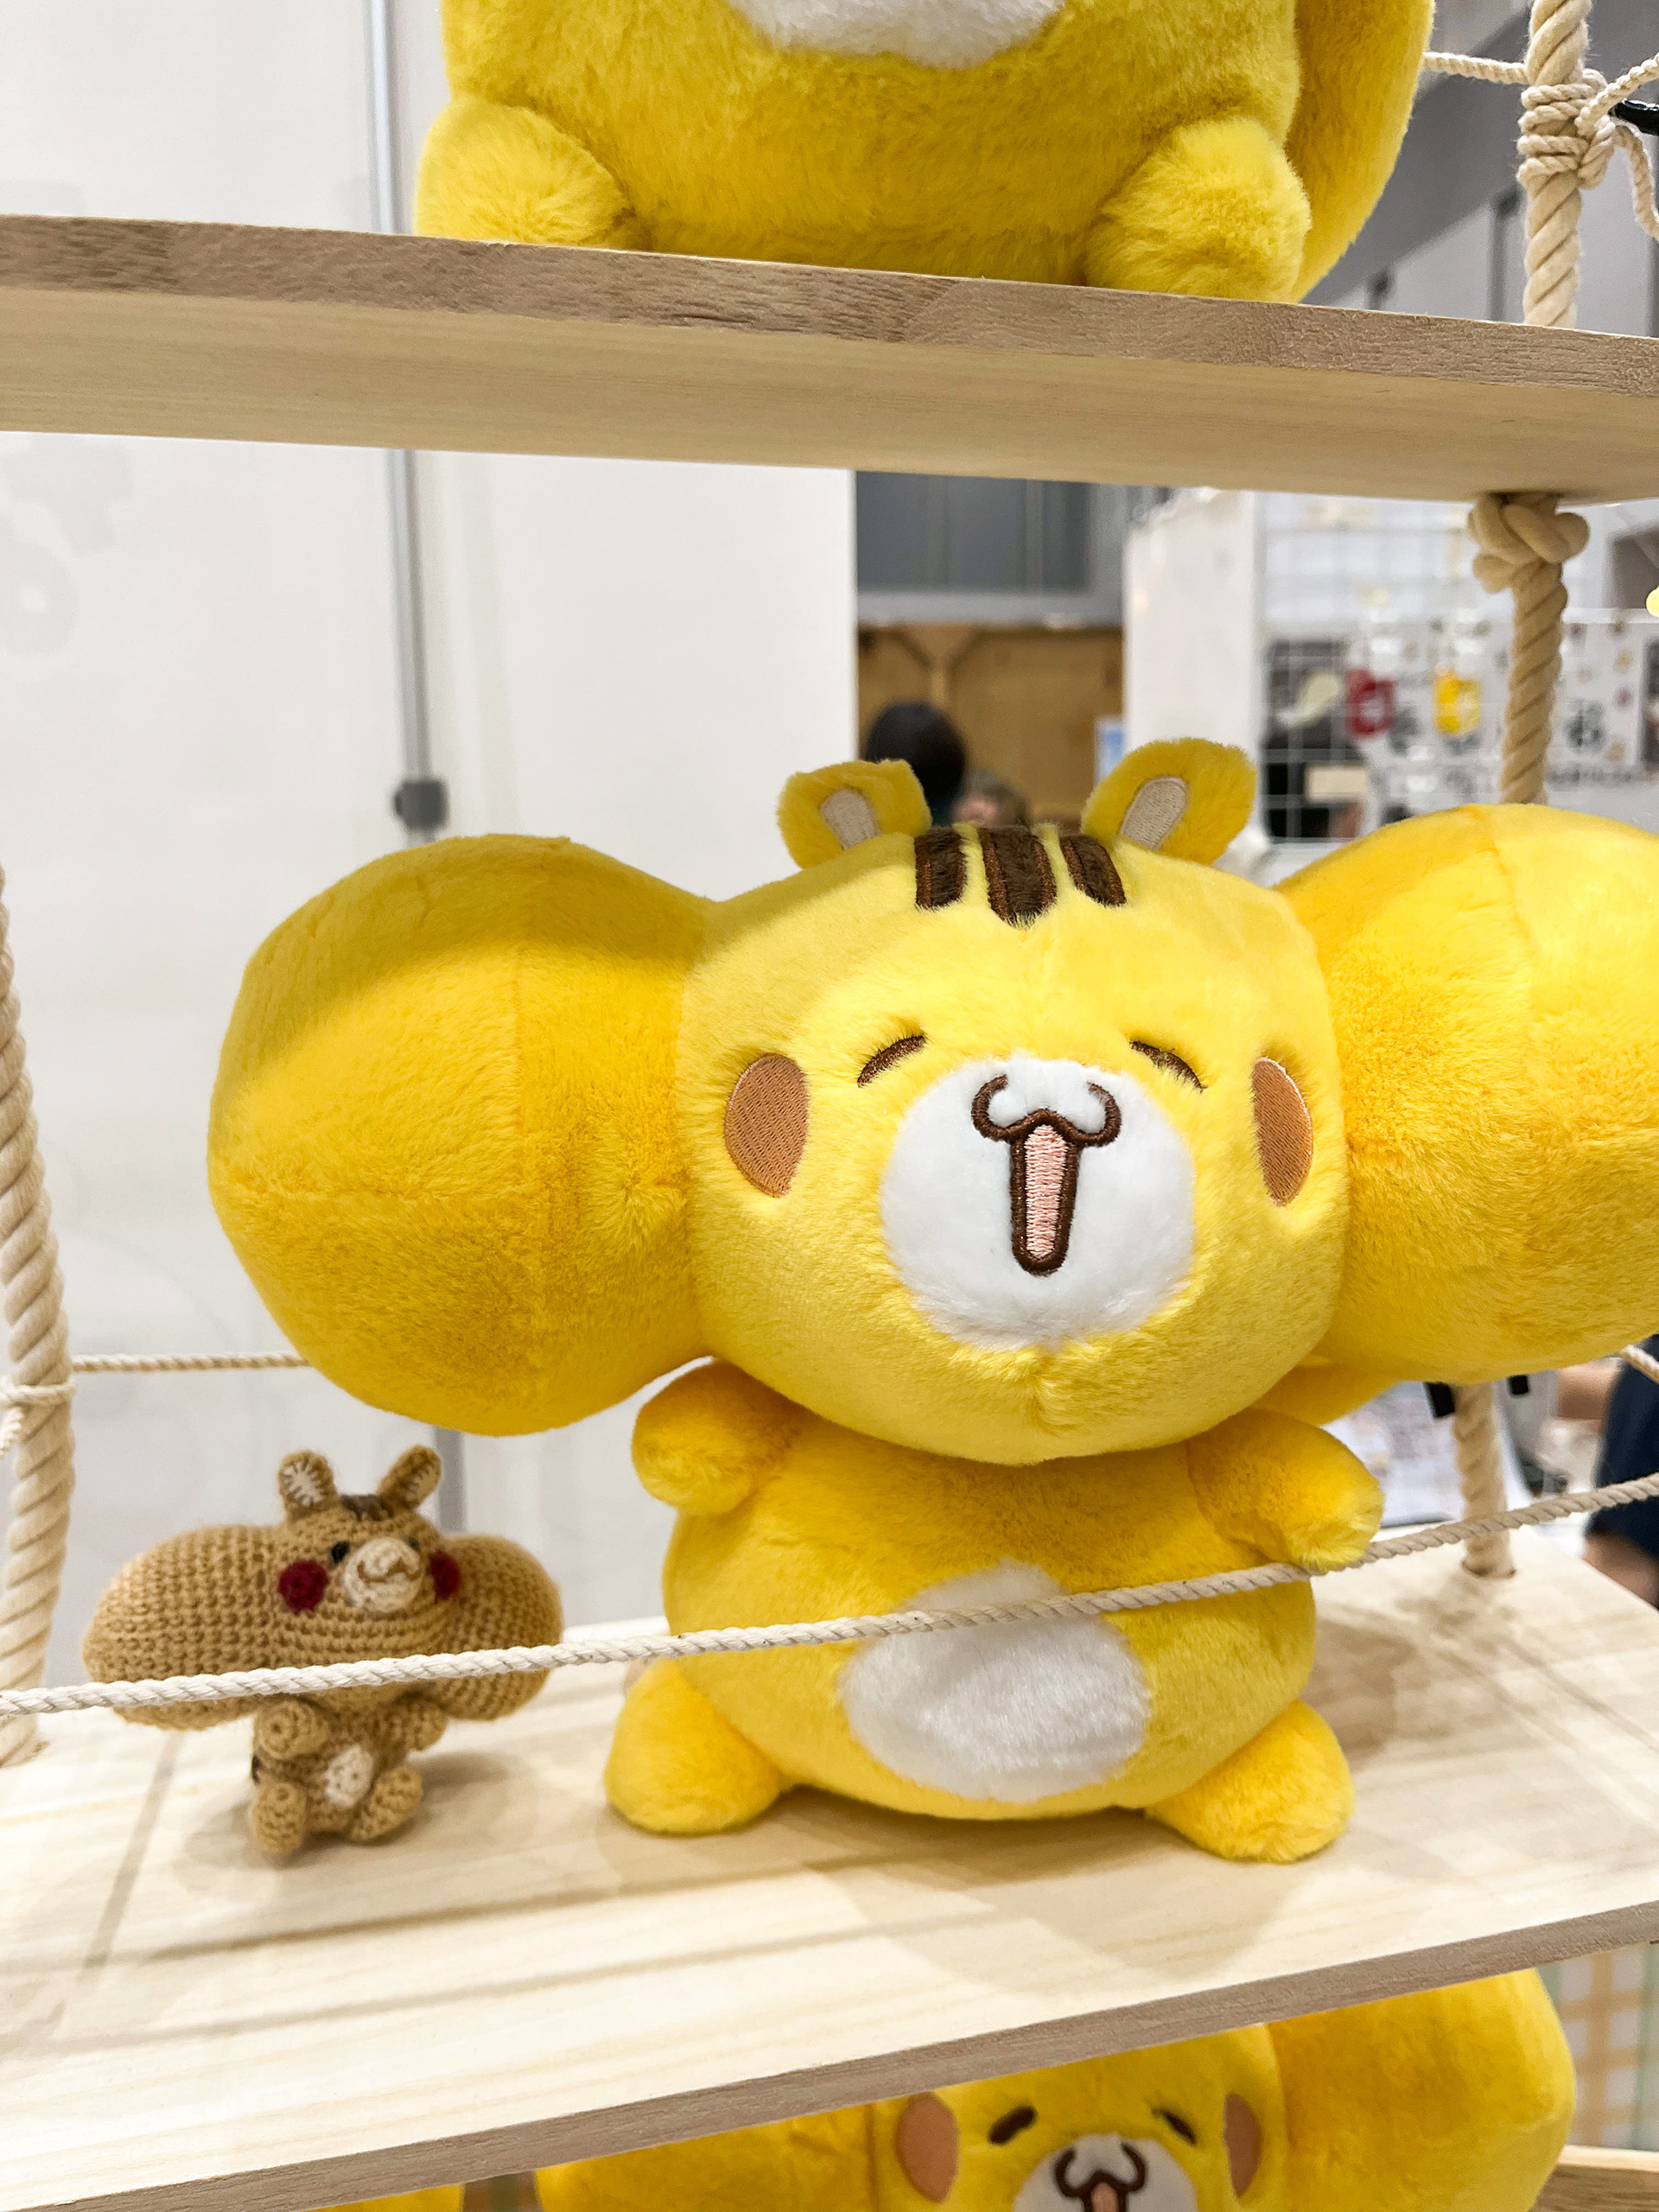
ふわふわぷーらしく、角の少ない、まる〜い印象のブースに仕上がりました!
お部屋の写真、ちょっと散らかっててごめんなさい…物が多すぎて「なにもない白壁」が存在しません…!笑
お部屋の写真、ちょっと散らかっててごめんなさい…物が多すぎて「なにもない白壁」が存在しません…!笑
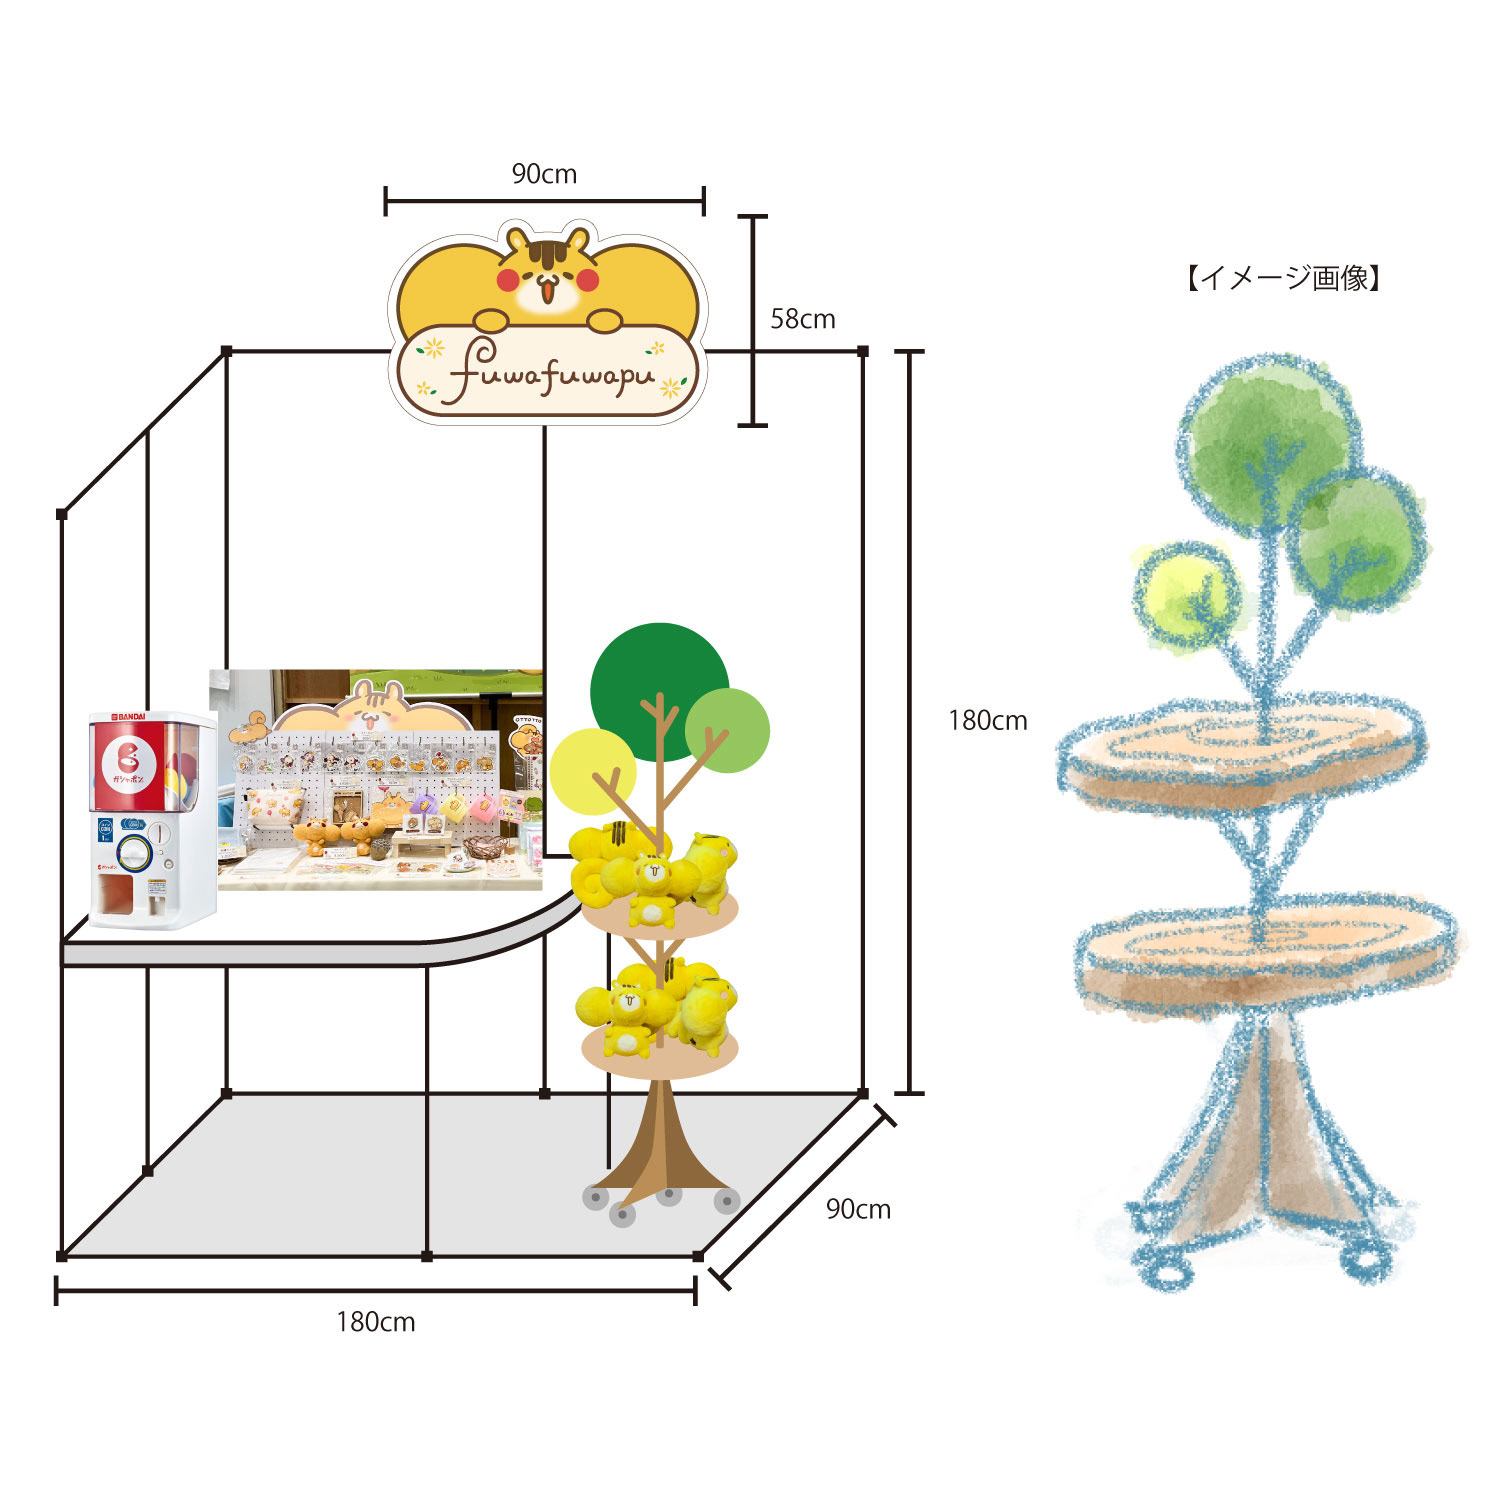
最後まで悩んでいたのは、ぬいぐるみに高さを出す方法。
試行錯誤の末、100均パネルを組み合わせてひな壇を作り、
さらに即席のブランコも設置してみました!
試行錯誤の末、100均パネルを組み合わせてひな壇を作り、
さらに即席のブランコも設置してみました!
その結果、注目度アップ! 陳列できる数もUP!に成功★
All that was left was attaching the joints and putting everything together!
(…Which, to be honest, was pretty hard too. lol)
(…Which, to be honest, was pretty hard too. lol)
The booth turned out just like fuwafuwapu—soft, rounded, and gentle in design!
Sorry the photos are a bit messy—
my room is so full of stuff, there's not a single plain white wall in sight!
Sorry the photos are a bit messy—
my room is so full of stuff, there's not a single plain white wall in sight!
One thing I really struggled with until the end was how to give the plushies some height.
After lots of trial and error, I made a tiered display using panels from the 100-yen shop,
and even set up a little swing on the spot!
After lots of trial and error, I made a tiered display using panels from the 100-yen shop,
and even set up a little swing on the spot!
As a result—more visibility, more cuteness, and more display space! ★
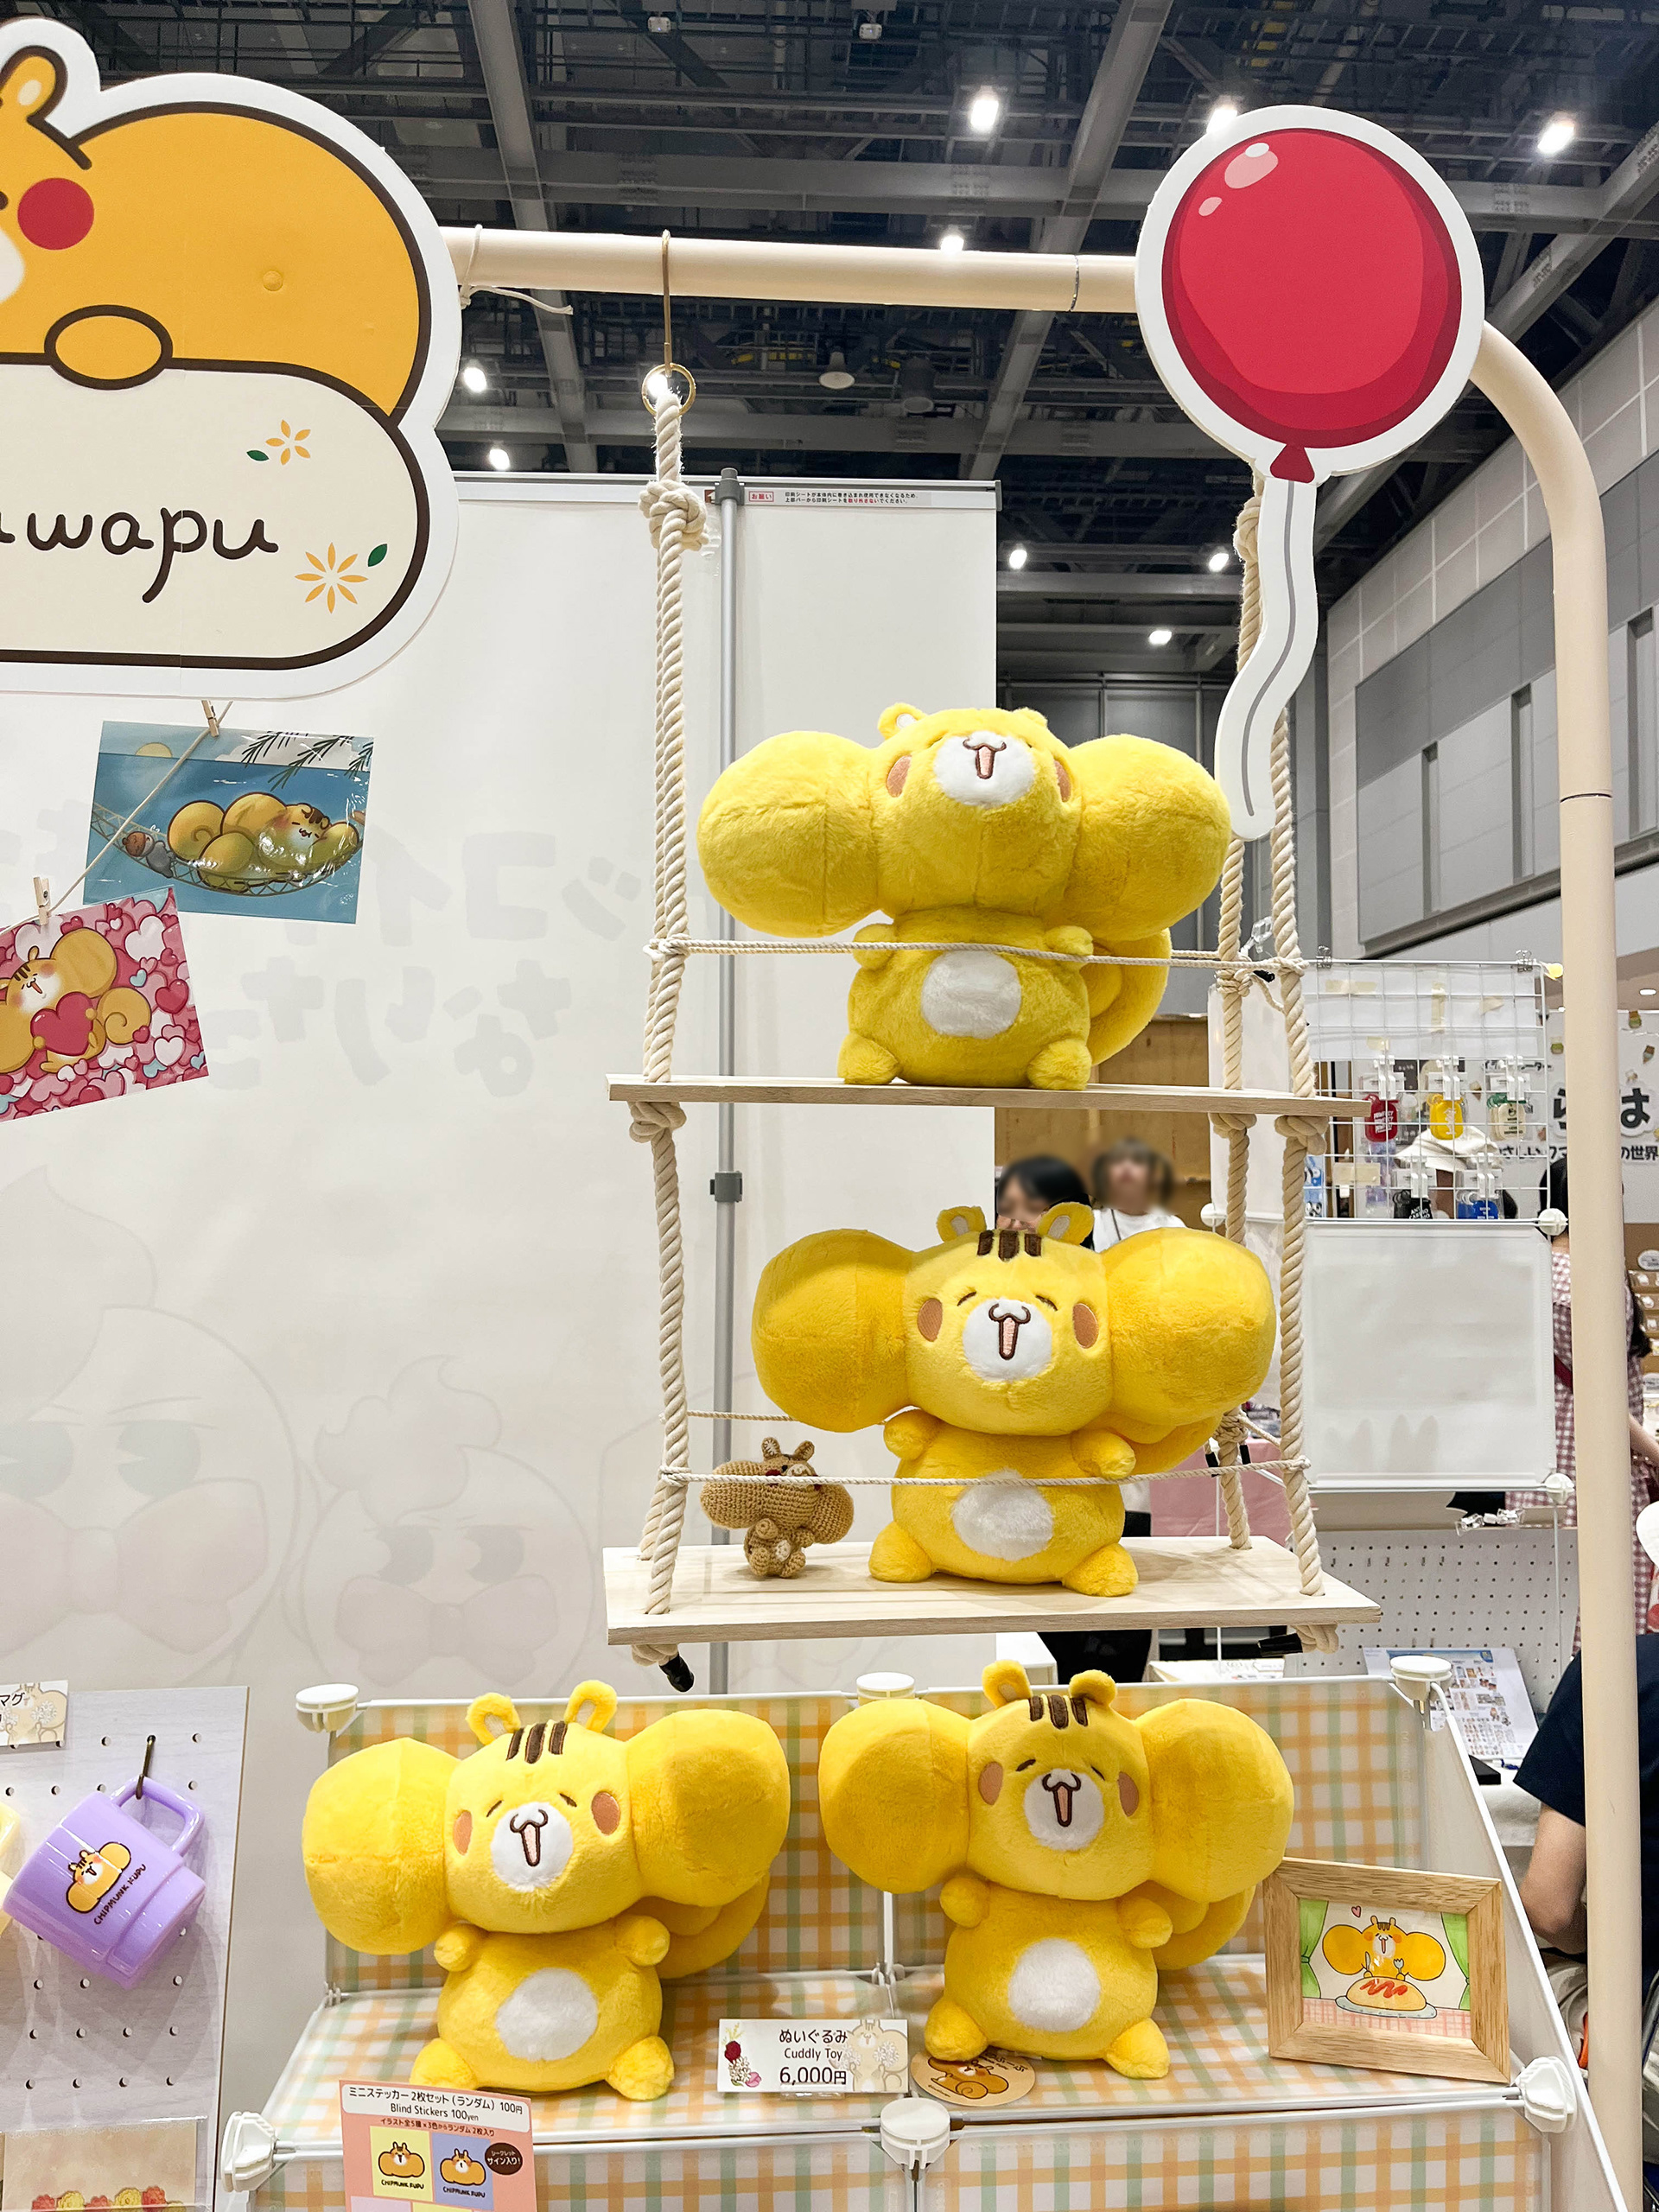
ブランコ
ブランコ
以下まとめです!
以前から使っているもの
・有効ボード(100均の板とオプションパーツ)
・防炎布(ネットで買った無地のもの)
新たに用意したもの
・机(カットサイズ指定で購入した板を着色、カット済みのイレクターパイプ、専用ジョイント)
・キャスター付き台(カットサイズ指定で購入した板を着色、カット済みのイレクターパイプ、キャスター)
・フリーマルチパネル(100均のものにオリジナルの模様を印刷した紙を裏張り)
・ブランコ(100均の板と自宅にあったロープ使用)
・どんぐりライト(IKEAのルームライトとホームセンターで購入した漏斗に布張り)
・看板、POP(でこタック)
以上のものを折りたたみキャリーカートひとつに入れて運びました。
まとめて持ち上げることもできるくらいの重量になりました。
組み立てはちょっとコツがいるけれど、長く愛用していきたいです!
Here’s a quick summary of everything!
Items reused from previous setups
・Perforated board (made with 100-yen store boards and accessory parts)
・Flame-retardant fabric (plain fabric purchased online)
・Perforated board (made with 100-yen store boards and accessory parts)
・Flame-retardant fabric (plain fabric purchased online)
Newly prepared for this event
・Main table (painted boards + pre-cut Erector pipes + special joints)
・Movable stand with casters (painted boards + pre-cut Erector pipes + casters)
・Free multi-panel (backed with original printed patterns on paper, attached to 100-yen panels)
・Swing display (100-yen board + rope from home)
・Acorn light (IKEA room light + funnel from a home center, covered with fabric)
・Signage & POPs (printed using “Deko Tack” sticker paper)
All of this was packed into a single foldable carry cart!
It was light enough that we could lift the whole thing in one go.
The assembly does take a bit of practice, but I’m really happy with how it turned out—and I hope to keep using it for a long time!
It was light enough that we could lift the whole thing in one go.
The assembly does take a bit of practice, but I’m really happy with how it turned out—and I hope to keep using it for a long time!
最後まで読んでいただきありがとうございました!
ブースの進化をより楽しんでいただける過去の記事(vol.53/vol.57/vol.58/vol.59)もおすすめです~!
ぜひデザインフェスタvol.61の記録 Part1も合わせてご覧ください。
ブースの進化をより楽しんでいただける過去の記事(vol.53/vol.57/vol.58/vol.59)もおすすめです~!
ぜひデザインフェスタvol.61の記録 Part1も合わせてご覧ください。
Thank you so much for reading all the way to the end!
If you’d like to see how the booth has evolved over time,
I recommend checking out my past posts from vol.53, vol.57, vol.58, and vol.59.
If you’d like to see how the booth has evolved over time,
I recommend checking out my past posts from vol.53, vol.57, vol.58, and vol.59.
Also, don’t forget to take a look at Design Festa vol.61 – Part 1 too!
I hope you enjoy seeing how it all came together.
I hope you enjoy seeing how it all came together.
↓ONLINE SHOPはこちら↓
各種SNSでも随時情報を発信していますので、ぜひチェックしてみてください!
Twitter : fuwafuwapu_mika
Instagram : fuwafuwapu_mika
2025.07.11
Twitter : fuwafuwapu_mika
Instagram : fuwafuwapu_mika
2025.07.11